How to Build a CI/CD Pipeline with AWS CodePipeline , S3 and GitHub for React Apps
Deploying applications manually can be time-consuming and prone to errors. As developers, we need a system that ensures our applications are built, tested, and deployed quickly and reliably—that’s where CI/CD comes in.
In this blog, we will talk through the process of creating a fully automated CI/CD pipeline using GitHub, AWS CodePipeline, AWS Code Build and Amazon S3. By the end, you will have a seamless deployment process for your react application. In the next post, i will automate this process with Terraform.
What is CI/CD?
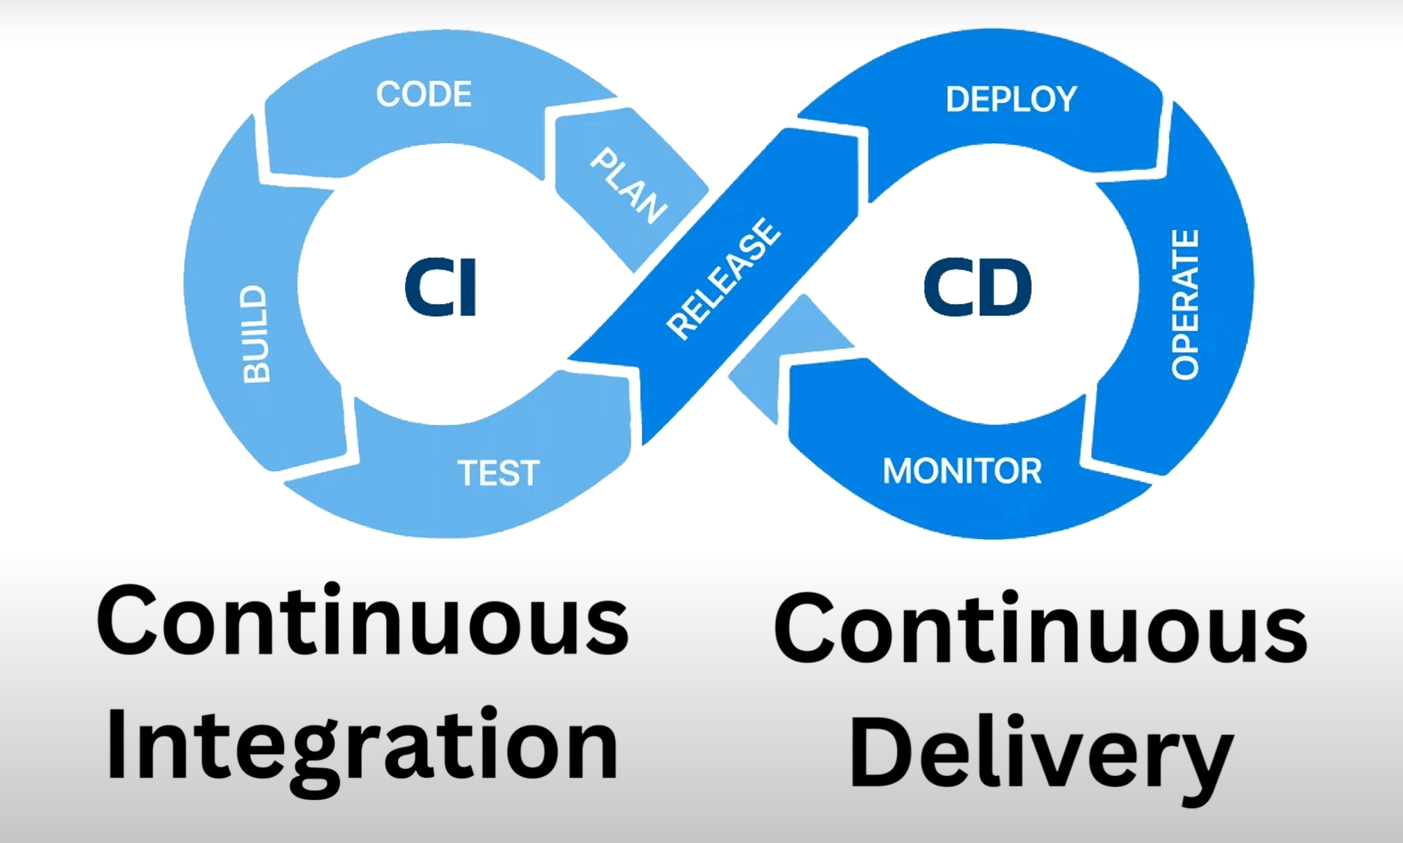
CI/CD stands for Continuous Integration and Continuous Delivery:
- Continuous Integration: Automatically builds and tests your code every time you make a change.
- Continuous Delivery: Automatically deploys the tested code to production or staging environments.
This approach eliminates human error and speeds up software delivery, making your development lifecycle smoother and more efficient.
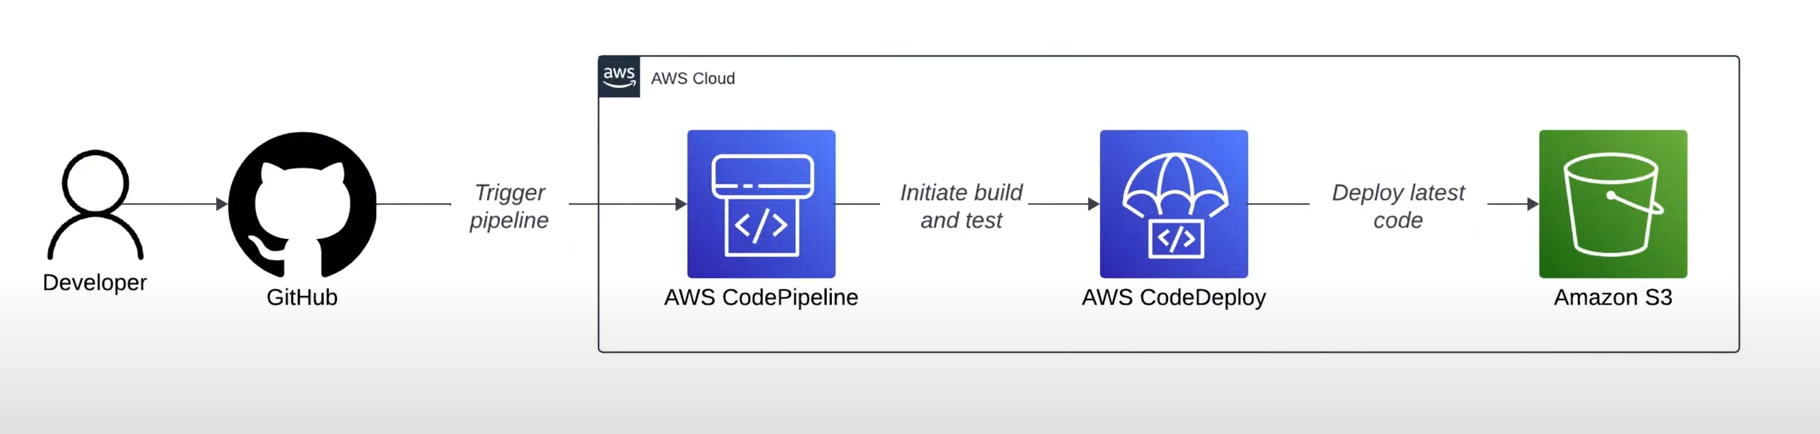
Architecture Overview
Here’s what we’re building:
- GitHub: Stores your React app Code.
- AWS CodePipeline: Manages the flow from source to deployment.
- AWS Code Build: Compiles and testes your React app.
- Amazon S3: Hosts the final deployed application (Static website)
Step-by-Step CI/CD Pipeline Setup
Step 1: Push Your React App to Github
Create a simple React app (e.g., a SaaS landing page). Commit and push it to a Github repository.
1
2
3
4
git init
git add .
git commit -m "Initial commit"
git push origin main
Step2: Setup a IAM for this Pipeline
Always avoid using the AWS root user and creating the least privilage IAM users/ Role based IAM users is the best practice. Lets create a new IAM user with permision to manage:
- Amazon S3
- AWS CodePipeline
- Code Build
- Code Commit
- Code Deploy
- Manage GitHub requests and authentication
- Create a Custom Policy
- Login to the AWS Management Console using your root user.
- Go to IAM → Policies → Create Policies
- Click the JSON tab
Paste this policy: Not the secure version, Only for the Test Environment 😉
1
2
3
4
5
6
7
8
9
10
11
12
13
14
15
16
17
18
19
20
21
22
23
24
25
26
27
28
29
30
31
32
33
34
35
36
37
38
39
40
41
42
43
44
45
46
47
48
49
50
51
52
53
54
55
56
57
58
59
60
61
62
63
64
65
66
67
68
69
70
71
72
73
74
75
76
77
78
79
80
81
82
83
84
85
86
87
88
89
90
91
92
93
94
95
96
97
98
99
100
101
102
103
104
105
106
107
108
109
110
  {
      "Version": "2012-10-17",
      "Statement": [
          {
              "Sid": "S3FullAccess",
              "Effect": "Allow",
              "Action": "s3:*",
              "Resource": "*"
          },
          {
              "Sid": "CodePipelineFullAccess",
              "Effect": "Allow",
              "Action": "codepipeline:*",
              "Resource": "*"
          },
          {
              "Sid": "CodeBuildFullAccess",
              "Effect": "Allow",
              "Action": "codebuild:*",
              "Resource": "*"
          },
          {
              "Sid": "CodeDeployFullAccess",
              "Effect": "Allow",
              "Action": "codedeploy:*",
              "Resource": "*"
          },
          {
              "Sid": "CodeStarConnectionsAccess",
              "Effect": "Allow",
              "Action": [
                  "codestar-connections:*"
              ],
              "Resource": "*"
          },
          {
              "Sid": "IAMFullAccessForPipeline",
              "Effect": "Allow",
              "Action": [
                  "iam:PassRole",
                  "iam:GetRole",
                  "iam:ListRoles",
                  "iam:CreateRole",
                  "iam:CreatePolicy",
                  "iam:PutRolePolicy",
                  "iam:AttachRolePolicy",
                  "iam:ListAttachedRolePolicies",
                  "iam:GetPolicy",
                  "iam:GetPolicyVersion",
                  "iam:ListPolicies"
              ],
              "Resource": "*"
          },
          {
              "Sid": "CloudWatchLogsAccess",
              "Effect": "Allow",
              "Action": [
                  "logs:CreateLogGroup",
                  "logs:CreateLogStream",
                  "logs:PutLogEvents",
                  "logs:DescribeLogStreams",
                  "logs:DescribeLogGroups"
              ],
              "Resource": "*"
          },
          {
              "Sid": "EC2NetworkingAccess",
              "Effect": "Allow",
              "Action": [
                  "ec2:DescribeVpcs",
                  "ec2:DescribeSubnets",
                  "ec2:DescribeSecurityGroups",
                  "ec2:DescribeNetworkInterfaces",
                  "ec2:CreateNetworkInterface",
                  "ec2:DeleteNetworkInterface"
              ],
              "Resource": "*"
          },
          {
              "Sid": "CloudFormationAccess",
              "Effect": "Allow",
              "Action": [
                  "cloudformation:DescribeStacks",
                  "cloudformation:CreateStack",
                  "cloudformation:UpdateStack",
                  "cloudformation:DeleteStack",
                  "cloudformation:GetTemplate",
                  "cloudformation:ListStacks"
              ],
              "Resource": "*"
          },
          {
              "Sid": "CodeCommitFullAccess",
              "Effect": "Allow",
              "Action": [
                  "codecommit:*"
              ],
              "Resource": "*"
          },
          {
              "Sid": "EventsAndSNS",
              "Effect": "Allow",
              "Action": [
                  "events:*",
                  "sns:*"
              ],
              "Resource": "*"
          }
      ]
  }
Reviewing the policy above, I don’t recommend using it in production environments. We’re creating this for testing purposes only. The policy grants full access permissions to many AWS services, which is acceptable during development but risky for production due to potential security, compliance, and operational issues.
What Security issues we have here if we done this on a production environment?
- Overly Permissive (Wildcards ):
Action: *andResource: *allow any action on all resources, which is very dangerous if this IAM user or role gets compromised.
- Privilege Escalation Risk:
- Granting full
iam:*or broadiam:PassRolerights can allow users to escalate privileges by attaching roles/policies.
- Granting full
- CloudTrail Gaps:
- Difficult to audit specific access without restrictive policies.
- Lateral Movement Risk:
- An attacker who gains access to this IAM user can move across many services and regions.
- Incompatible with Least Privilege Principle:
- Violates AWS’s security best practices by not limiting access only to what’s needed.
How to improve for the production - Best Practices?
Use Least Privilege Principle
- Only allow exact actions your pipeline requires.
Replace:
1
2
3

  "Action": "s3:*"
with:
1
2
3
4
5
6
7

  "Action": [
  "s3:GetObject",
  "s3:PutObject",
  "s3:ListBucket"
  ]
Restrict Resource Access
- Replace
"Resource": "*"with the ARNs of specific buckets, pipelines, roles, etc.
1
2
3

 "Resource": "arn:aws:s3:::my-app-bucket/*"
- Replace
Limit IAM Permissions
- Only allow specific roles to be passed:
1
2
3
4

 "Action": "iam:PassRole",
 "Resource": "arn:aws:iam::123456789012:role/MyCodeBuildServiceRole"
Use Condition Keys
- Use
Conditionto limit usage by service, time, IP, etc.
1
2
3
4
5
6
7

 "Condition": {
   "StringEquals": {
     "aws:RequestedRegion": "us-east-1"
   }
 }
- Use
Split by Use Case (Granular Roles)
- Create separate IAM roles for:
- CodeBuild
- CodePipeline
- Deployment
- Assign only required permissions to each.
- Create separate IAM roles for:
Enable CloudTrail + GuardDuty
- Use these for logging and anomaly detection.
- Set up alerts for
iam:PassRole,CreatePolicy, etc.
Scoped S3 Access Policy in the production
1
2
3
4
5
6
7
8
9
10
11
12
13
14
```json
{
"Effect": "Allow",
"Action": [
    "s3:GetObject",
    "s3:PutObject",
    "s3:ListBucket"
],
"Resource": [
    "arn:aws:s3:::my-app-bucket",
    "arn:aws:s3:::my-app-bucket/*"
]
}
```
🔁 Recommended Best Practices:
- Create separate IAM roles for each service (CodeBuild, CodePipeline, etc.).
- Start with AWS managed policies (
AWSCodeBuildDeveloperAccess,AWSCodePipelineFullAccess) as templates, then restrict permissions further. - Verify least privilege implementation using AWS Access Analyzer or IAM Access Advisor.
- Name the policy as
DevTeam-S3-CodePipeline-Access. Create the policy
- Create IAM Group:
dev-team- Go to User groups → Create group
- Group name:
dev-team - In the Permissions step, search for
DevTeam-S3-CodePipeline-Access - Select it and proceed
- Create the group
- Create IAM User
tj- Go to IAM → Users → Add users
- User name:
tj - Access type:
- ✅ Programmatic access (for CLI)
- ✅ AWS Management Console access
- Set a custom password
- Click Next: Add user to group
- Select Group:
dev-team - Skip tags and review
- Click Create user
- Create IAM Group:
Step 3: Create a CodePipeline using GitHub + CodeBuild and S3
Ensure you are in the same region (e.g., us-east-1).
- Create an S3 Bucket for Hosting
- Go to S3 Service → Create Bucket
- Bucket name: cybersense-aws-b-demo
- Leave everything as default for now and scroll down → Click Create Bucket.
Create CodePipeline
CodePipeline is Amazon’s solution for continuous delivery.
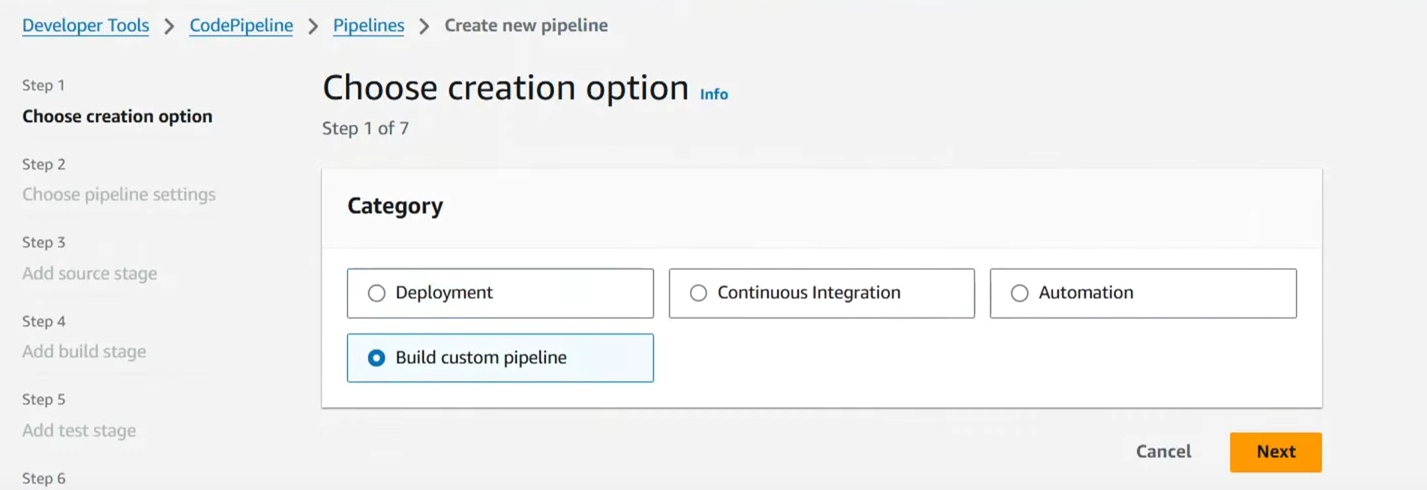
- Search “Code Pipeline” from the search and Click Create Pipeline.
Select “Build Custom Pipeline.”
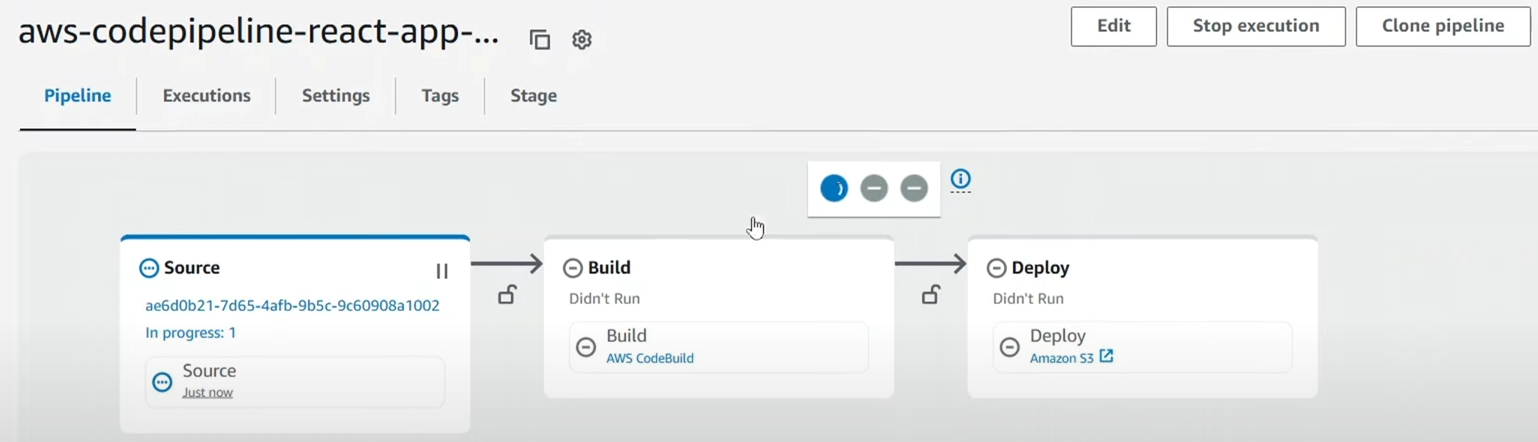
Pipeline name: aws-codepipline-react-app-demo
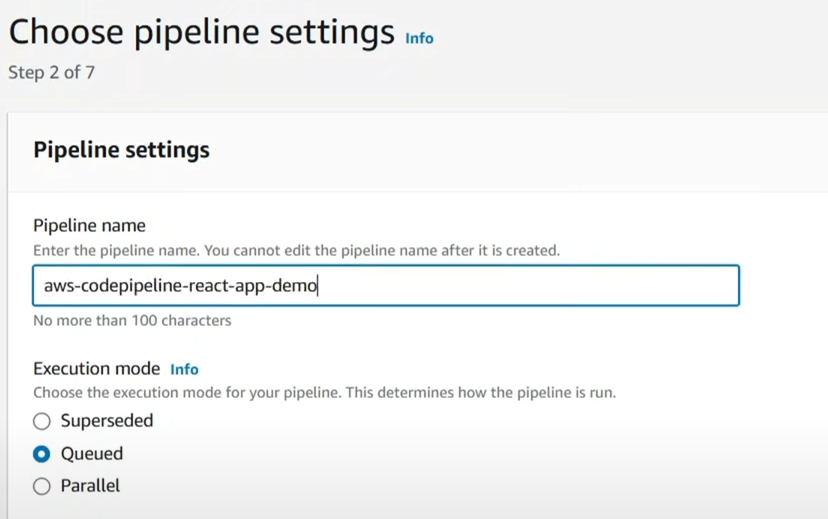
- Leave the role as “New service role” and click next.
- Source Stage:
- Source Provider: GitHub
- Connect via GitHub App
- Name the connection as “cicd-connection-demo”
- Click Connect to GitHub and install new app.
- In the GitHub account, choose only select repositories and select the project repository.
- After the connection is established, choose the Repository name and Default Branch.
- Click Next.
- Create CodeBuild Project
- Choose the Build Provider as “Other build providers” and select AWS CodeBuild.
- Click → Create Project.
- Project name: aws-cicd-pipeline-demo-build
- In the environment:
- Provisioning mode: On demand
- Environment image: Managed Image
- Compute: EC2
- Running Mode: Container
- Operating system: Amazon Linux
- Runtime: Standard
- Configure Buildspec:
- Select “Use a buildspec file”
- Go to your project directory in VSCode and create a file named
buildspec.yml. Paste the following code:
1
2
3
4
5
6
7
8
9
10
11
12
13
14
15
16
17
18
19
20
  version: 0.2

  phases:
    install:
      runtime-versions:
        nodejs: 18
      commands:
        - echo Installing dependencies...
        - npm ci --legacy-peer-deps

    build:
      commands:
        - echo Building the React app...
        - npm run build

  artifacts:
    files:
      - '**/*'
    base-directory: dist
    discard-paths: no
- Commit the changes to Github. and get back to CodeBuild page and click “Continue to CodePipeline”
- You would notice that Our CodeBuild has been successfully created.
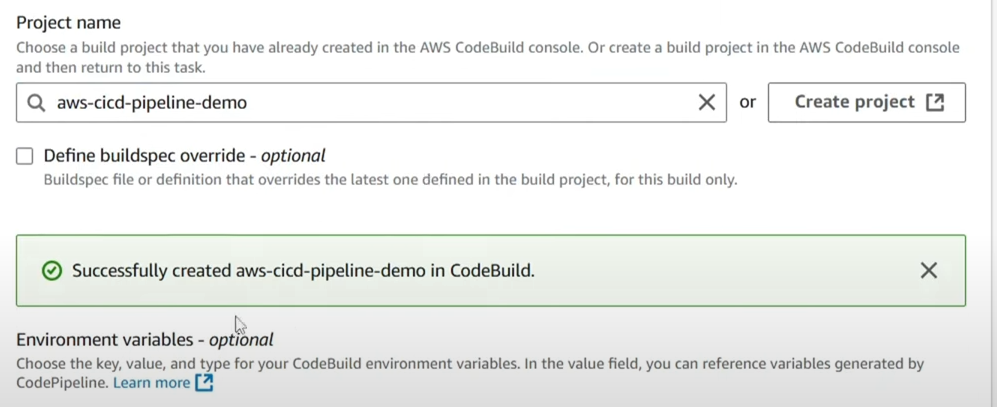
- Click Next.
- Select Deploy Provider as “Amazon S3” - We can do it in CloudFormation or Elastic beanstalk.
- Select “Extract file before deploy”
- Click Next.
- Go through the configuration and click Create pipeline.
Once the Build is completed, you will see the code is going through the Source → Build → Deploy Stage.
Navigate to S3 Backets and verify whether the files has been extracted.
- Go to properties in the S3 Bucket and Navigate to Static Website hosting and Click Edit.
- Select Host a static website.
- Index document: index.html
- Error document: index.html
- Click save.
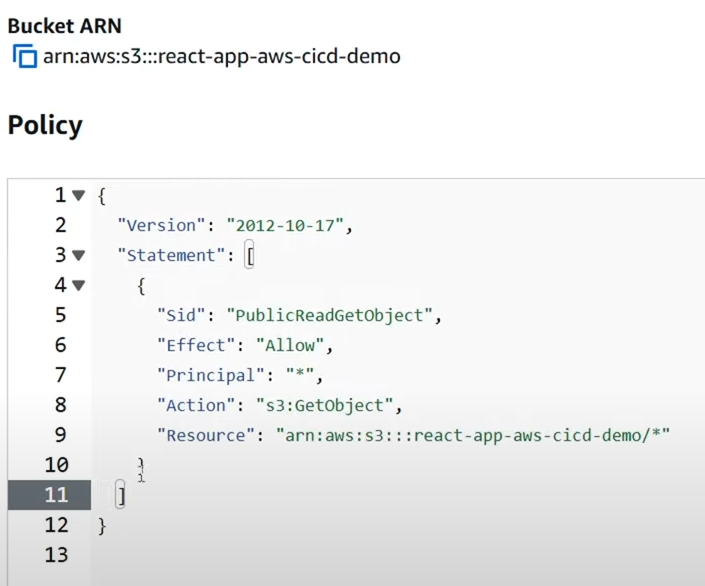
- Navigate to permissions and un check the Block all public access checkbox.
Add a Bucket policy to enable Read and write access to s3 Bucket.
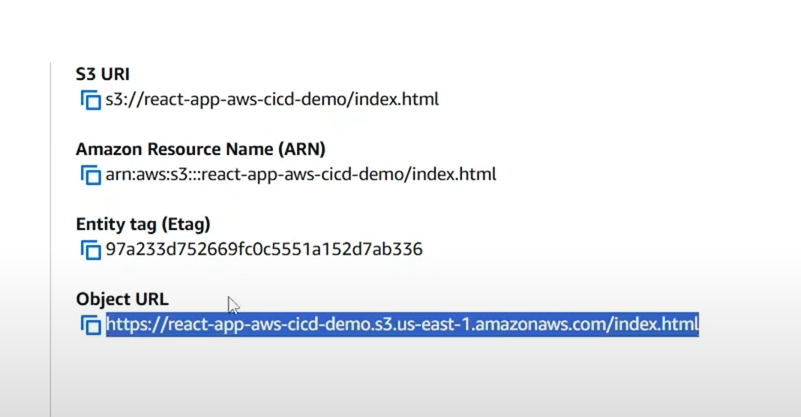
Test the Pipeline
Navigate back to the S3 Bucket objects and click on index.html. This will provide you with a public object URL. Copy this URL and paste it into your browser to access your deployed application.
Link :https://cybersense-aws-b-demo.s3-website.us-east-1.amazonaws.com/ Don’t add the /html at the end.
Conclusion
In this walkthrough, we established a secure, structured approach that allows developers to manage specific AWS services without exposing the root user or granting excessive permissions. Here’s what we achieved:
- ✅ Created a dedicated IAM user (
tj) to avoid using the AWS root account for routine tasks. - ✅ Built an IAM group (
dev-team) and attached a custom least-privilege policy that grants access only to:- Amazon S3
- AWS CodePipeline
- AWS CodeBuild
- AWS CodeCommit
- AWS CodeConnections (with OAuth access permissions)
- ✅ Attached the policy to the group for reuse with future users.
- ✅ Verified access and tested permissions to ensure users can authenticate with third-party services (e.g., GitHub) using OAuth and build pipelines.
By implementing this least privilege principle, you now have a secure environment where developers can work independently within defined boundaries—minimizing risk while maximizing productivity.