How to Configure Opencti on AWS EC2 Instance
Introduction
OpenCTI (Open Cyber Threat Intelligence) is an open-source platform designed to manage, analyze and share cyber threat intelligence (CTI). It helps organization’s structure, store and visualize both technical and non-technical information about cyber threats.
Architecture
Then OpenCTI platform relies on several external databases and services in order to work.
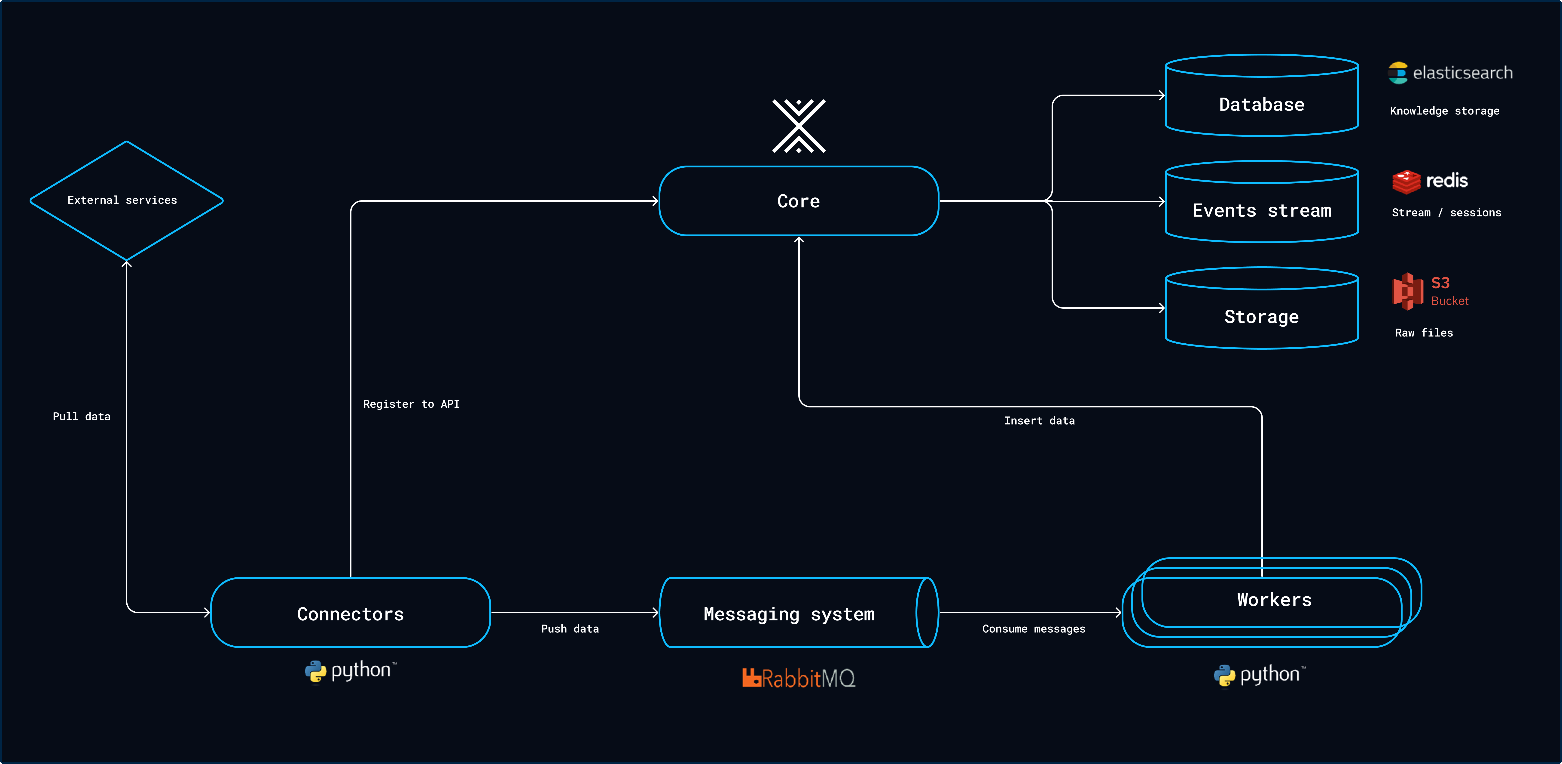
Backend: OpenCTI’s Backend is built using Node.js and Express providing a robust and scalable server-side framework.
Frontend: The frontend is developed with React, offering a dynamic and responsive user interface.
Database: It uses Elasticsearch for storing and querying large volumes of data effectively. Additionally, Redis is used for caching and message brokering.
GraphQL API: OpenCTI employs GraphQL for its API, enabling flexibility and efficient data retrieval.
Platform
The Platform is the central Part of the OpenCTI technological Stack. It allows users to access to the user interface but also provides GraphQL API used by connectors and workers to insert data. In context of a production deployment, system may need to scale horizontally and launch multiple platforms behind load balancers connected to the same databases(ElasticSearch,Redis,S3,RabbitMQ).
Workers
The workers are standalone Python processes consuming messages from the RabbitMQ broker in order to do asynchronous write queries. You can launch as many workers as you need to increase the write performances. At some point, the write performances will be limited by the throughput of the ElasticSearch database cluster.
Connectors
The connectors are third-party pieces of software (Python processes) that can play five different roles on the platform:
| Type | Description | Examples |
|---|---|---|
| EXTERNAL_IMPORT | Pull data from remote sources, convert it to STIX2 and | MITRE Datasets, MISP, CVE, |
| insert it on the OpenCTI platform. | AlienVault, Mandiant, etc. | |
| INTERNAL_ENRICHMENT | Listen for new OpenCTI entities or users’ requests, pull | Shodan, DomainTools, IpInfo, etc. |
| data from remote sources to enrich. | ||
| INTERNAL_IMPORT_FILE | Extract data from files uploaded on OpenCTI through the | STIX 2.1, PDF, Text, HTML, etc. |
| UI or the API. | ||
| INTERNAL_EXPORT_FILE | Generate export from OpenCTI data, based on a single | STIX 2.1, CSV, PDF, etc. |
| object or a list. | ||
| STREAM | Consume a platform data stream and do something with | Splunk, Elastic Security, Q-Radar, etc. |
| events. |
Infrastructure Requirements Dependencies
| Component | Version | CPU | RAM | Disk Type | Disk Space |
|---|---|---|---|---|---|
| ElasticSearch / | >= 8.0 / >= 2.9 | 2 cores | ≥ 8GB | SSD | ≥ 16GB |
| OpenSearch | |||||
| Redis | >= 7.1 | 1 core | ≥ 1GB | SSD | ≥ 16GB |
| RabbitMQ | >= 3.11 | 1 core | ≥ 512MB | Standard | ≥ 2GB |
| S3 / MinIO | >= RELEASE.2023-02 | 1 core | ≥ 128MB | SSD | ≥ 16GB |
Platform
| Component | CPU | RAM | Disk Type | Disk Space |
|---|---|---|---|---|
| OpenCTI Core | 2 cores | ≥ 8GB | None | - |
| (stateless) | ||||
| Worker(s) | 1 core | ≥ 128MB | None | - |
| (stateless) | ||||
| Connector(s) | 1 core | ≥ 128MB | None | - |
| (stateless) |
Environment Setup
Setup an EC2 Server on AWS
Login to the AWS Management Console and setup the root account. If you don’t have the account, you will prompt to create one. With the AWS Free tier, we will get 750 hours/month of select EC2 instances for free.
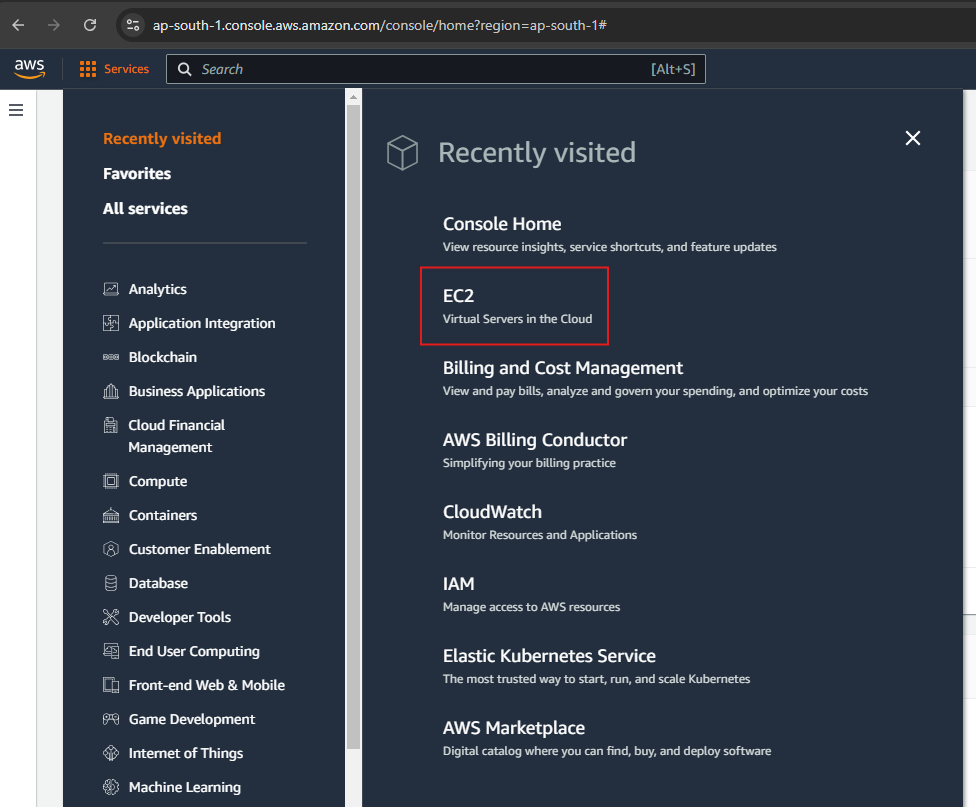
Navigate to the EC2 Dashboard
Once logged in, navigate to Services in the top left corner and Select EC2 under Compute.
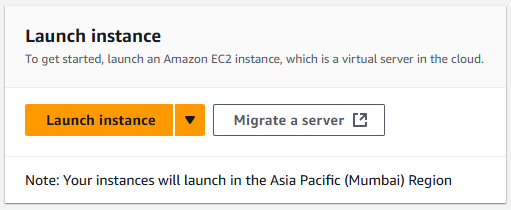
Launch an Instance
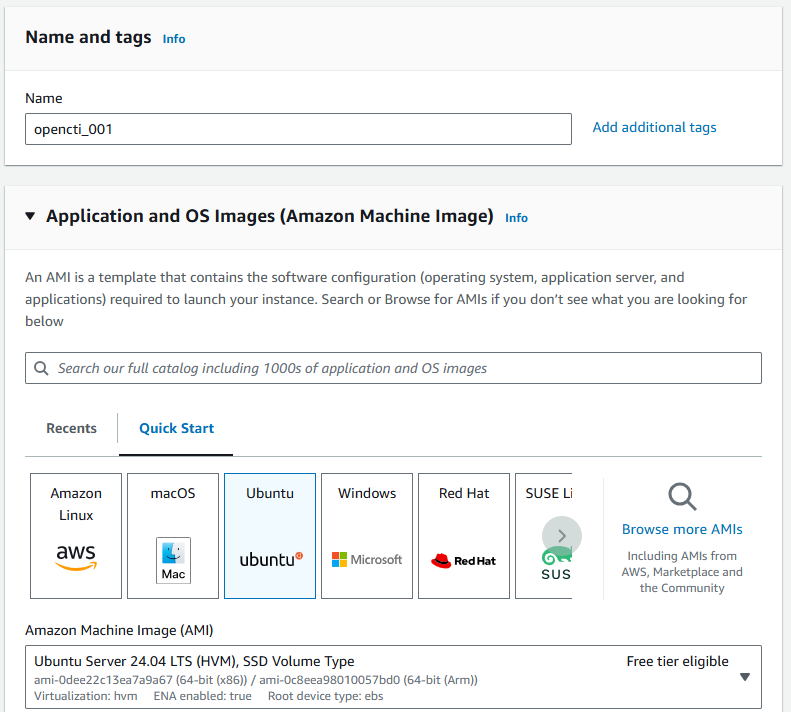
In the EC2 Dashboard, Click the Launch Instance button, and name your instance (e.g “Opencti-001). And for Application and OS images, Select Ubuntu.
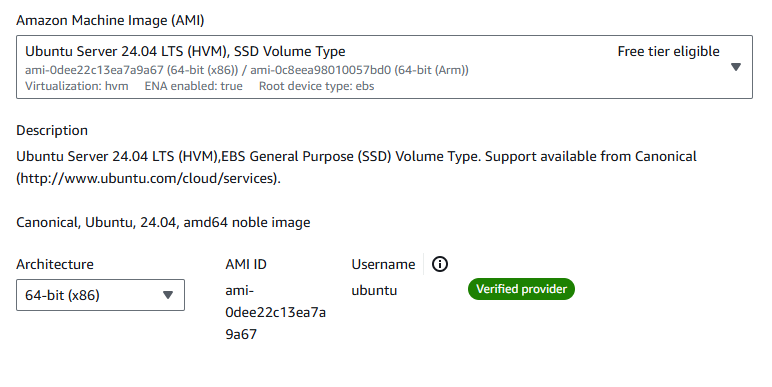
Choose an Ubuntu AMI
In the AMIs Section, Search for Ubuntu and select the latest Ubuntu Server LTS version. Then select the 64-Bit(x86) architecture for most general uses.
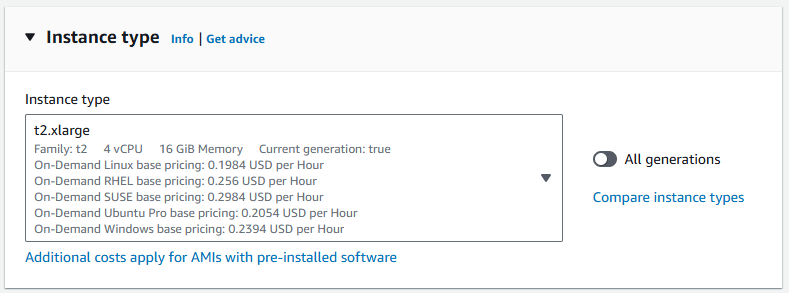
Select an Instance Type
AWS will display a variety of instance types. For basic usage t2.micro (1 vCPU, 1GB RAM) is a good starting point and is eligible for the AWS Free Tier. But for OpenCTI we need more resources, therefore better to choose the server with higher resources. We choose t2.xlarge(4vCPU,16GB RAM). (Keep the cost in Mind)
Configure Security Group
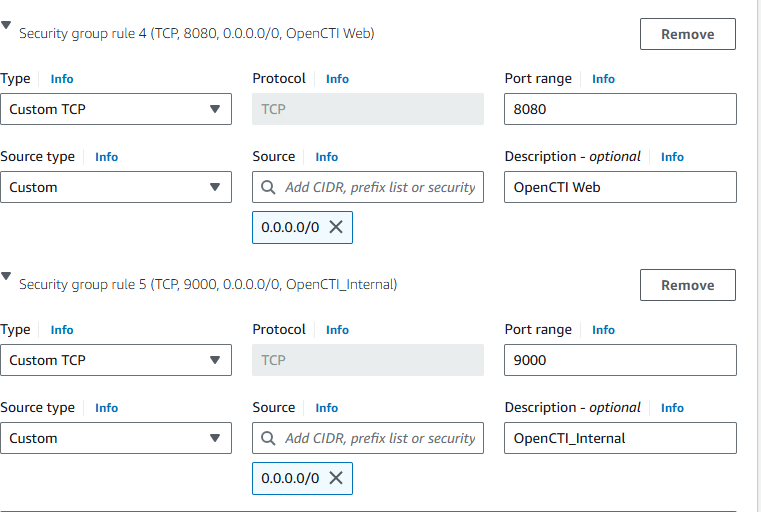
Scroll down to the configure Security Group section. By default, a security group will create for the instance.
Click Edit Security group and define which ports are open.
For SSH access, make sure port 22 is open(default for ssh).
For opencti Web server access, port 8080
For Opencti internal communication, Port 9000
Set the Source Type to My IP to restrict access to your IP only or anywhere if you’re testing and don’t need restrictions (be cautious with this).
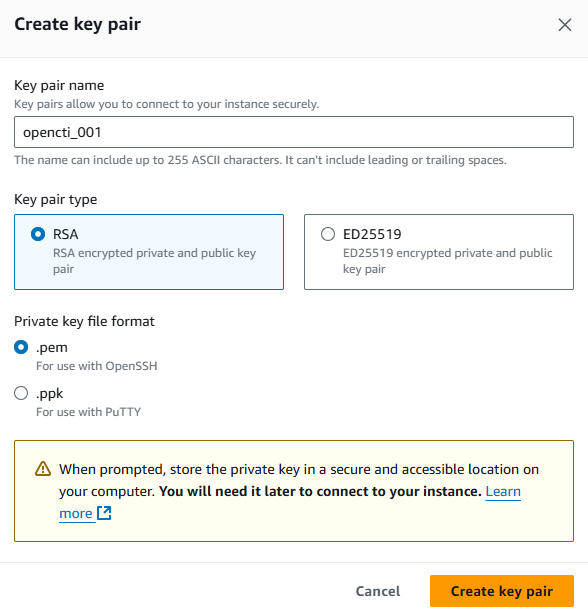
Generate Key Pair
In the Key Pair section, choose to create New Key Pair to generate SSH Key Pair and Name the key pair and Set the Key Pair type as RSA(Recommended). Then click Create Key Pair and download the file to the local machine.
Configure Storage
Under the Configure Storage section set the storage size for our instance. The default is 8GB, but for our case we need more storage, therefore we choose 100GB as the General Purpose SSD(gp2).
Review and Launce
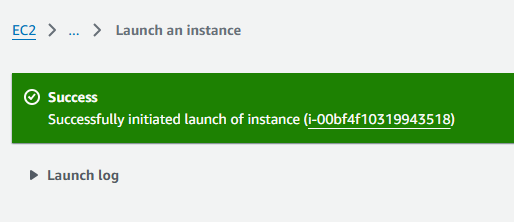
Review all the settings and click launch instance to start creating the ubuntu instance. AWS will take few moments to provision your instance. Once its ready, you will see a View instance button. Click it to view the Instance details.

Connect to the Instance via SSH
In the Instance section of the EC2 Dashboard, Find the newly created instance and click Connect. Then follow the below instructions to connect via ssh or in the terminal.
ssh -i /path/to/your-key.pem ubuntu@your-instance-public-ip
Install OpenCTI in Ubuntu
There are Two options for the installation, One is Deploy using Docker and other one is Deploy dependencies and launch the platform manually using the packages released in the GitHub releases. Here we Choose Docker installation, since we don’t need to face any dependencies and resources issue. 1. Login to the Server and Update the repositories.
Sudo apt-get update
Install docker:
# Add Docker's official GPG key:
1
2
3
4
5
6
sudo apt-get update
sudo apt-get install ca-certificates curl gnupg
sudo install -m 0755 -d /etc/apt/keyrings
curl -fsSL https://download.docker.com/linux/ubuntu/gpg \| sudo gpg --dearmor -o /etc/apt/keyrings/docker.gpg
sudo chmod a+r /etc/apt/keyrings/docker.gpg
Add the repository to Apt sources:
1
2
3
4
echo "deb \[arch=\$(dpkg \--print-architecture) signed-by=/etc/apt/keyrings/docker.gpg\] https://download.docker.com/linux/ubuntu \\
 \$(. /etc/os-release && echo \"\$VERSION_CODENAME\") stable\" \| \\
 sudo tee /etc/apt/sources.list.d/docker.list \> /dev/null
 sudo apt-get update
Install Docker & Run
1
2
3
4
5
6
7
sudo apt-get install docker-ce docker-ce-cli containerd.io
docker-buildx-plugin docker-compose-plugin
sudo docker run hello-world
sudo groupadd docker
sudo gpasswd -a \$USER docker
newgrp docker
docker run hello-world
Install OpenCTI
1
2
3
git clone https://github.com/OpenCTI-Platform/docker
mv docker opencti
cd opencti
Modify the .env file
1
2
cp .env.sample .env
nano .env
Configure the Following variables.
1
2
3
4
5
6
7
8
9
10
11
12
13
14
15
16
17
OPENCTI_ADMIN_EMAIL=admin@opencti.io
OPENCTI_ADMIN_PASSWORD=ChangeMePlease
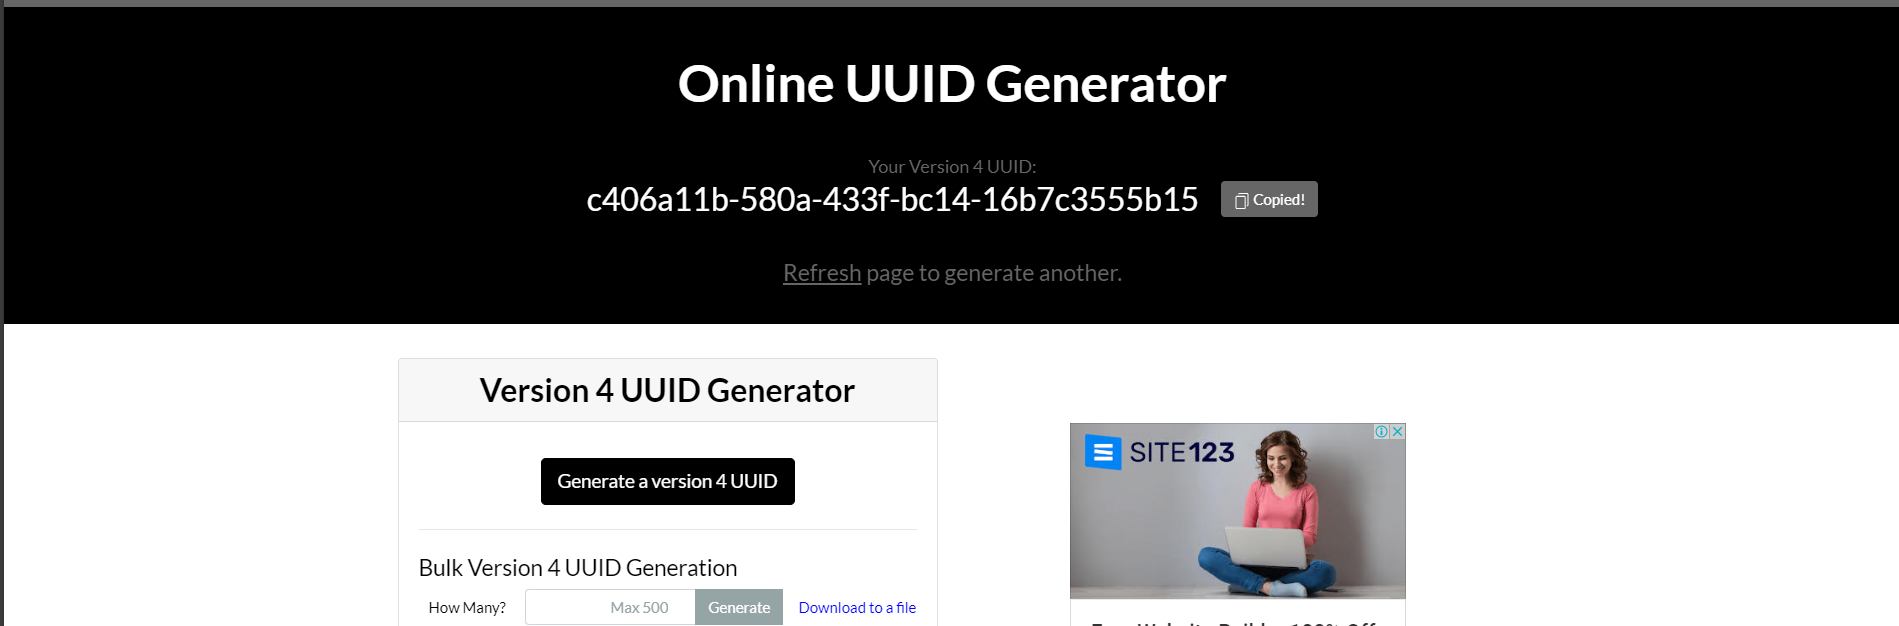
OPENCTI_ADMIN_TOKEN=(Generate UUID)) #Change this
OPENCTI_BASE_URL=http://PUBLICIP):8080 #Give the public ip address of the server
MINIO_ROOT_USER=(Generate UUID)) #Change this
MINIO_ROOT_PASSWORD=(Generate UUID)) #Change this
RABBITMQ_DEFAULT_USER=guest #Change this
RABBITMQ_DEFAULT_PASS=guest #change this
ELASTIC_MEMORY_SIZE=4G
CONNECTOR_HISTORY_ID=(Generate UUID)) #Change this
CONNECTOR_EXPORT_FILE_STIX_ID=(Generate UUID)) #Change this
CONNECTOR_EXPORT_FILE_CSV_ID=(Generate UUID)) #Change this
CONNECTOR_IMPORT_FILE_STIX_ID=(Generate UUID)) #Change this
CONNECTOR_EXPORT_FILE_TXT_ID=(Generate UUID)) #Change this
CONNECTOR_IMPORT_DOCUMENT_ID=(Generate UUID)) #Change this
SMTP_HOSTNAME=localhost
PS: With this website, we can generate random UUID [Online UUID Generator Tool]{.underline}
Run the docker container.
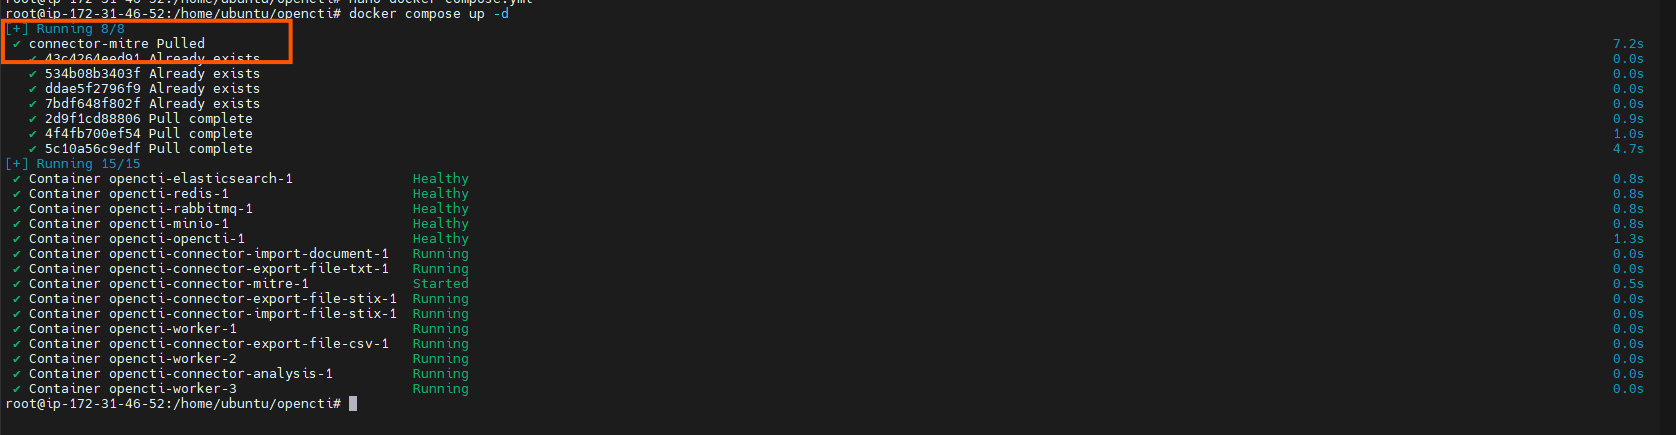
docker compose up -d
Output should be like this when we start the Docker instance.

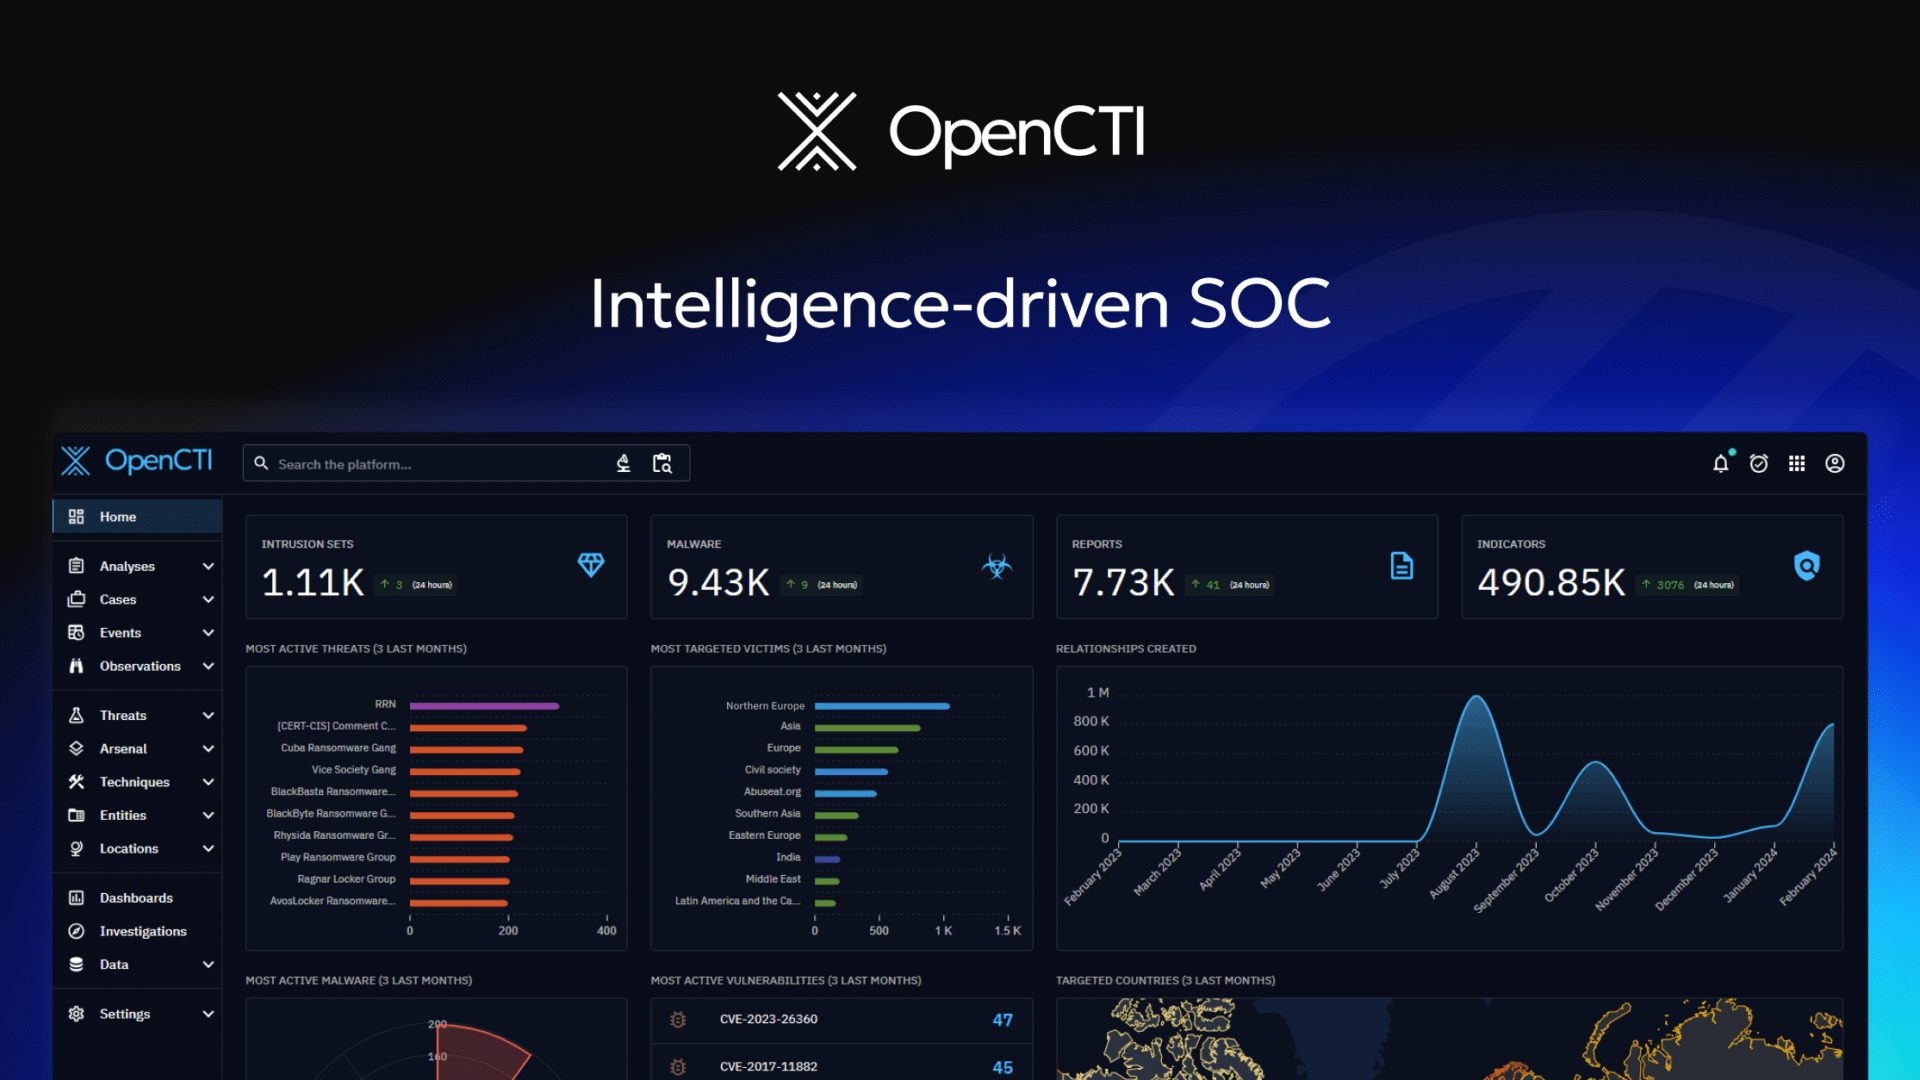
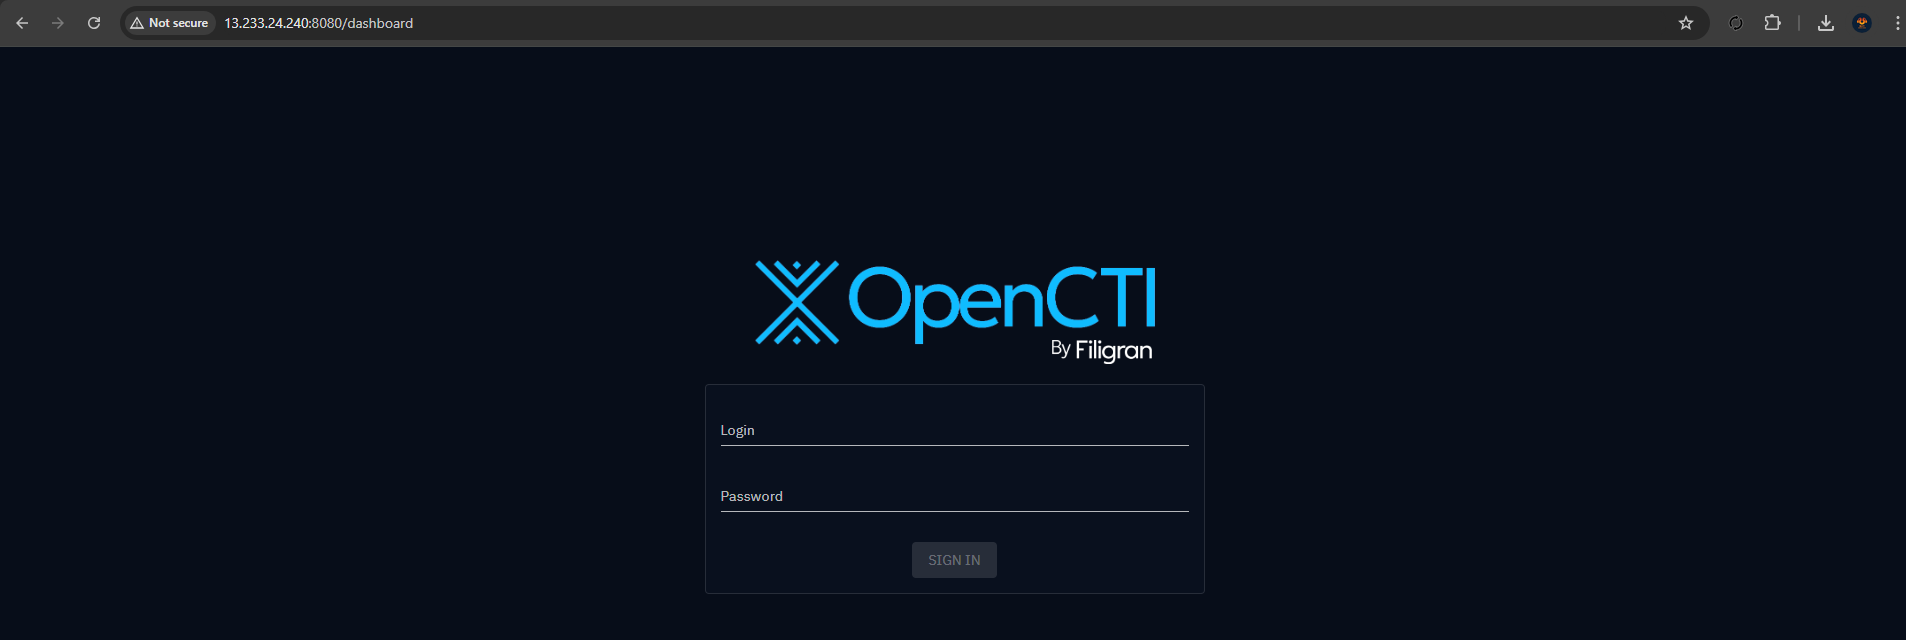
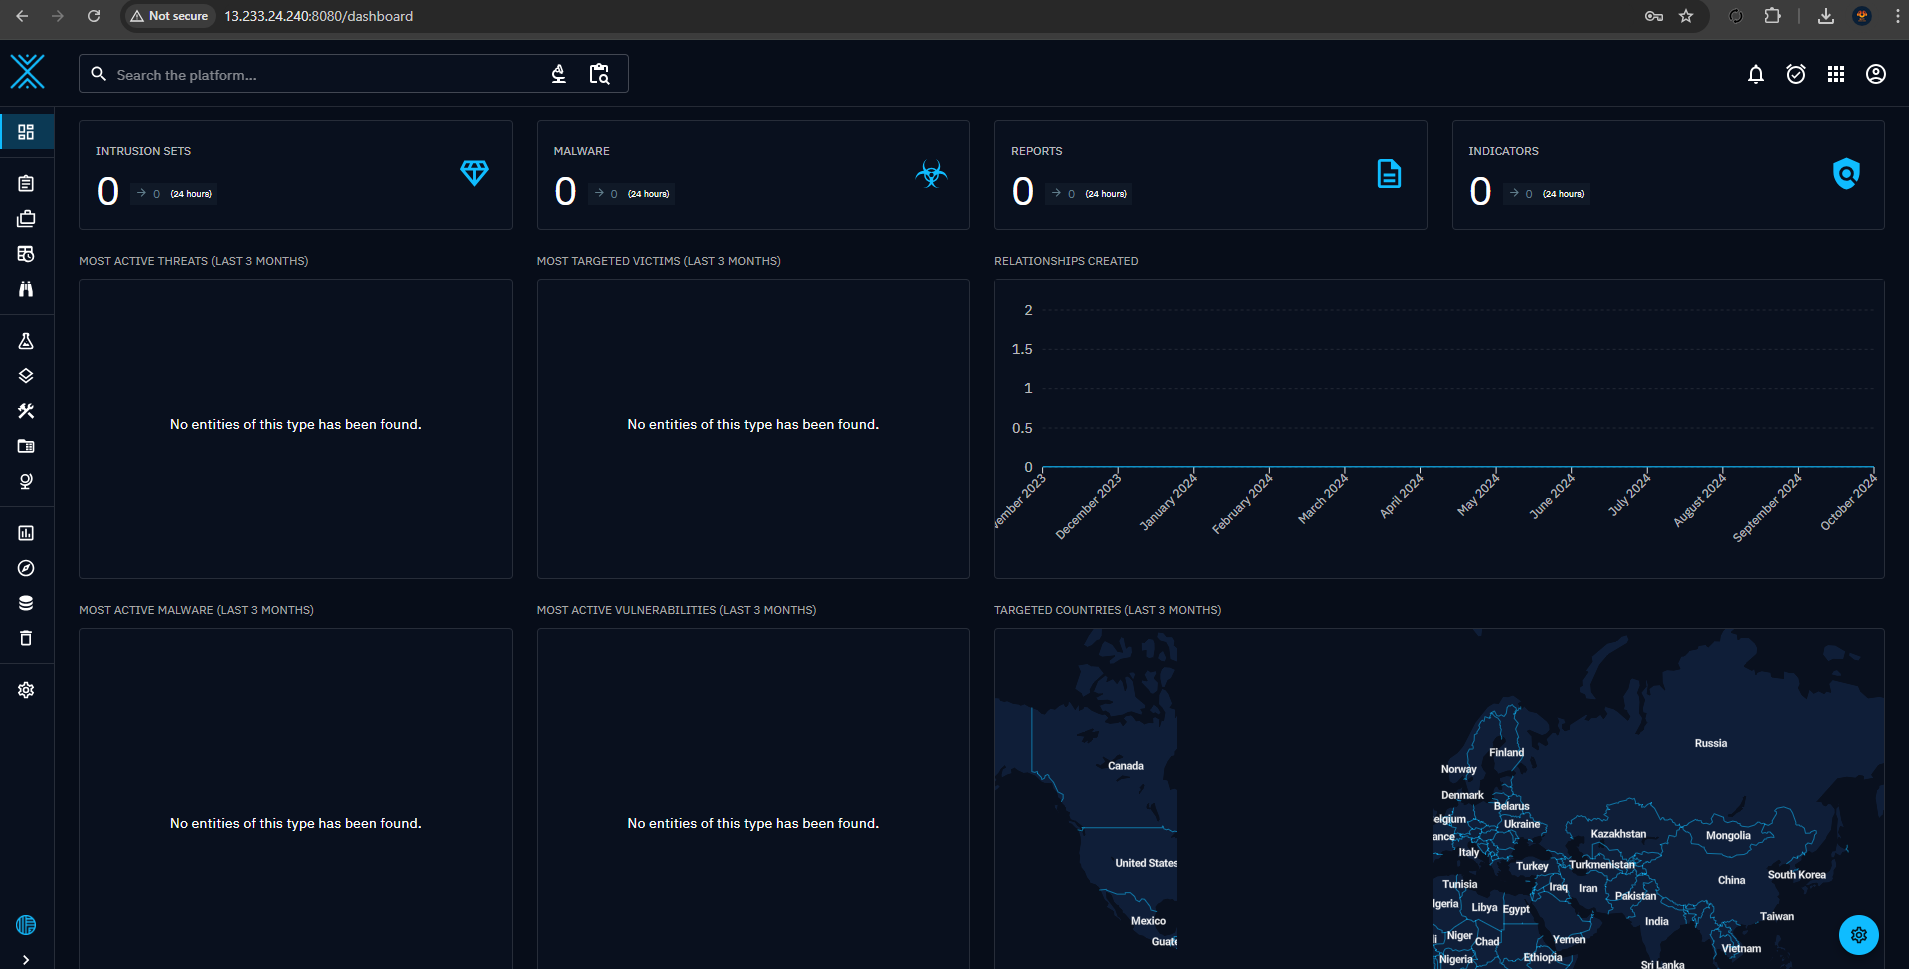
Access the OpenCTI Web application by Navigating to the https://public_ip:8080 and login with the given credentials in .env file.
Data Ingestions with Connectors
Connectors OpenCTI has a lot of pre-built connectors that allow for ingesting data. We can find the list here. Some connectors are free and some of them are paid. We choose free one for now.
MITRE Connector, Lets get some data from this, because it ingests a log of known APTs, tools and the MIRE ATT&CK as well. Setting up the connector is super simple. First just go to the connector we would like to use and open “docker-compose.yml”
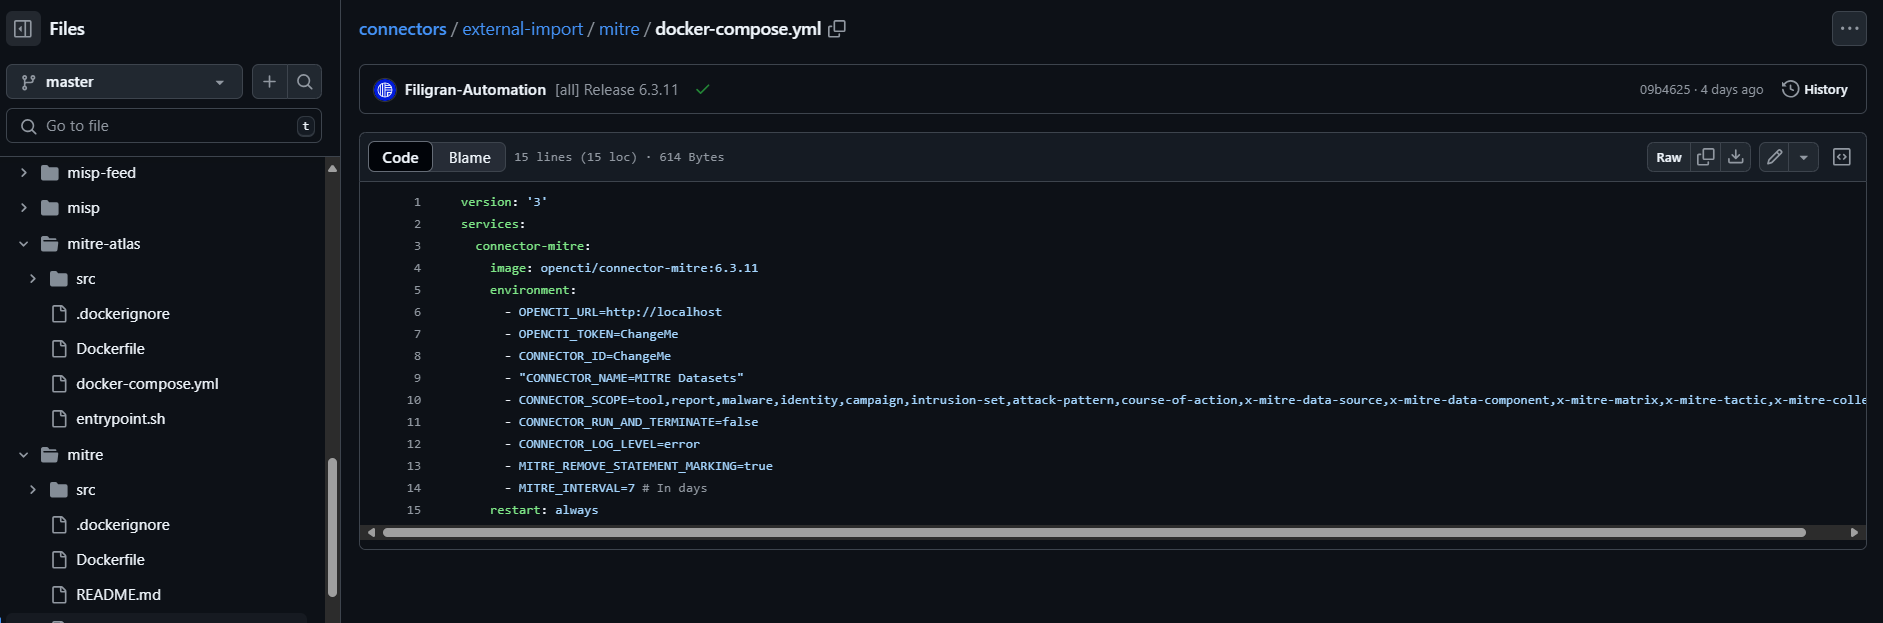
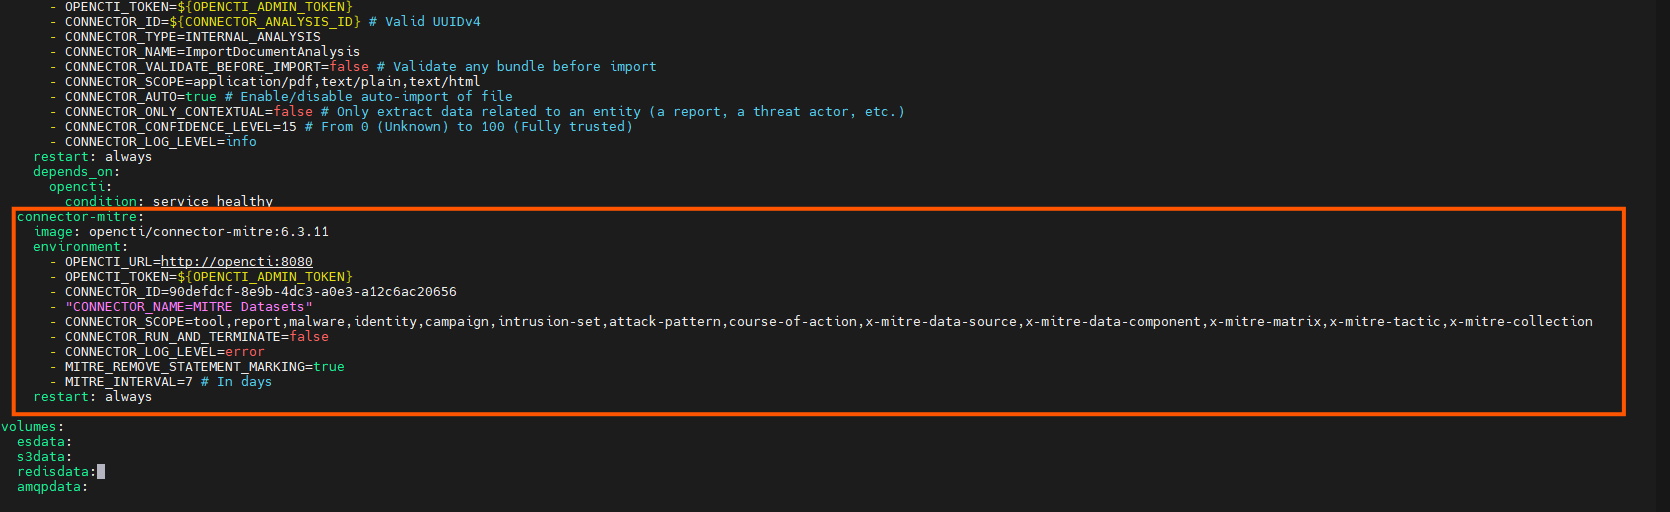
Once in the docker-compose file, select everything below the “services” line and copy it into the OpenCTI docker-composer.yml file in the server. Scroll down and paste it a the bottom(right above the “Volume”).
Then make a few modifications, setting the following :
1
2
3
-   OPENCTI_TOKEN=\${OPENCTI_ADMIN_TOKEN}

-   CONNECTOR_ID=ChangeMe
The “CONNECTOR_ID” will need to be set to a UUID. You can generate a new one here.
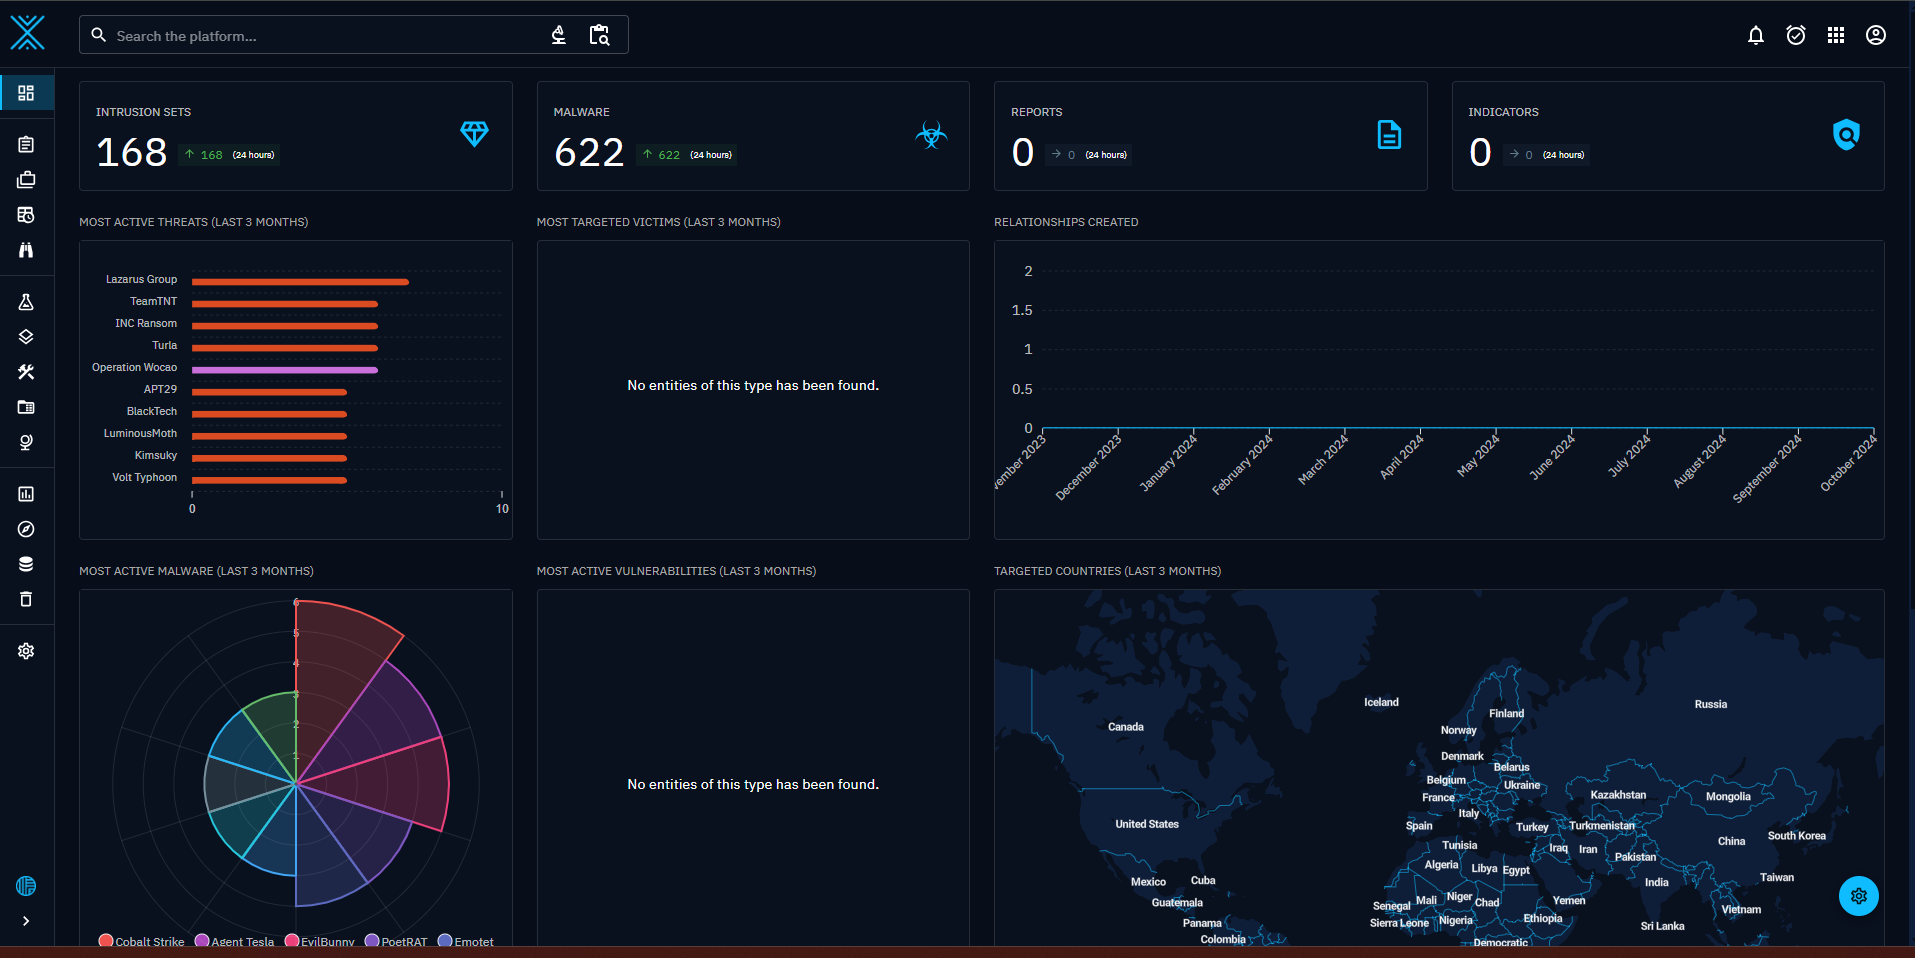
After that restart the docker stack and refresh the OpenCTI Dashboard. We can see the data being ingesting.
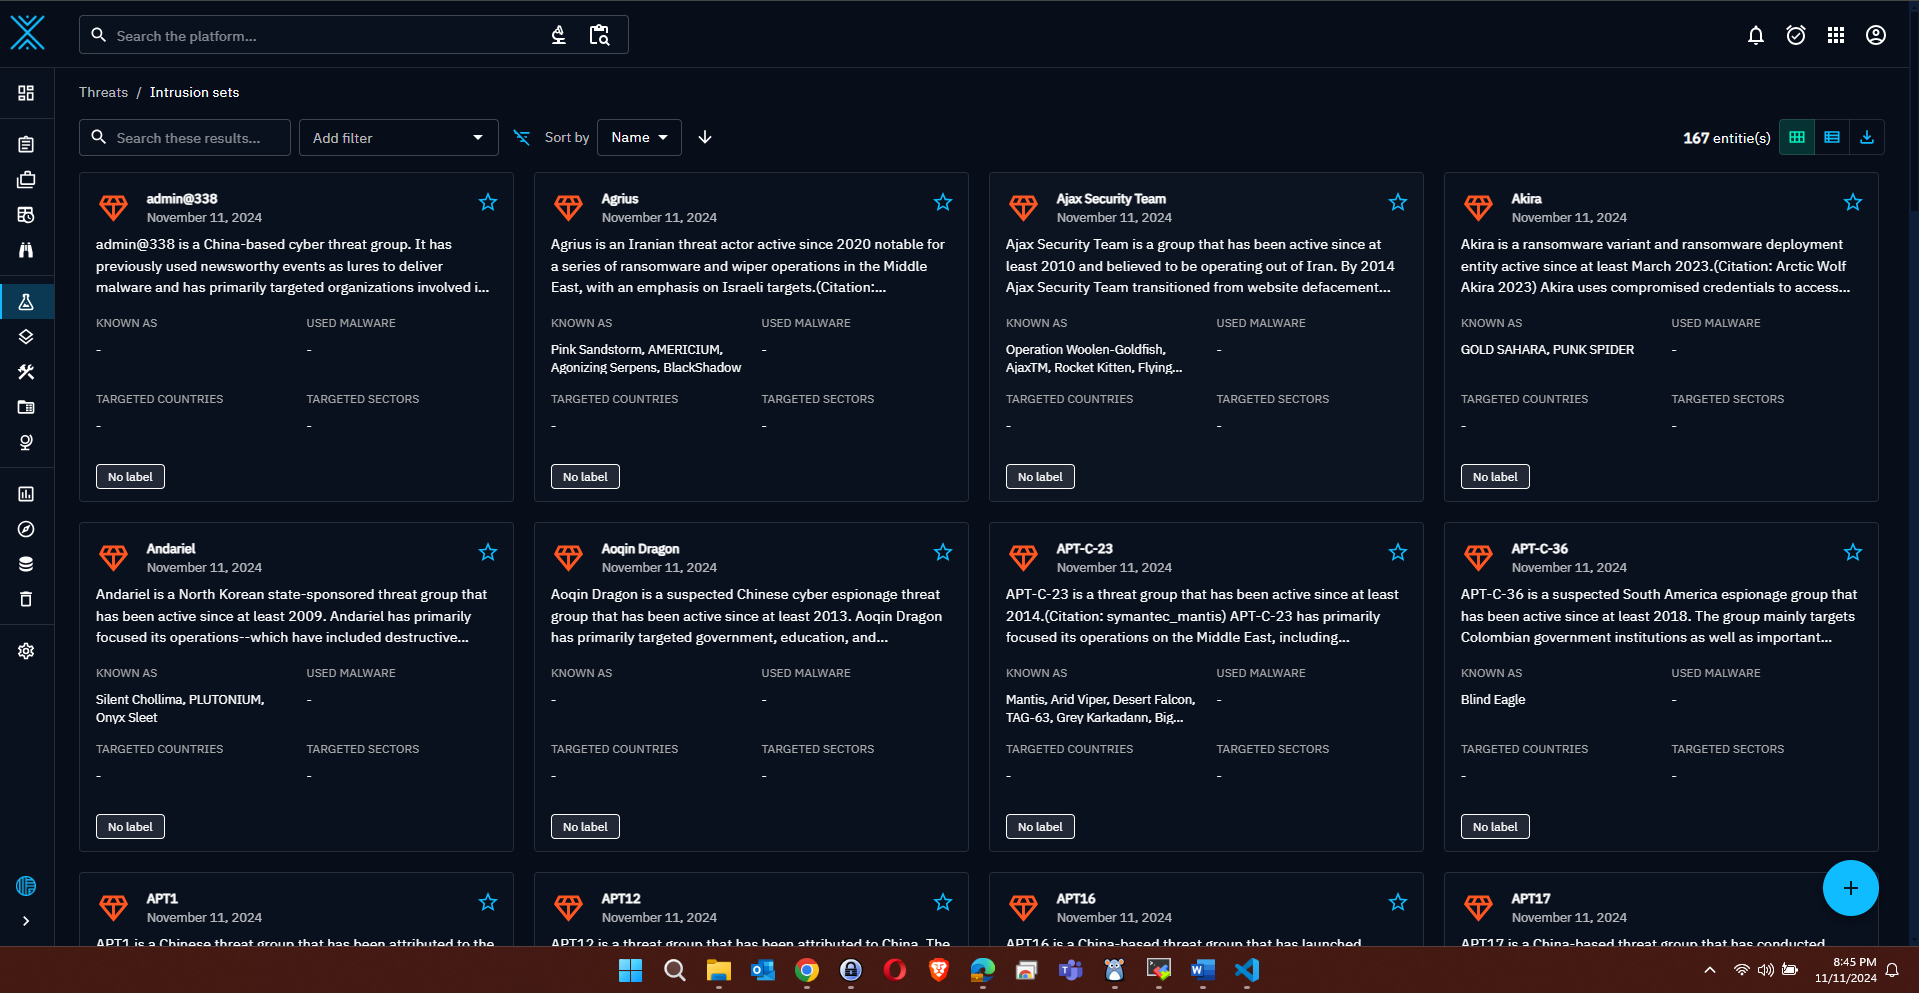
The main areas (for the MITRE connector) that data comes in, is under:
Threats →Intrusion sets
Arsenal → Malware
Arsenal → Tools
Techniques → Attack patterns
Let’s connect Following Free connectors as well:
- CISA-known-exploited-vulnerabilities
1
2
3
4
5
6
7
8
9
10
11
12
13
14
15
16
connector-cisa-known-exploited-vulnerabilities:
image: opencti/connector-cisa-known-exploited-vulnerabilities:6.3.11
environment:
- OPENCTI_URL=http://localhost
- OPENCTI_TOKEN=ChangeMe
- CONNECTOR_ID=ChangeMe
- CONNECTOR_NAME=CISA Known Exploited Vulnerabilities
- CONNECTOR_SCOPE=cisa
- CONNECTOR_RUN_AND_TERMINATE=false
- CONNECTOR_LOG_LEVEL=error
- CONNECTOR_DURATION_PERIOD=P2D
- CISA_CATALOG_URL=https://www.cisa.gov/sites/default/files/feeds/known_exploited_vulnerabilities.json
- CISA_CREATE_INFRASTRUCTURES=false
- CISA_TLP=TLP:CLEAR
- restart: always
- AlienVault (requires free account on AlienVault)
1
2
3
4
5
6
7
8
9
10
11
12
13
14
15
16
17
18
19
20
21
22
23
24
25
26
27
28
29
30
31
32
33
34
35
36
37
38
39
40
connector-alienvault:
- image: opencti/connector-alienvault:6.3.11
- environment:
- OPENCTI_URL=http://opencti:8080
- OPENCTI_TOKEN=ChangeMe
- CONNECTOR_ID=ChangeMe
- CONNECTOR_NAME=AlienVault
- CONNECTOR_SCOPE=alienvault
- CONNECTOR_LOG_LEVEL=error
- CONNECTOR_DURATION_PERIOD=PT30M \# In ISO8601 Format starting with \"P\" for Period ex: \"PT30M\" = Period time of 30 minutes
- ALIENVAULT_BASE_URL=https://otx.alienvault.com
- ALIENVAULT_API_KEY=ChangeMe
- ALIENVAULT_TLP=White
- ALIENVAULT_CREATE_OBSERVABLES=true
- ALIENVAULT_CREATE_INDICATORS=true
- ALIENVAULT_PULSE_START_TIMESTAMP=2022-05-01T00:00:00
# BEWARE! Could be a lot of pulses!
- ALIENVAULT_REPORT_TYPE=threat-report
- ALIENVAULT_REPORT_STATUS=New
- ALIENVAULT_GUESS_MALWARE=false
# Use tags to guess malware.
- ALIENVAULT_GUESS_CVE=false
# Use tags to guess CVE.
- ALIENVAULT_EXCLUDED_PULSE_INDICATOR_TYPES=FileHash-MD5,FileHash-SHA1
# Excluded Pulse indicator types.
- ALIENVAULT_ENABLE_RELATIONSHIPS=true
# Enable/Disable relationship creation between SDOs.
- ALIENVAULT_ENABLE_ATTACK_PATTERNS_INDICATES=false
# Enable/Disable \"indicates\" relationships between indicators and attack patterns
- ALIENVAULT_INTERVAL_SEC=1800
- ALIENVAULT_DEFAULT_X\_OPENCTI_SCORE=50
- ALIENVAULT_X\_OPENCTI_SCORE_IP=60
- ALIENVAULT_X\_OPENCTI_SCORE_DOMAIN=70
- ALIENVAULT_X\_OPENCTI_SCORE_HOSTNAME=75
- ALIENVAULT_X\_OPENCTI_SCORE_EMAIL=70
- ALIENVAULT_X\_OPENCTI_SCORE_FILE=85
- ALIENVAULT_X\_OPENCTI_SCORE_URL=80
- ALIENVAULT_X\_OPENCTI_SCORE_MUTEX=60
- ALIENVAULT_X\_OPENCTI_SCORE_CRYPTOCURRENCY_WALLET=80
  restart: always
1
2
3
4
5
6
7
8
9
10
11
12
13
14
15
16
17
18
19
20
21
- CISA-known-exploited-vulnerabilities
  Malwarebazaar-recent-additions
- connector-malwarebazaar-recent-additions:
- image: opencti/connector-malwarebazaar-recent-additions:6.3.11
- environment:
- OPENCTI_URL=http://opencti:8080
- OPENCTI_TOKEN=ChangeMe
- CONNECTOR_ID=ChangeMe
- CONNECTOR_NAME=MalwareBazaar Recent Additions
- CONNECTOR_LOG_LEVEL=error
- MALWAREBAZAAR_RECENT_ADDITIONS_API_URL=https://mb-api.abuse.ch/api/v1/
- MALWAREBAZAAR_RECENT_ADDITIONS_COOLDOWN_SECONDS=300
# Time to wait in seconds between subsequent requests
- MALWAREBAZAAR_RECENT_ADDITIONS_INCLUDE_TAGS=exe,dll,docm,docx,doc,xls,xlsx,xlsm,js
# (Optional) Only download files if any tag matches. (Comma separated)
- MALWAREBAZAAR_RECENT_ADDITIONS_INCLUDE_REPORTERS=
# (Optional)Only download files uploaded by these reporters. (Comma separated)
- MALWAREBAZAAR_RECENT_ADDITIONS_LABELS=malware-bazaar
# (Optional) Labels to apply to uploaded Artifacts. (Comma separated)
- MALWAREBAZAAR_RECENT_ADDITIONS_LABELS_COLOR=#54483b
# Color to use for labels
Add RSS Live Feeds to Open CTI
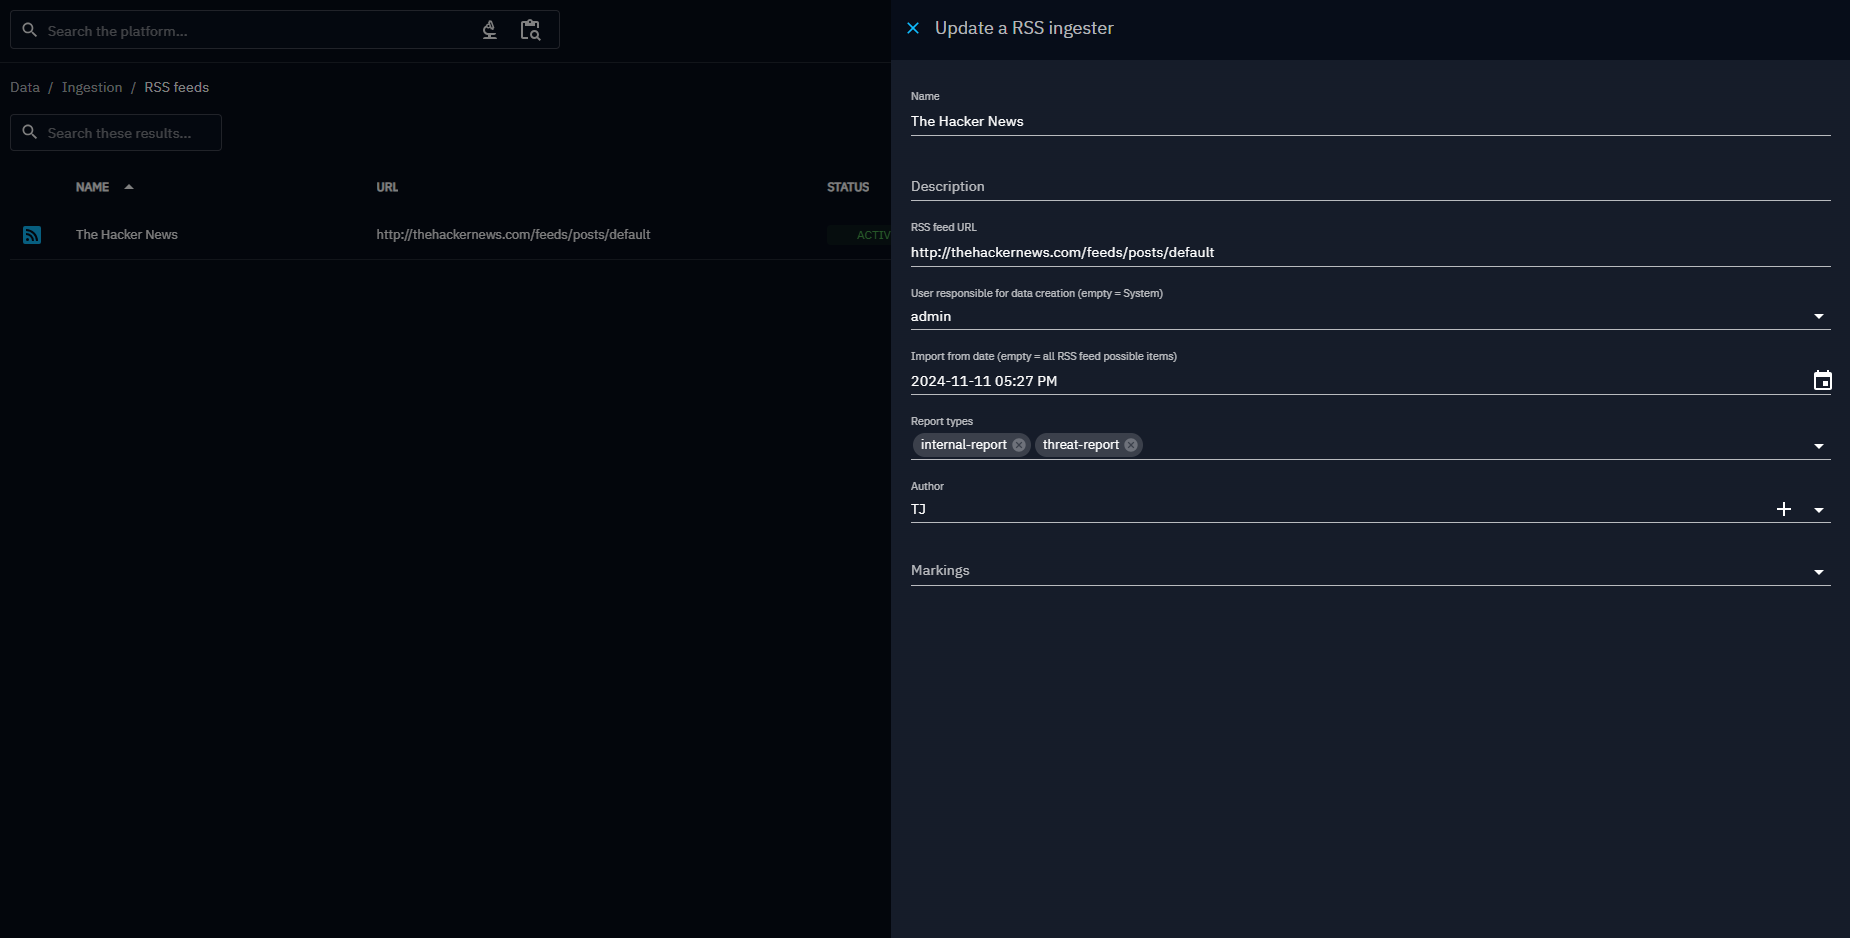
Navigate to Data/Ingestion/RSS feeds and add the RSS configuration details.
Some of the famous RSS feeds site can be found below.
Happy Hacking :)