Building a Realistic Enterprise Level SOC LAB for Blue & Red Teamers - Part 2
Network Segmentation, Security Configurations & pfSense Firewall Rules
Hey again, folks! If you’ve followed along in part1, you’ve already seen how i kicked off my journey to build a real world inspired soc lab right from home — with a strong focus on Blue & Red team perspectives, Active Directory, Segmented Networks, VPN Tunneling and SIEM Integration.
In this part, we step into the true heart of network defense — firewall segmentations. This is where your network boundaries are defined, communication is carefully controlled and the whole setup begins to resemble secure enterprise environment.
We’ll go step by step through pfSense firewall rule setup for each interface — LAN, DMZ, SIEM, WAN, and our upcoming VPN — so each zone only gets the access it truly needs.
The Mission
We’ll configure:
- Secure LAN rules (AD, Client, RDP, Splunk Logs)
- Controlled DMZ (Isolated, public-facing services)
- Restricted SIEM zone (One-way logging only)
- WAN rules (Internet, VPN Port)
- Prepare for VPN integration (with AD authentication in the next part)
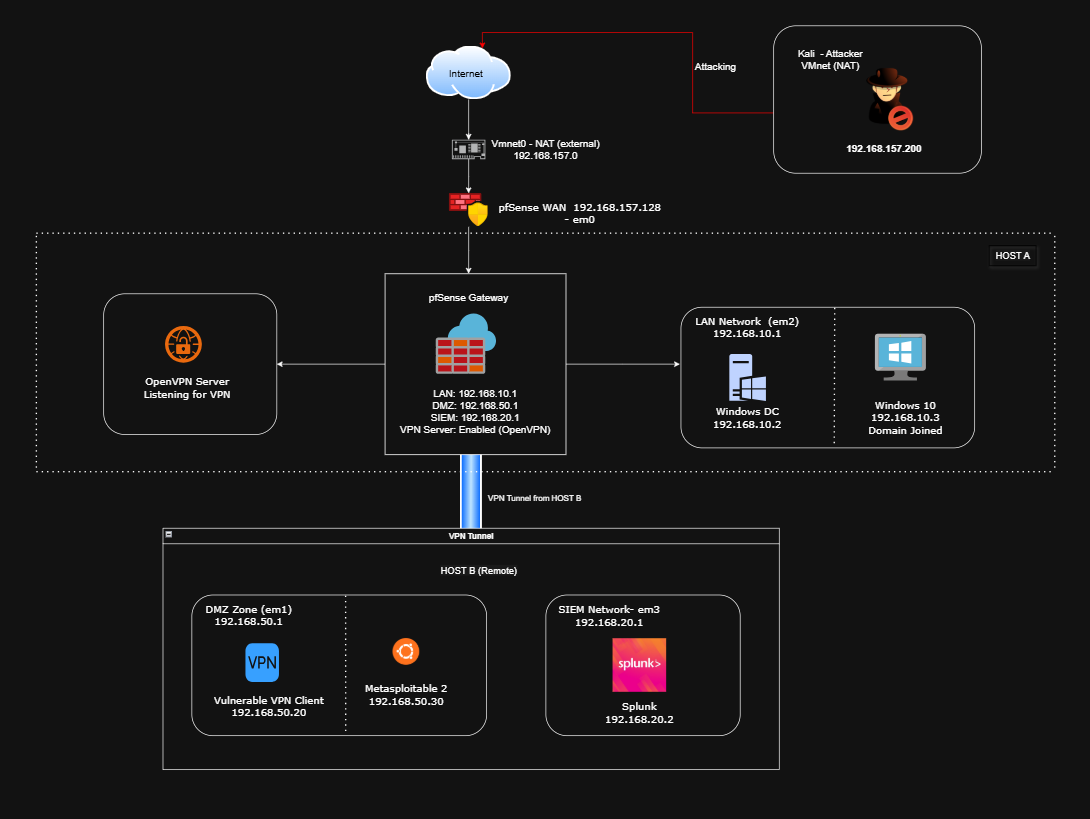
Interface Recap
| Interface | Name | Network | Purpose |
|---|---|---|---|
| WAN | vmnet0 | DHCP/NAT | Internet connection |
| LAN | vmnet2 | 192.168.10.0/24 | Internal services (AD, Clients) |
| DMZ | vmnet1 | 192.168.50.0/24 | Public-facing apps (Metasploitable) |
| SIEM | vmnet3 | 192.168.20.0/24 | Splunk & Sysmon logs |
| VPN | — | 10.10.10.0/24 | Remote AD-authenticated access |
pfSense Firewall Rules Setup
Step 1: LAN Rules (192.168.10.0/24)
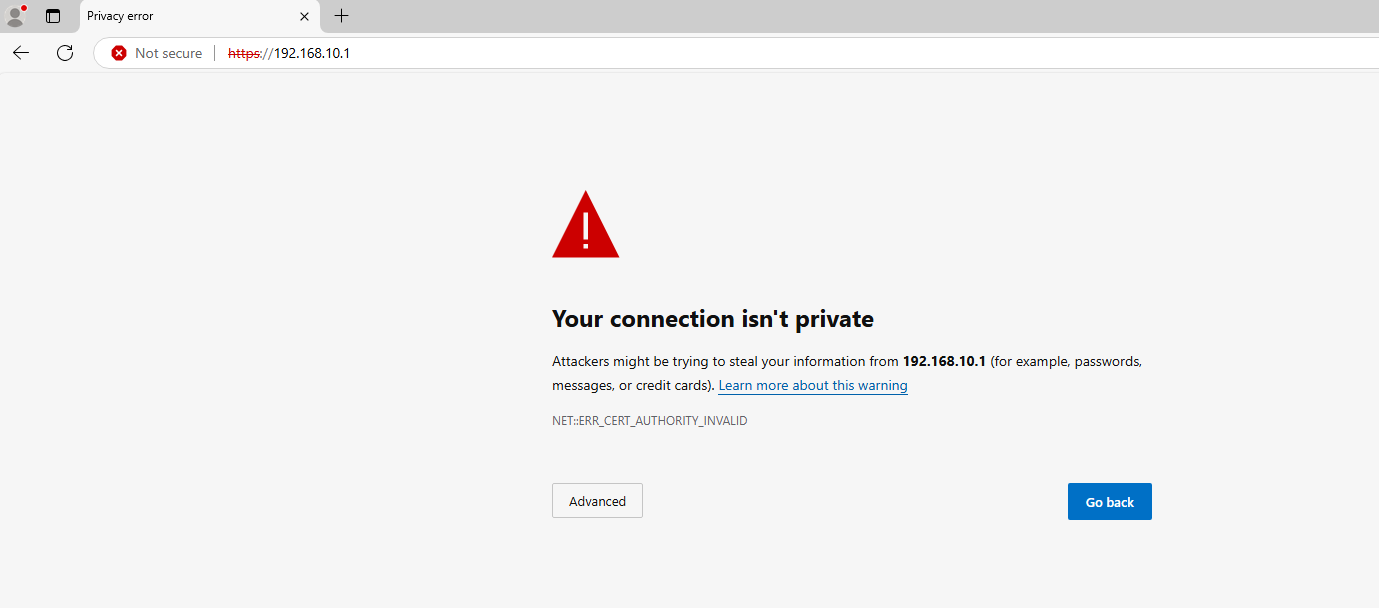
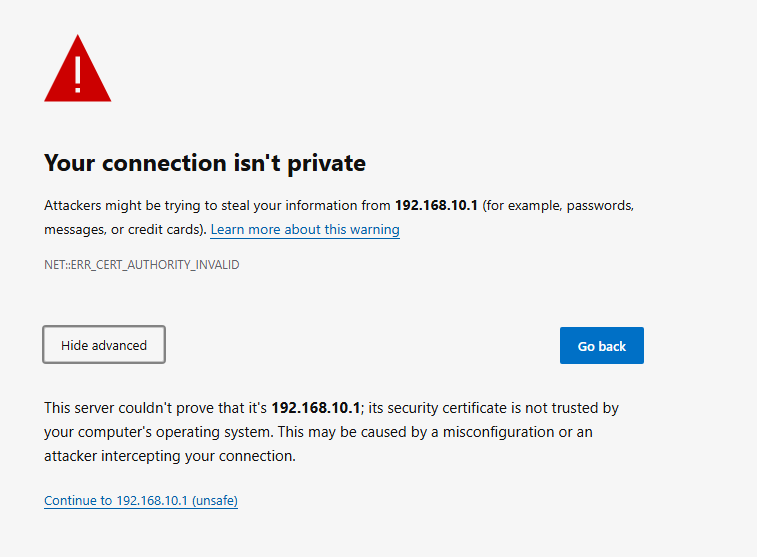
- From the Windows 10 Client → Browse to the firewall with the IP address of our LAN https://192.168.10.1 and Click Advanced and click Continue.
- Login to the pfSense with the default Credentials, and later we will change it.
- username: admin
- password: pfsense
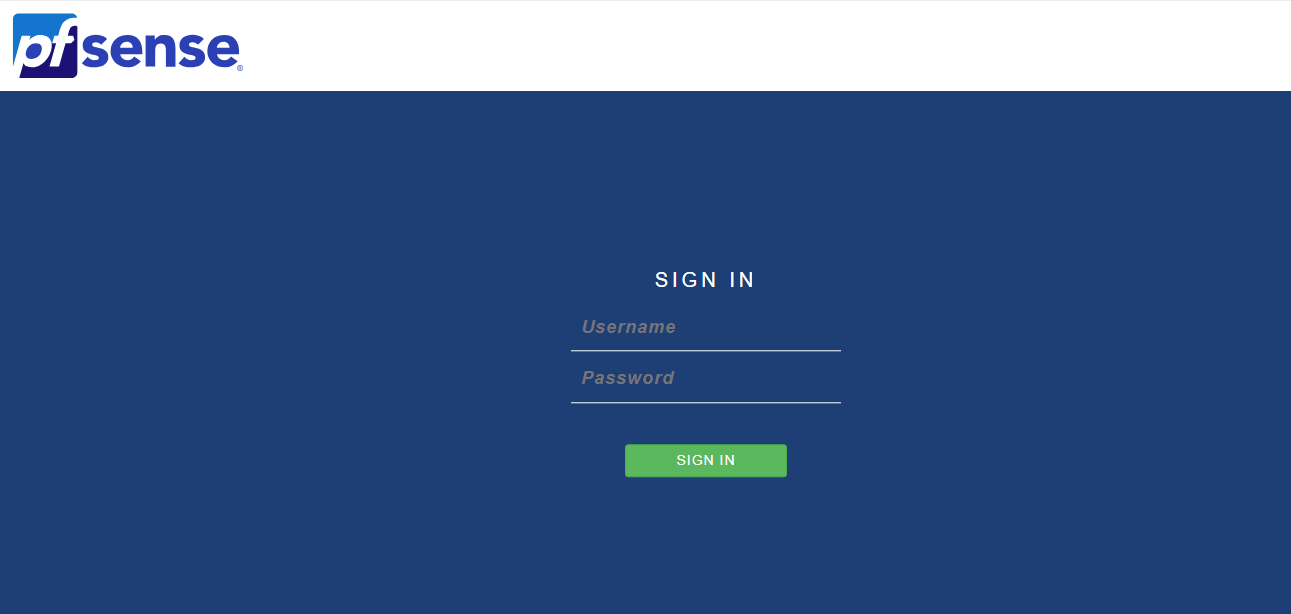
Now we logged into the pfSense Firewall manager. Don’t be a lazy Admin, Change the password immediately, or it will cost you so much, TRUST ME!!!!
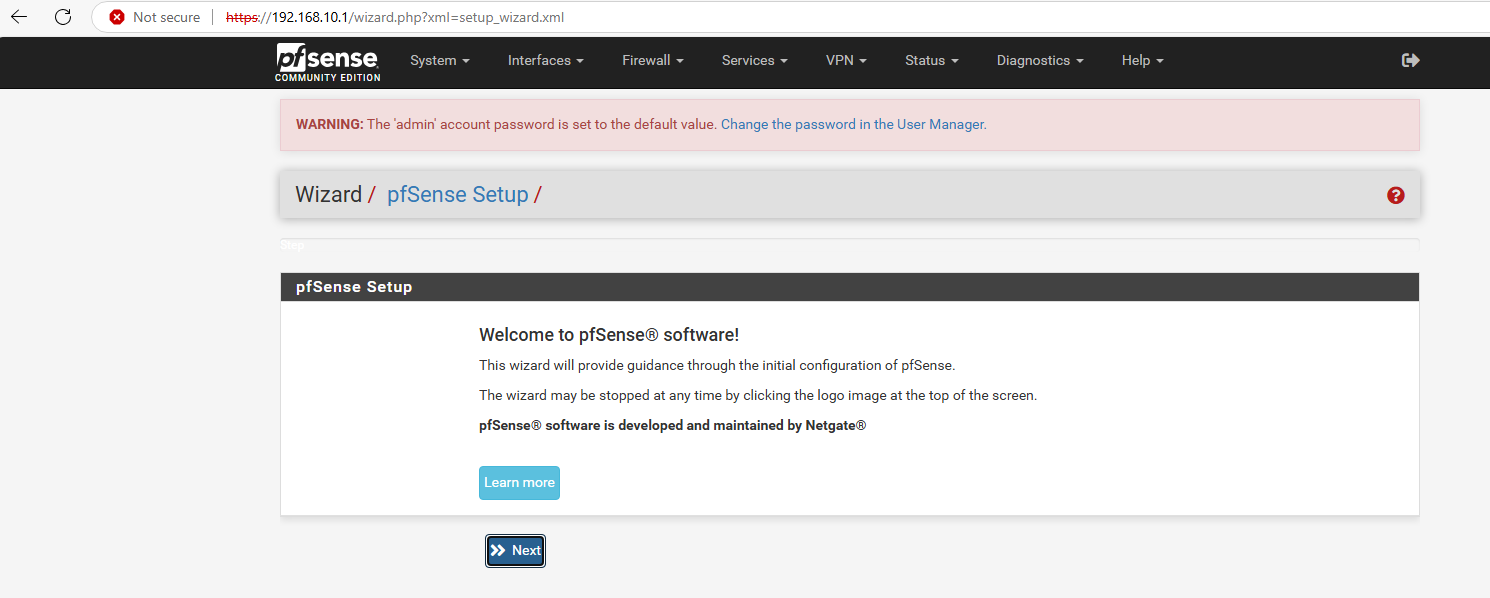
Click the “Change the password in the User Manager” Option in the top of the page and change the password.

- Go to Firewall → Rules → LAN
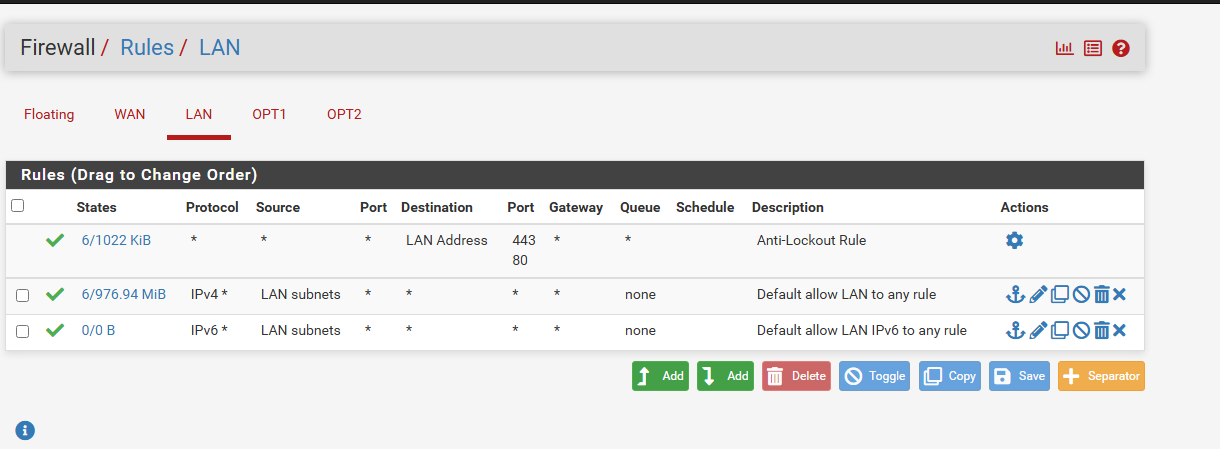
AS you can see here, We have some default Rules, First one is Anti-locked out rule, This rule is essential for us to keep ourselves not being locked out of pfSense GUI via HTTPS(443) and HTTP (80) access. we can later restrict it to a management IP range, but for now keep it as it is.
Other one it Default allow LAN to any Rules, We need to disable this rule after we create the custom rules. Its necessary to enforce network segmentation, otherwise all LAN traffic goes everywhere.
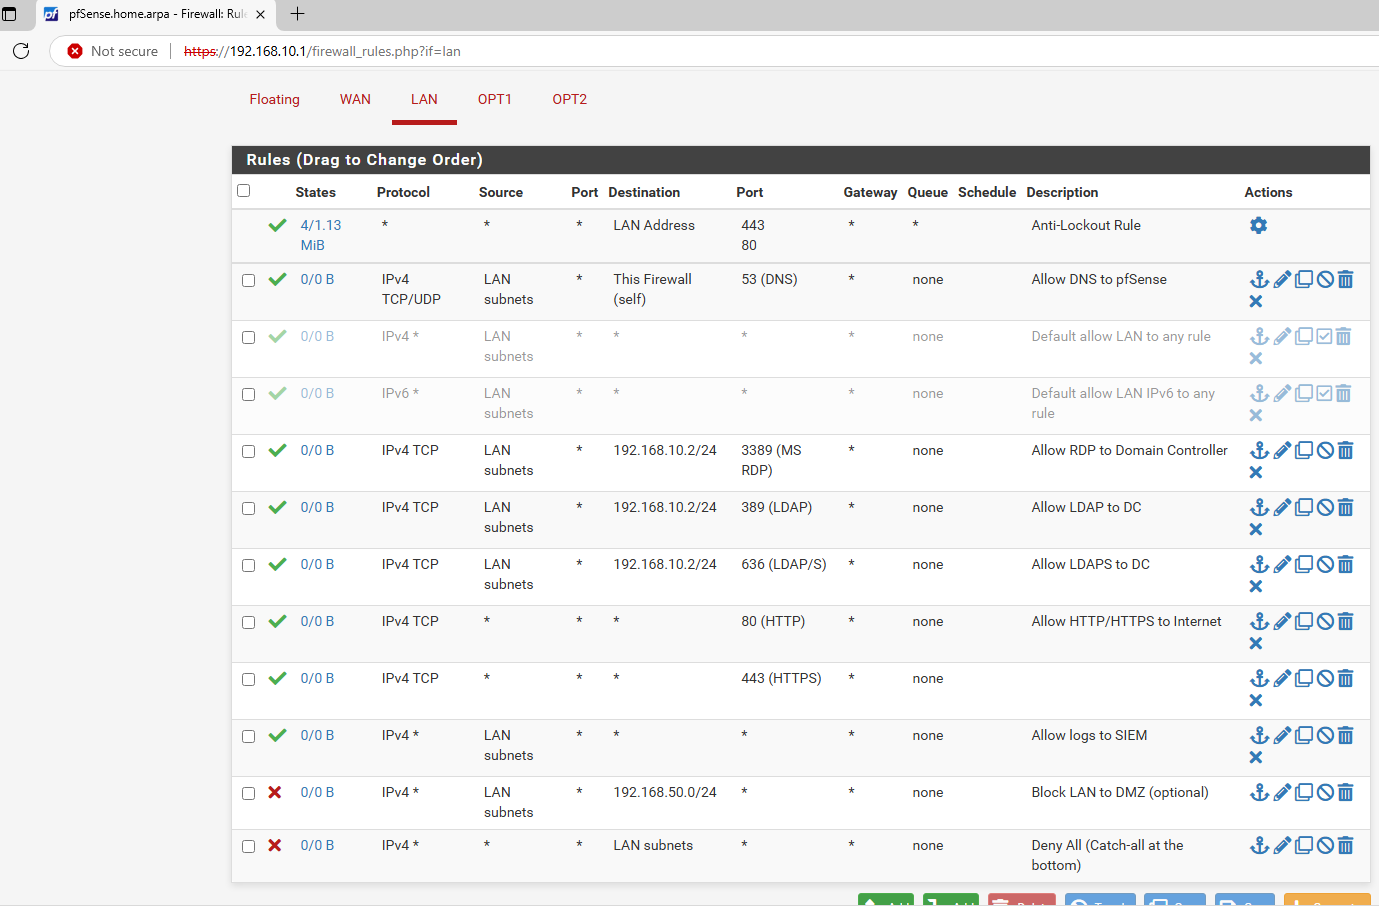
- Add the Following Rules:
| Action | Interface | Address Family | Protocol | Source | Destination | Destination Port | Description |
|---|---|---|---|---|---|---|---|
| Pass | LAN | IPv4 | TCP/UDP | LAN net | This Firewall | 53 | Allow DNS to pfSense |
| Pass | LAN | IPv4 | TCP | LAN net | 192.168.10.2 | 3389 | Allow RDP to Domain Controller |
| Pass | LAN | IPv4 | TCP | LAN net | 192.168.10.2 | 389, 636 | Allow LDAP/LDAPS to DC |
| Pass | LAN | IPv4 | TCP | LAN net | any | 80, 443 | Allow HTTP/HTTPS to Internet |
| Pass | LAN | IPv4 | Any | LAN net | 192.168.20.0/24 | * | Allow logs to SIEM |
| Block | LAN | IPv4 | Any | LAN net | 192.168.50.0/24 | * | Block LAN to DMZ (optional) |
| Block | LAN | IPv4 | Any | LAN net | any | * | Deny All (Catch-all at the bottom) |
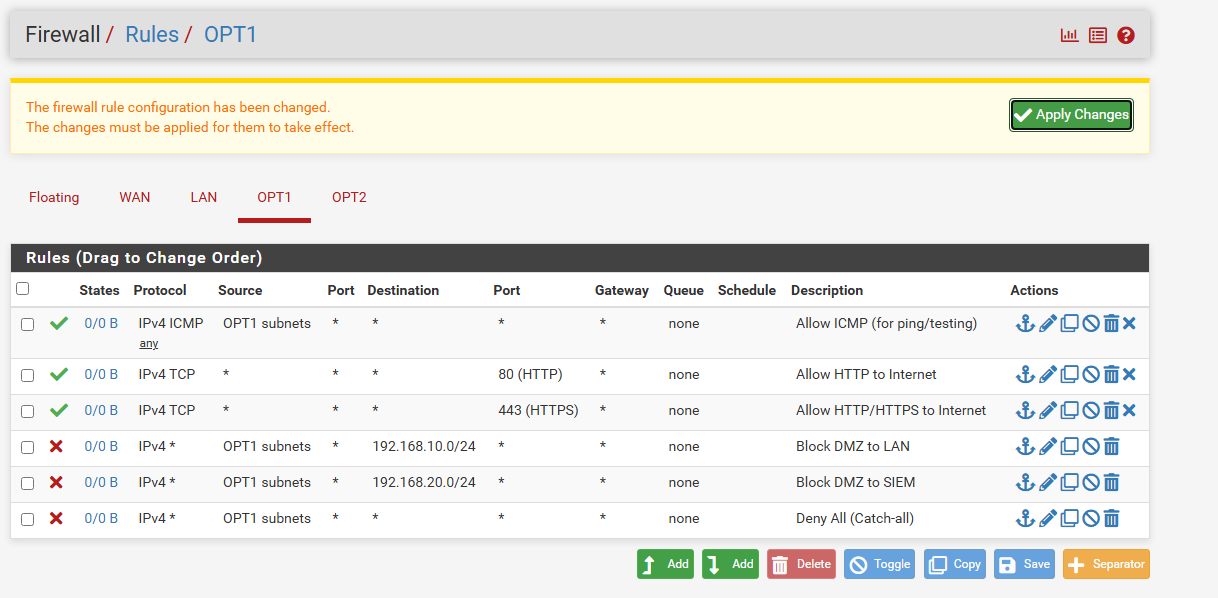
Step 02— DMZ Interface Firewall Rules (192.168.50.0/24)
Go to: Firewall > Rules > DMZ > Add
| Action | Interface | Address Family | Protocol | Source | Destination | Destination Port | Description |
|---|---|---|---|---|---|---|---|
| Pass | DMZ/OPT1 | IPv4 | ICMP | DMZ net | any | * | Allow ICMP (for ping/testing) |
| Pass | DMZ/OPT1 | IPv4 | TCP | DMZ net | any | 80, 443 | Allow HTTP/HTTPS to Internet |
| Block | DMZ/OPT1 | IPv4 | Any | DMZ net | 192.168.10.0/24 | * | Block DMZ to LAN |
| Block | DMZ/OPT1 | IPv4 | Any | DMZ net | 192.168.20.0/24 | * | Block DMZ to SIEM |
| Block | DMZ/OPT1 | IPv4 | Any | DMZ net | any | * | Deny All (Catch-all) |
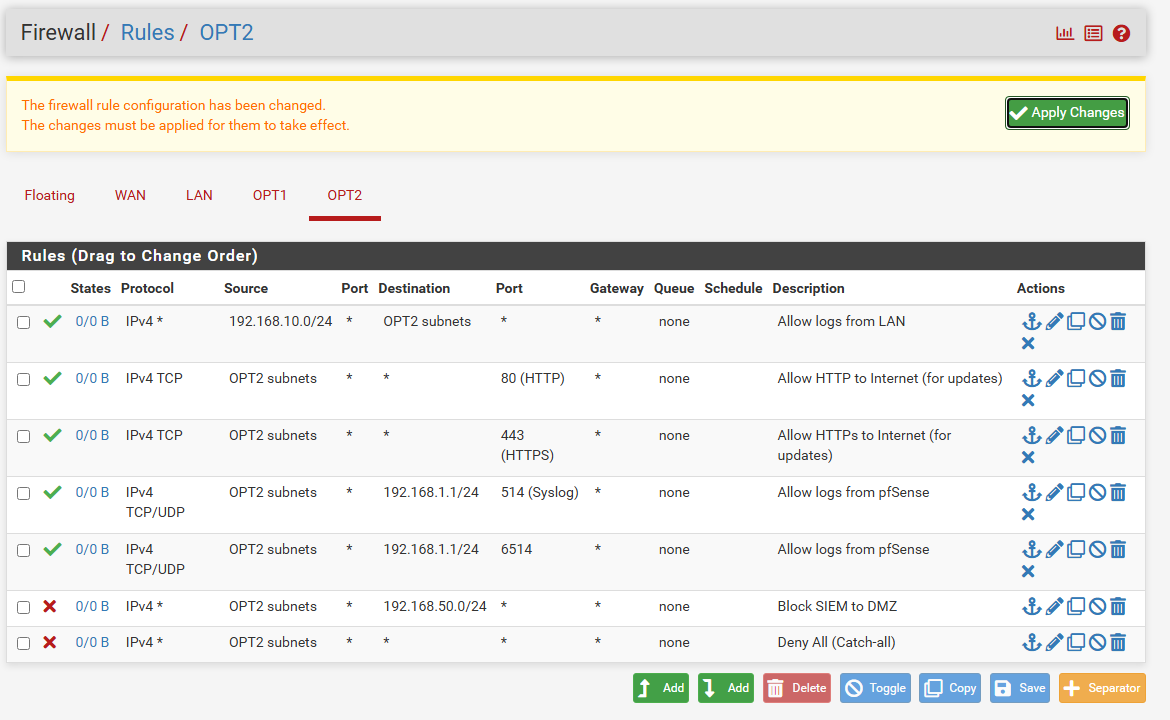
Step 03— SIEM Interface Firewall Rules (192.168.20.0/24) Go to: Firewall > Rules > SIEM > Add
| Action | Interface | Address Family | Protocol | Source | Destination | Destination Port | Description |
|---|---|---|---|---|---|---|---|
| Pass | SIEM/OPT2 | IPv4 | Any | 192.168.10.0/24 | SIEM net | * | Allow logs from LAN |
| Pass | SIEM/OPT2 | IPv4 | TCP | SIEM net | any | 443, 80 | Allow HTTP/HTTPS to Internet (for updates) |
| Pass | SIEM/OPT2 | IPv4 | UDP/TCP | SIEM net | 192.168.1.1 (pfSense) | 514/6514 | Allow logs from pfSense |
| Block | SIEM/OPT2 | IPv4 | Any | SIEM net | 192.168.50.0/24 | * | Block SIEM to DMZ |
| Block | SIEM/OPT2 | IPv4 | Any | SIEM net | any | * | Deny All (Catch-all) |
Step 04— WAN Interface Firewall Rules (Internet) Go to: Firewall > Rules > WAN > Add
| Action | Interface | Address Family | Protocol | Source | Destination | Destination Port | Description |
|---|---|---|---|---|---|---|---|
| Pass | WAN | IPv4 | UDP | any | WAN address | 1194 | Allow OpenVPN traffic |
| Block | WAN | IPv4 | Any | any | any | * | Block all other inbound |
WAN rules must be strict — only allow essential public access like VPN.
Creating VPN Access Through pfSense with Active Directory Authentication
After building and securing our segmented SOC lab environment with pfSense, Domain Controller, and SIEM, it’s time to enable remote access securely. We’ll set up a VPN (OpenVPN) on the pfSense firewall that authenticates users via Active Directory (LDAP). This allows remote machines (like our SIEM on Host B) to securely tunnel into the internal LAN, access domain resources, and appear as if they’re on-site.
Why Use VPN with AD Authentication?
In enterprise networks, remote users authenticate against a centralized directory — usually Active Directory — before gaining access to the network. We’re replicating that here using OpenVPN + LDAP on pfSense, so:
- Only authorized domain users can connect
- VPN clients appear on the LAN
- Domain policies (GPO), logging, and restrictions apply
Understanding the Flow: LDAP & VPN
Here’s how the VPN login works when using LDAP:
| Step | Action |
|---|---|
| 1️⃣ | VPN client initiates connection to pfSense |
| 2️⃣ | pfSense collects the AD username/password |
| 3️⃣ | pfSense performs an LDAP query to the Domain Controller |
| 4️⃣ | If successful, tunnel is created |
| 5️⃣ | Client now joins the LAN (e.g., 192.168.10.0/24) and accesses internal resources |
✅ Important: pfSense must be able to:
- Resolve
soclab.local - Reach the Domain Controller on port
389or636 - Be part of the same LAN or have routing to the DC
Step 01 — Setup OpenVPN Server with AD (LDAP) Auth on pfSense
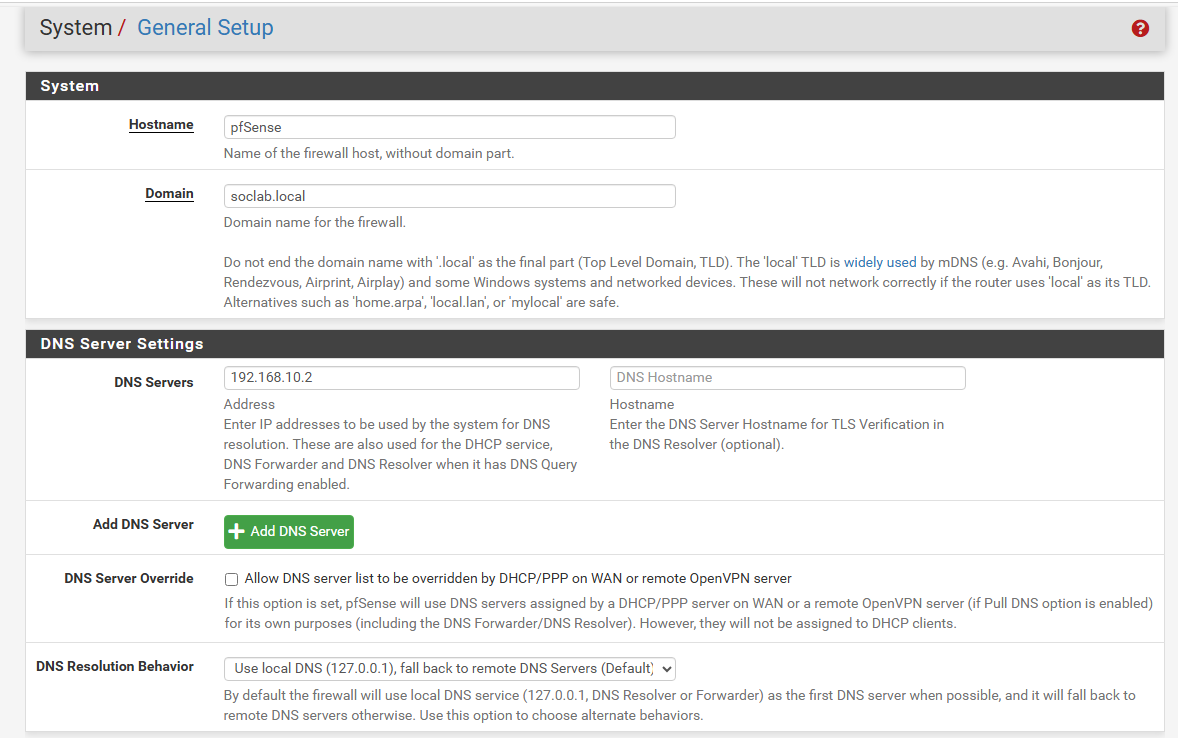
- Enable DNS Resolution to the Domain
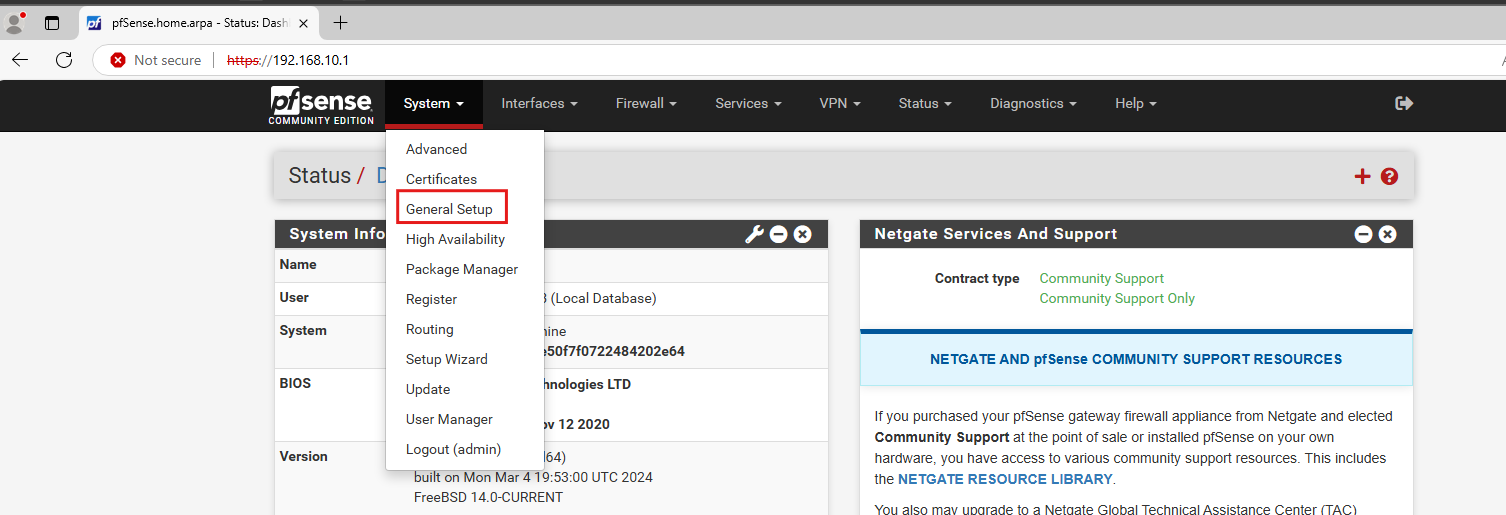
Go to System → General Setup
- Add your DC IP as DNS Server
- Set domain name: soclab.local
Check “Allow DNS server list to be overridden by DHCP” → Disabled
- Generating the Certificate Authority (CA)
- We are going to generate Certificate Authority(CA) for validate the OPENVPN Server’s identity and authenticate user certificates.
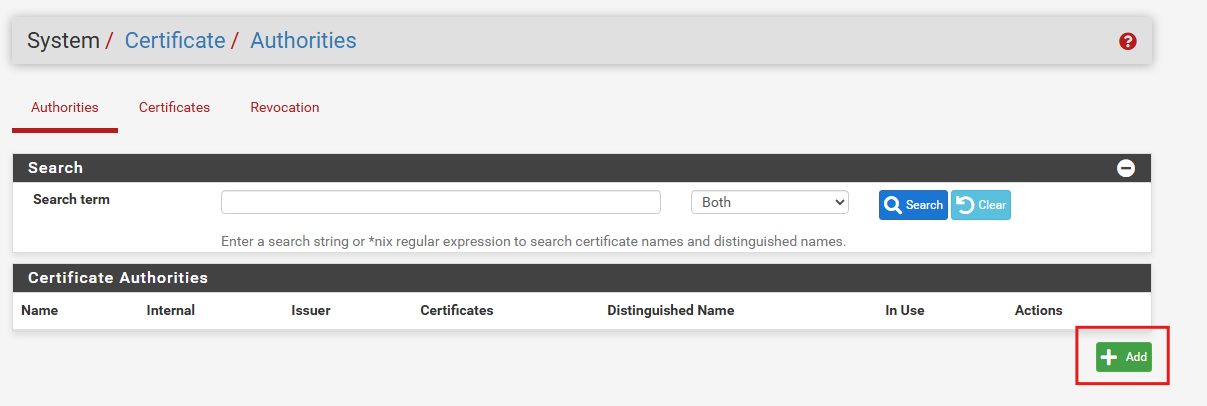
Navigate to System > Certificates > Authorities
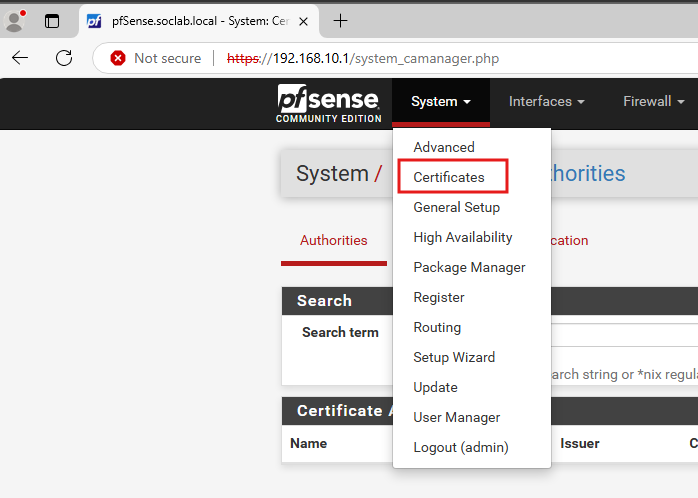
Click the Add button at the bottom of the page.
- Descriptive name:
OpenVPN-CA - Method: Create an Internal Certificate Authority
- Key Type: RSA
- Key Length: 4096
- Digest Algorithm: SHA512
Choose a Common Name for your Certificate or leave the default of internal-ca
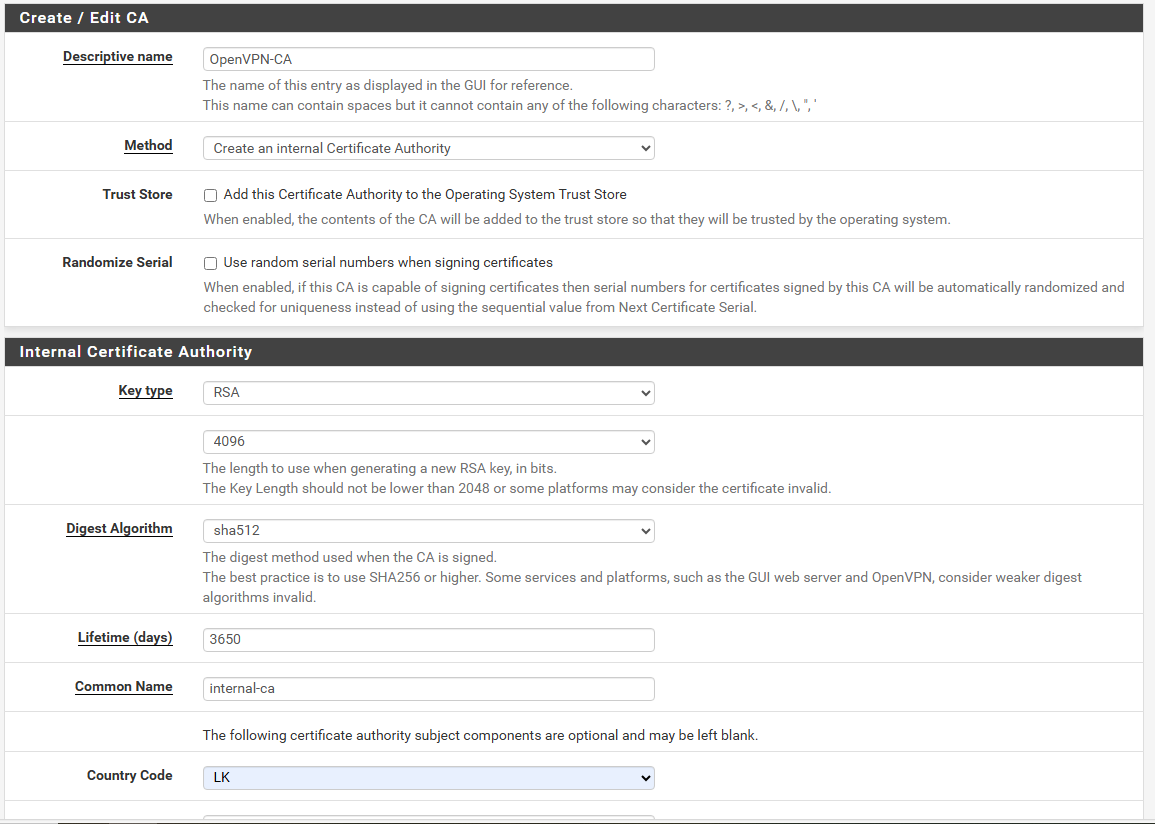
Click Save. You’ve Created your own Certificate Authority.

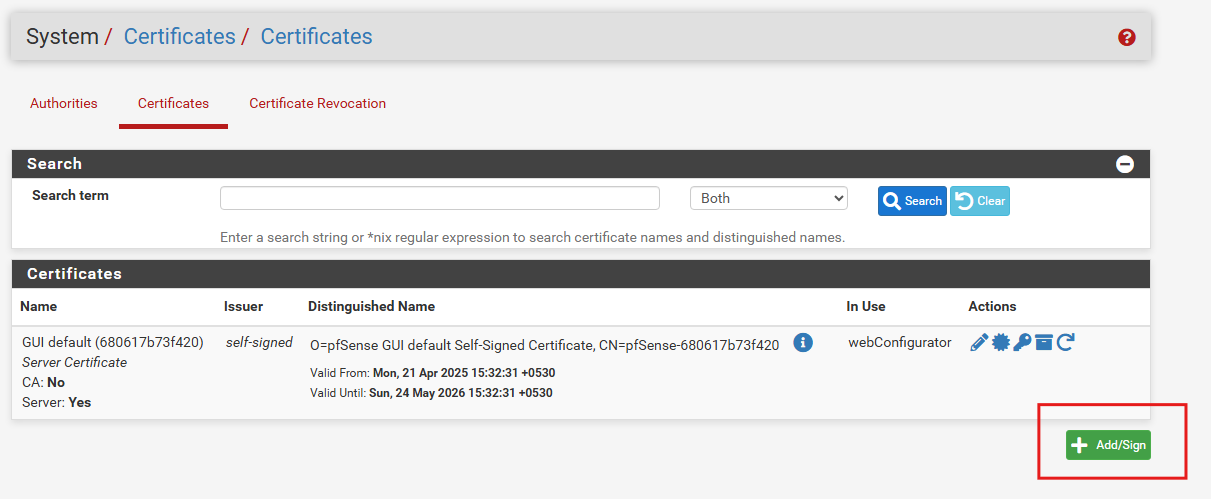
- Generate the Server Certificate
Navigate to System > Certificates > Certificates and click Add/Sign Button at the bottom.
- Method: Create an Internal Certificate.
- Descriptive name:
OpenVPN-Server-Cert - Use the same values you set for the certificate authority for the key type and length, as well as for the Digest Algorithm.
- Lifetime: 365 Days
Certificate Type: Server Certificate
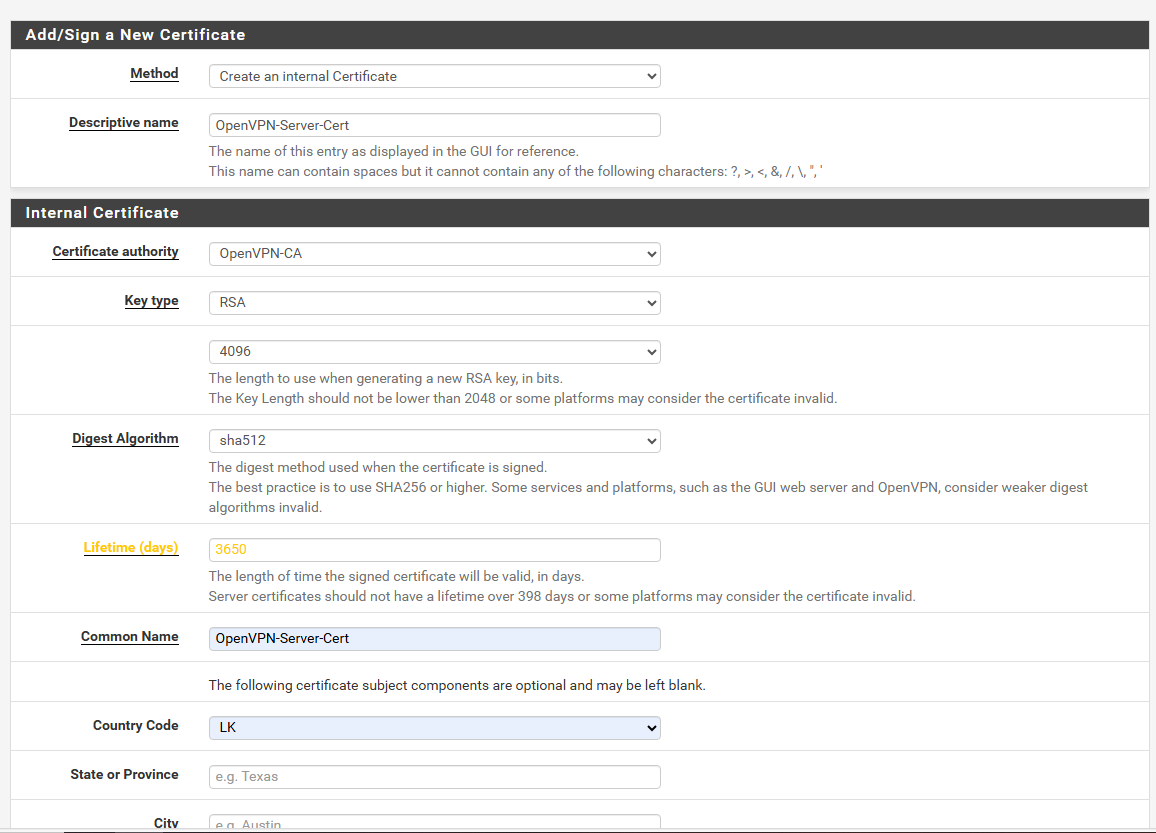
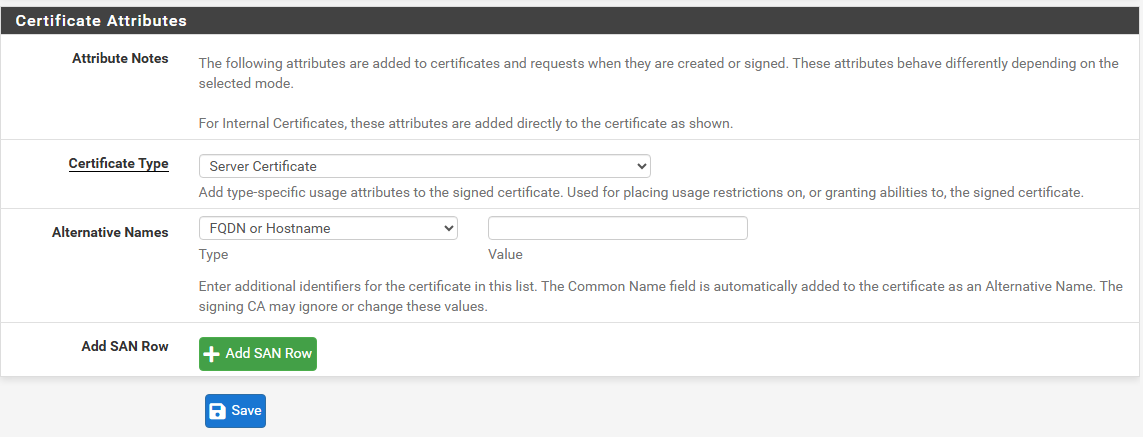
Click Save.
- Create Local Open VPN User and User Certificate
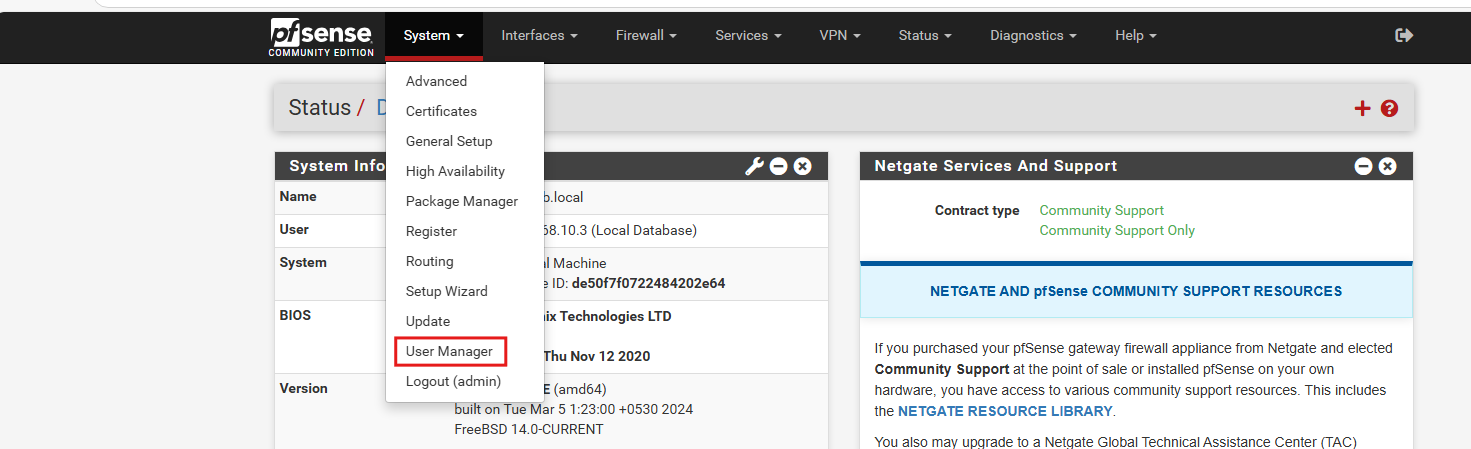
Navigate to System > User Manager.
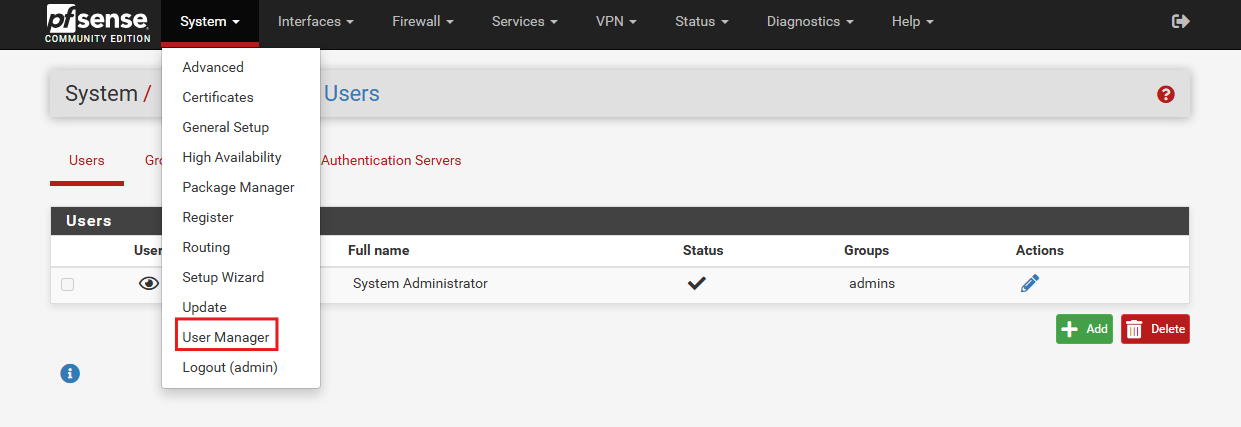
Click the Add button and Enter the username and the password.
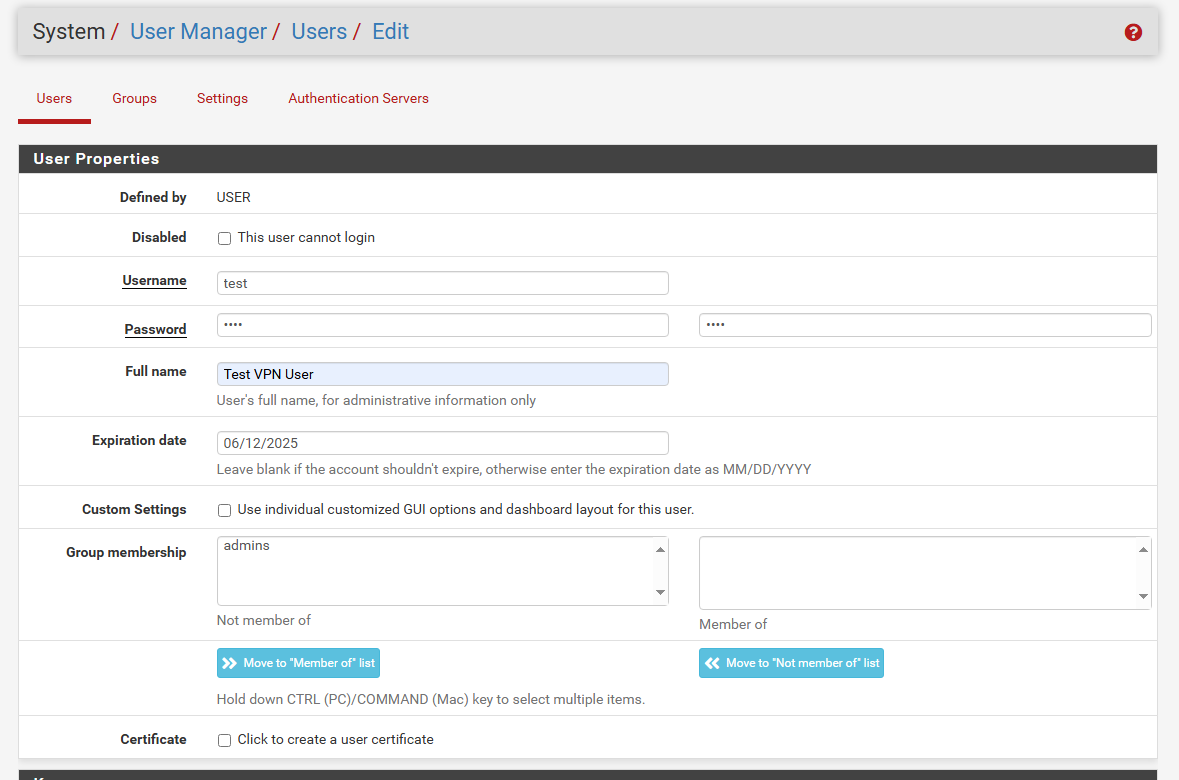
- If you chose to set up your server for certificate-based authentication or for certificate and password-based authentication, click the pencil icon to the right of your new user. You’re taken back to the Edit User window.
Click the Add button under User Certificates. You’re taken to the Certificate Manager, and you’re prompted to input the parameters for your user certificate.

- Method: Create an Internal Certificate.
- Descriptive name:
OpenVPN-User-Cert - Set the same values you set for the Certificate Authority for the Key type and length, as well as for the Digest Algorithm.
- Set the Lifetime to 365 days.
- Make sure Certificate Type is set to User Certificate.
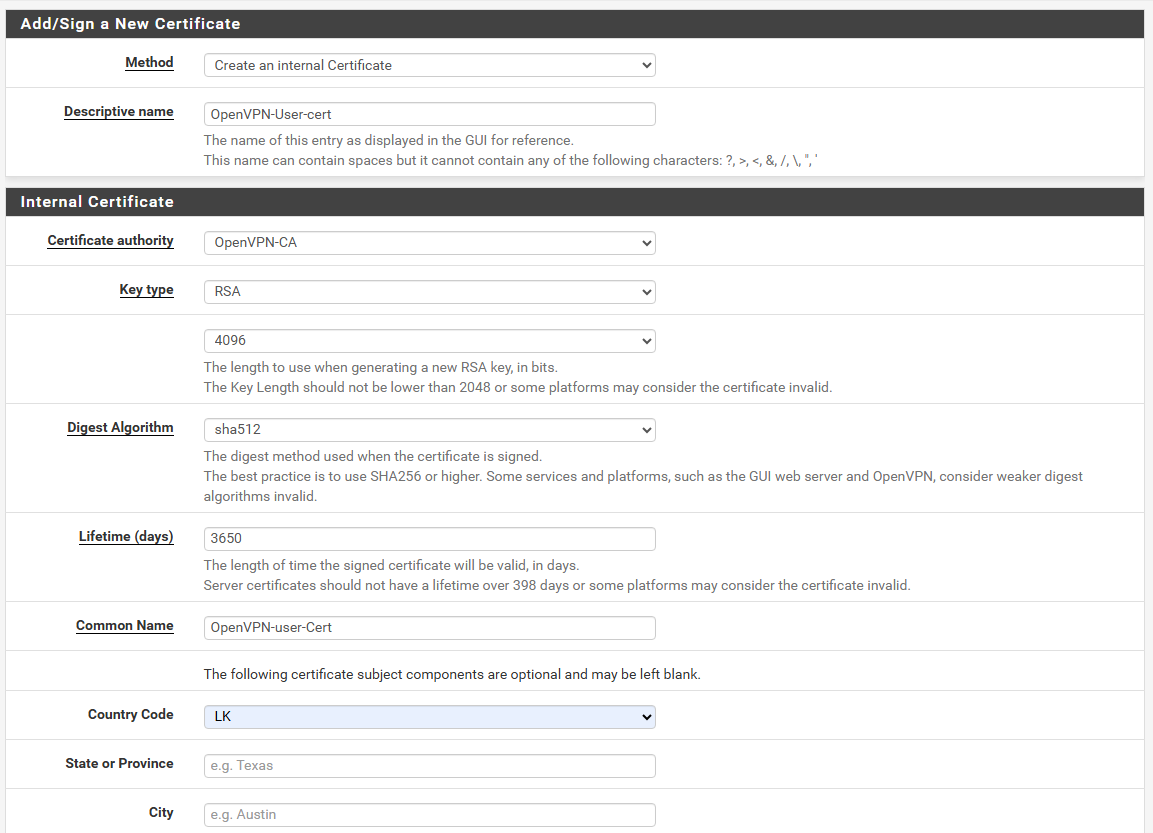
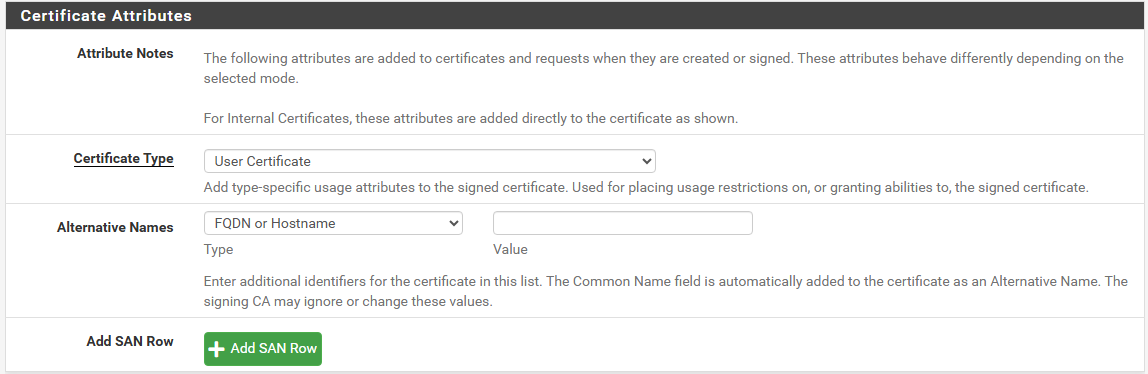
Click Save. You’re taken back to the User Manager, and you can see that your newly created user certificate is now associated with your OpenVPN user.

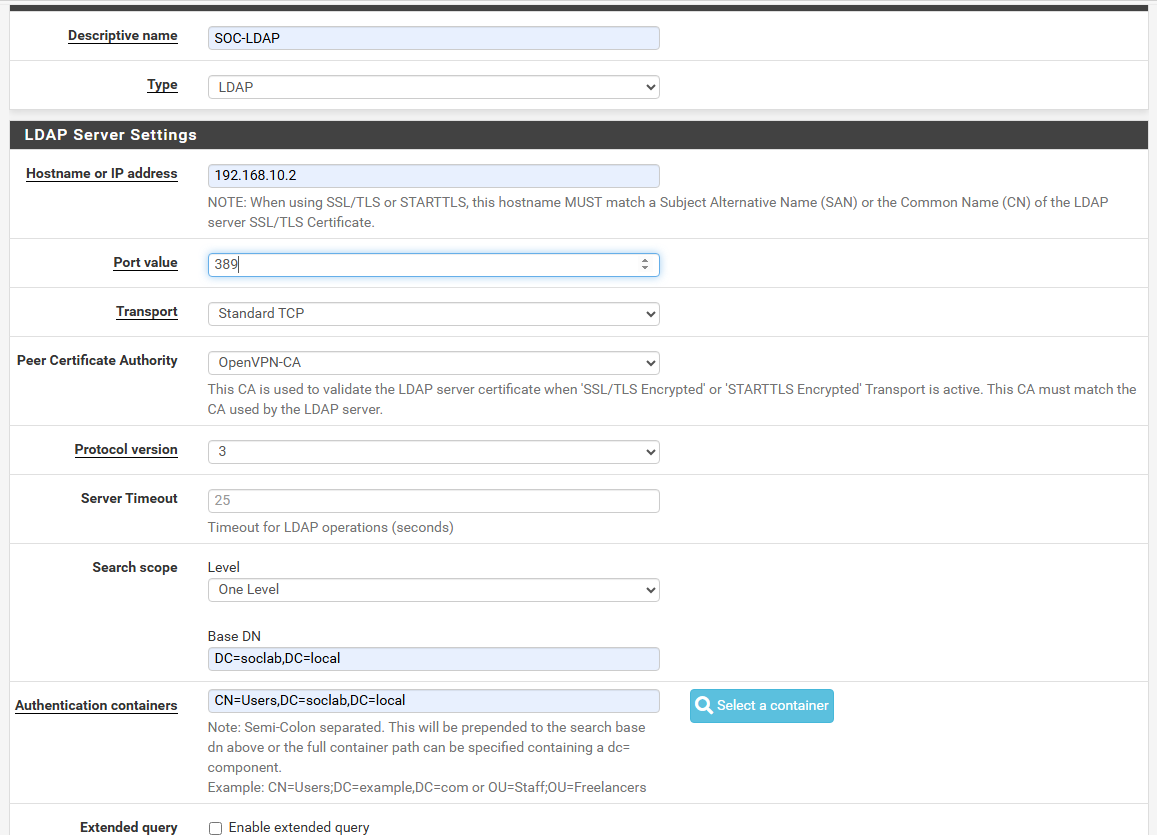
- Add an LDAP Authentication Server
Navigate to: System > User Manager > Authentication Servers > Add
- Type: LDAP
- Name:
SOC-LDAP - Hostname or IP:
192.168.10.2(Your DC IP) - Port:
389(for LDAP) or636(LDAPS) - Transport:
TCP - Standard - Certificate Authority: OpenVPN-CA
- Configure Base DN and Bind DN
Base DN: This defines where pfSense starts its LDAP search:
1
  DC=soclab,DC=local
You an get this via PowerShell on DC:
1
  Get-ADDomain | Select DistinguishedName
If “Anonymous bind” is checked, pfSense won’t try to log in to LDAP — but this is not allowed by default in AD.
✅ Uncheck: Bind anonymous
Then provide:
| Field | Value |
|---|---|
| Bind DN | CN=pfsensebind,CN=Users,DC=soclab,DC=local (example) |
| Password | The password of this domain account |
Note: You should create a low-privilege domain user (e.g., pfsensebind) in AD just for this.
- Authentication container:
CN=Users,DC=soclab,DC=local
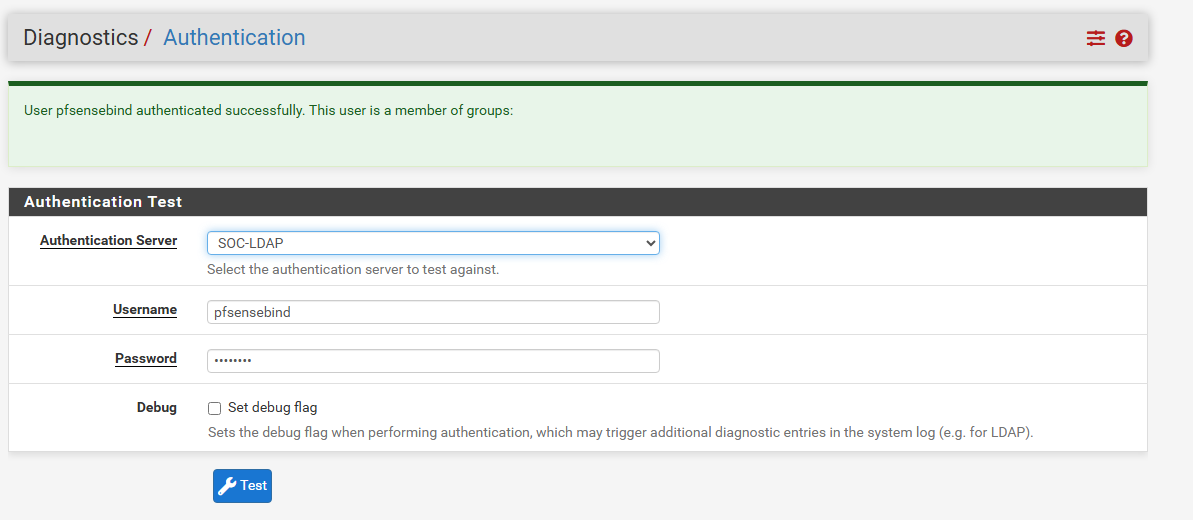
- Save and test the connection
- Click Save.
- Go to Diagnostics → Authentication.
- Test a domain user login (e.g.,
pfsensebindwith password). - You should get “Authentication success”.
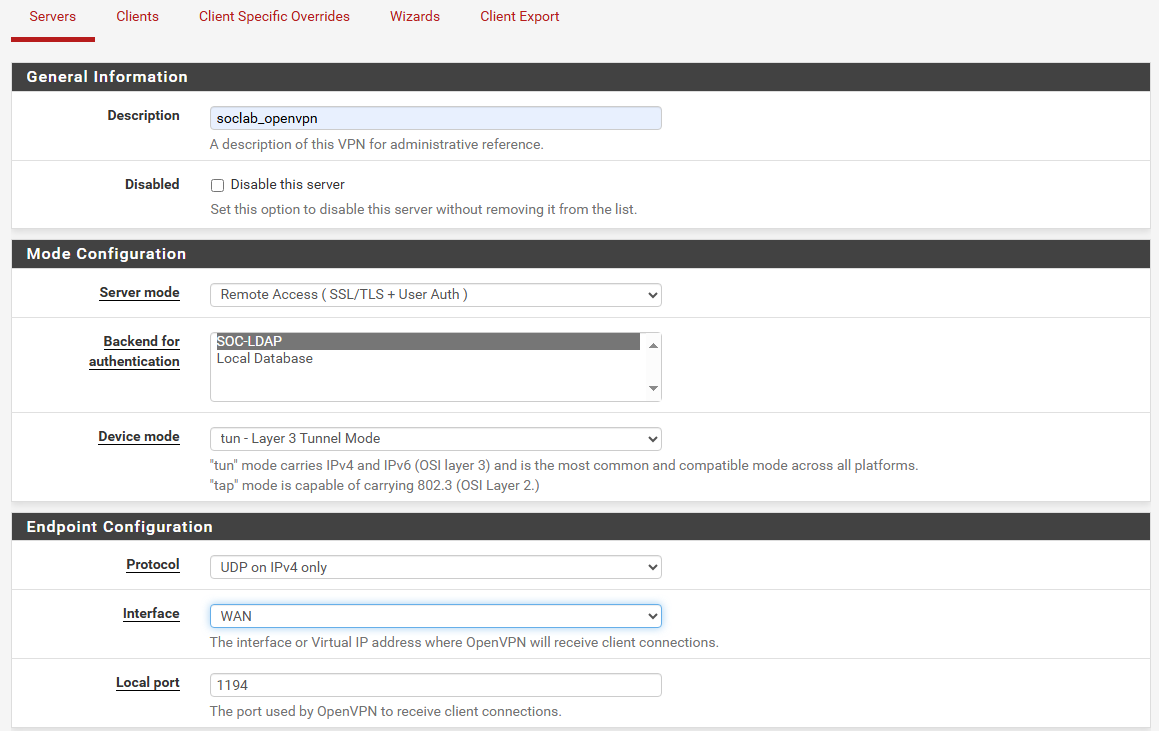
- Creating the OpenVPN Server
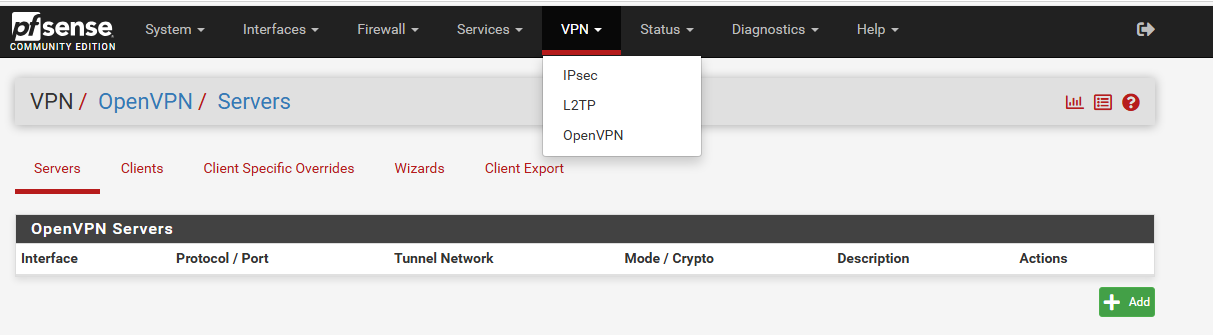
Navigate to VPN >. OpenVPN > Servers and Click Add at the bottom right.
- Description : Soclab_openvpn
- Server Mode: Remote Access (SSL/TLS + User Auth)
- Backend for Authentication: SOC-LDAP (Since we are going to use AD for authentication)
Local Port: 1194
- Make sure Use a TLS Key and Automatically generate a TLS Key are enabled.
- Make sure your Peer Certificate Authority is set to the CA we created earlier.
- Set the Server certificate field to the server certificate we created earlier.
- Select 4096 for the DH Parameter Length setting.
- Set the Auth digest algorithm to RSA-SHA512 (512-bit).
- IPv4 Tunnel Network:
- Enable Redirect IPv4 Gateway in order to route all IPv4 traffic over the VPN tunnel.
- Under the Advanced Settings:
- Enable UDP Fast I/O.
- If you’re only using IPv4, select IPv4 only in the Gateway creation field. If you’re using both IPv4 and IPv6, leave it set to Both.
- Click Save.
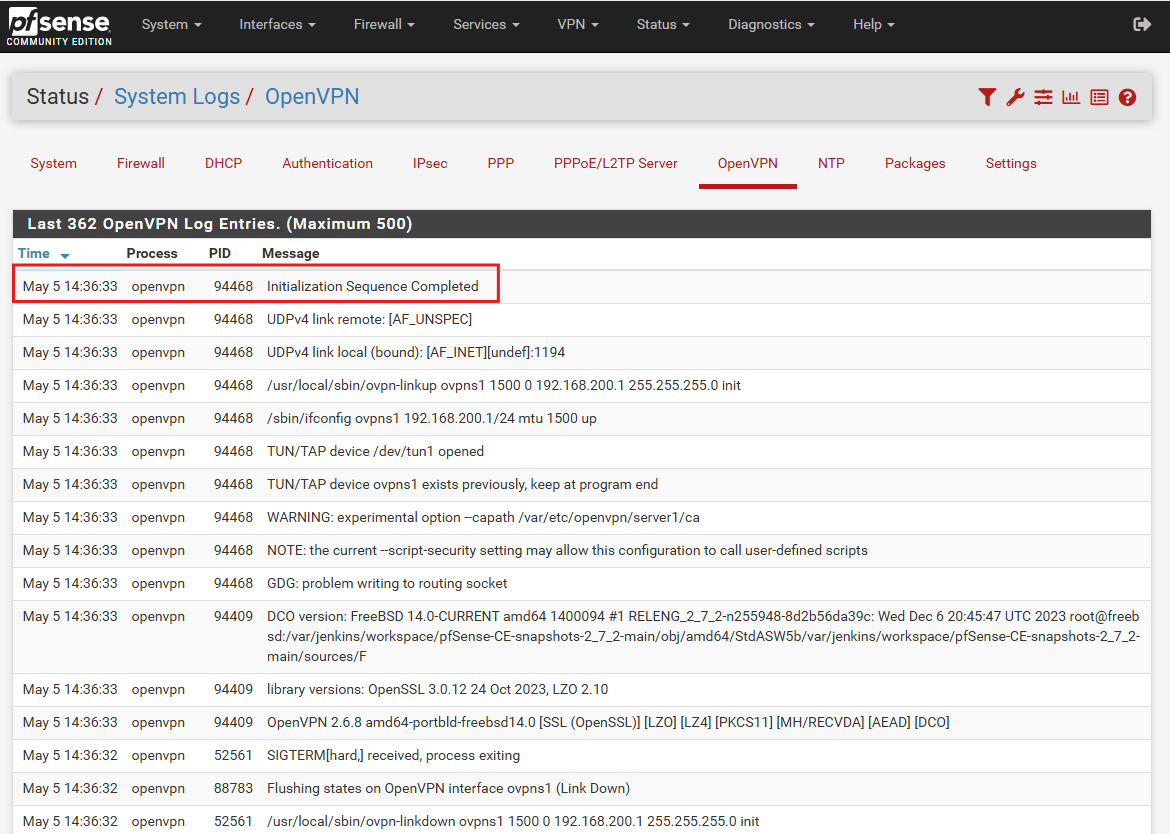
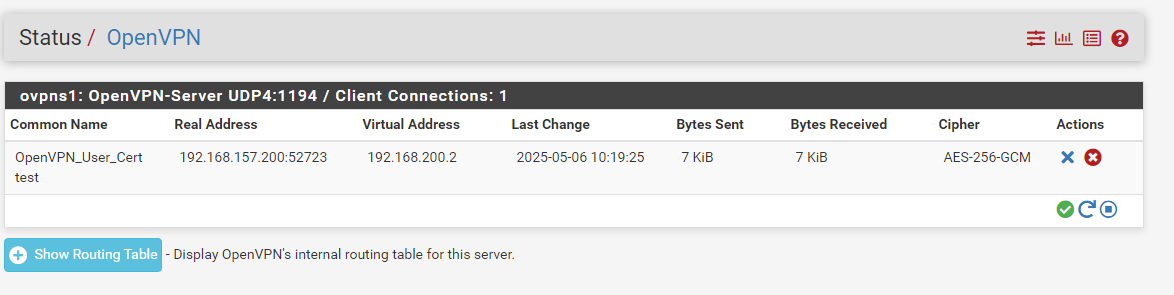
- Verify the OpenVPN Server Configuration
- To make sure the server setup correctly, Navigate to Status > System Logs from the top menus.
- Select the OpenVPN from the submenu.
If everything Setup correctly you should see Initialization Sequence Completed. Make sure to Sort by Time.
- Create the VPN Firewall Rules.
- We have already created the WAN Rules. You can check above. If you haven’t
- From the menus at the top of the screen, select Firewall > Rules.
- Select the WAN sub-menu (the default).
- Set the Address Family to IPv4 + IPv6 if your system is using both IPv4 and IPv6. If not, leave it at the default value of IPv4.
- Make sure Source is set to Any.
- Set the Protocol field to UDP.
- Set the Destination Port Range to 1194
- Enter a description for this rule in the Description field.
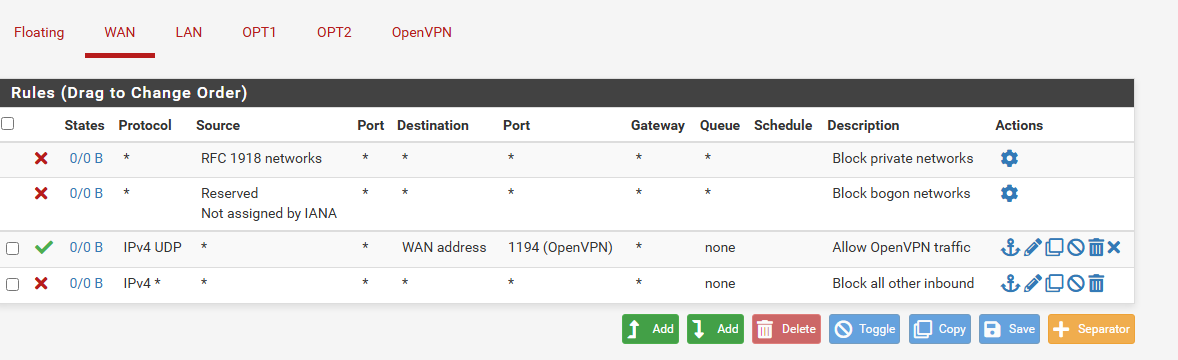
Click save. and Click Apply changes. Traffic will now be allowed from internet to OpenVPN server.
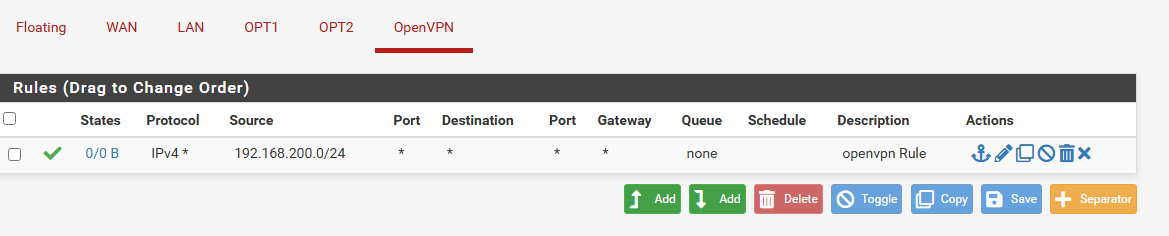
- OpenVPN Rules
- Navigate to Firewall > Rules > OpenVPN and click add.
- Set the Address Family to IPv4
- Interface: OpenVPN
- Set the Protocol field to Any.
- Set the Source to Network.
- Enter the OpenVPN subnet you specified earlier in the Source Address field but without the /24. For example: 192.168.200.0.
- Select 24 from the drop-down menu to the right of the Source Address field.
- Enter a description for this rule in the Description field.
- We have already created the WAN Rules. You can check above. If you haven’t
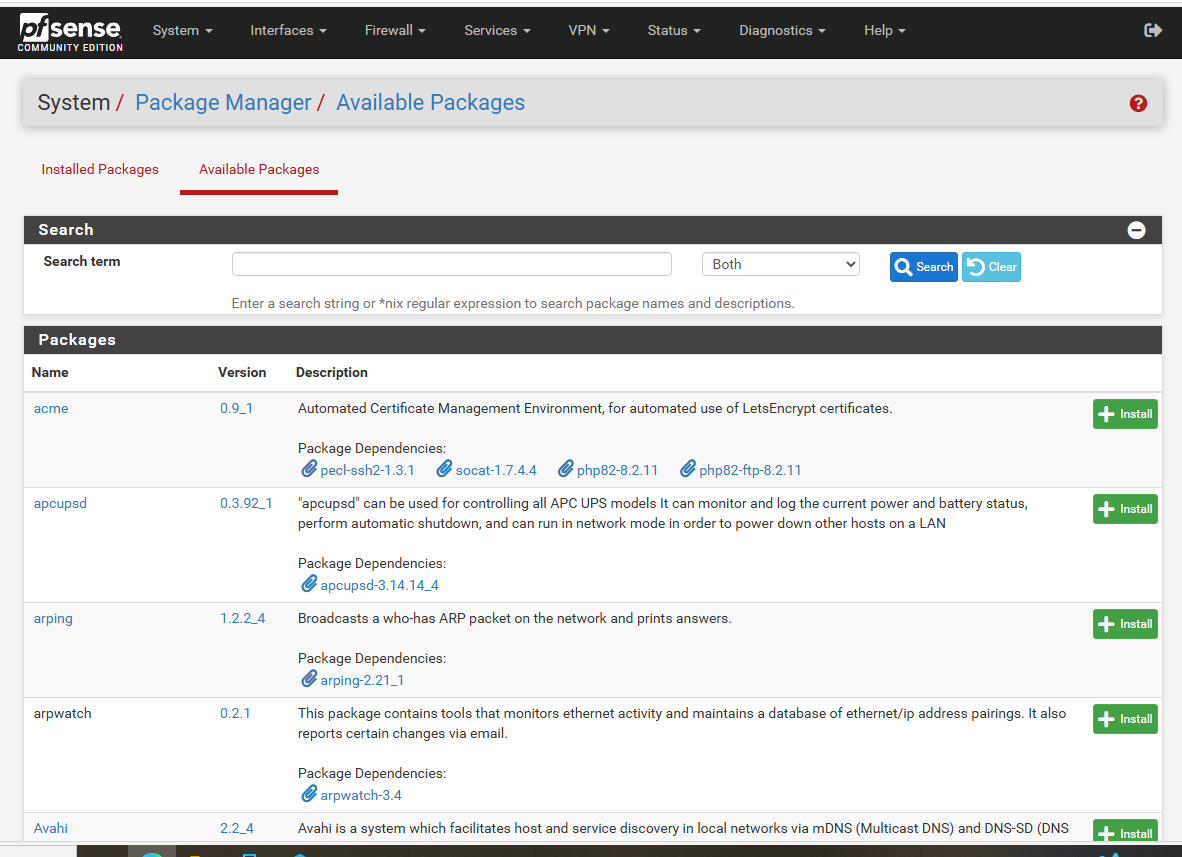
- Install the OpenVPN Client Export Utility
- From the menus at the top of the screen, select System > Package Manager. You are taken to the Package Manager.
- Select the Available Packages sub-menu.
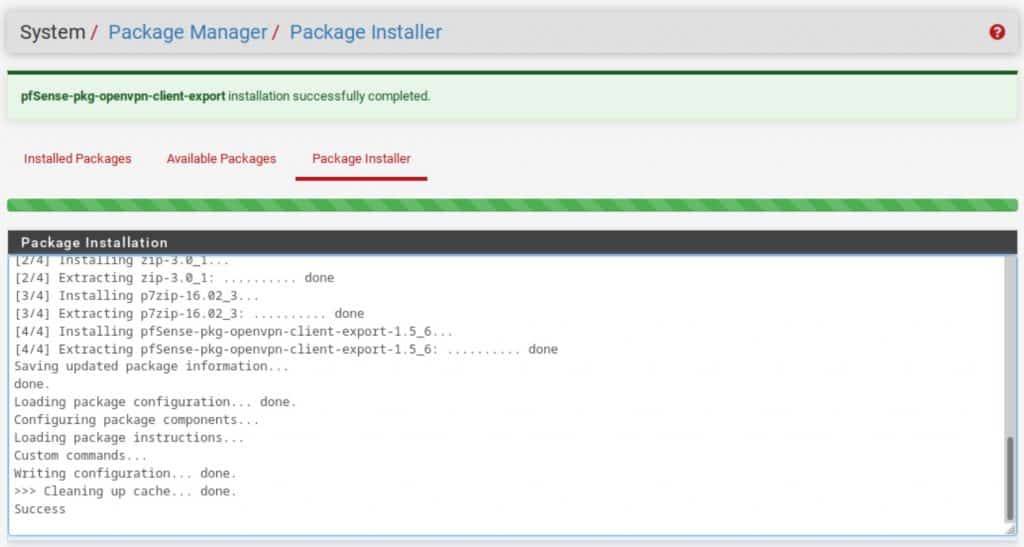
Scroll down until you see openvpn-client-export and click the Install button to its right. You’re taken to the Package Installer page.
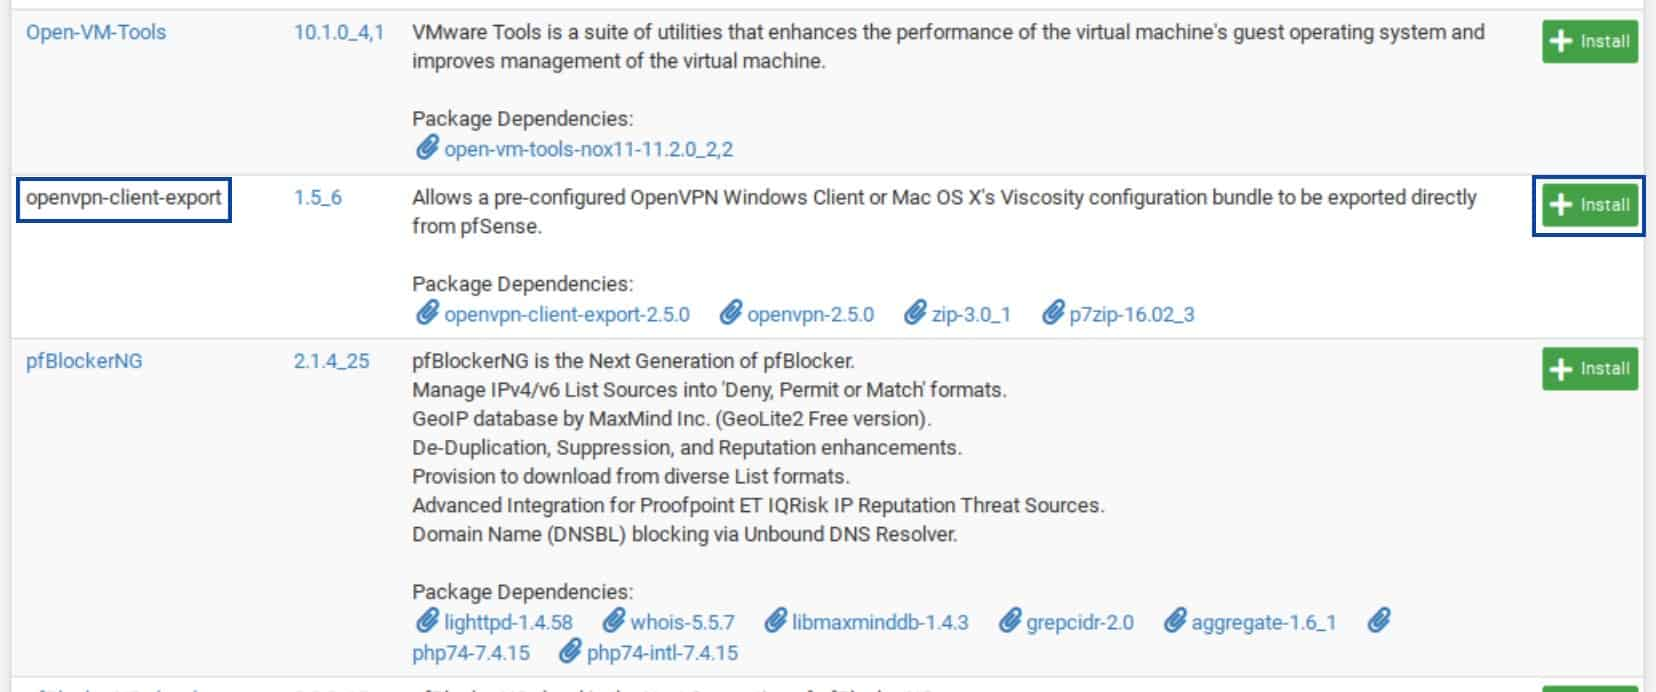
- Click Confirm. The installation begins.
- Once the installation is finished, the progress bar turns green, and you should see Success displayed in the Package Installation window.
- Export the OpenVPN Client Configuration
- Navigate to VPN > OpenVPN and Select the Client Export
- Make sure the correct OpenVPN server is selected next to Remote Access Server.
- Scroll down to the bottom of the page, and you’ll find generated configurations for various systems and apps. Click on the appropriate configuration for your device(s) to download it to your computer.
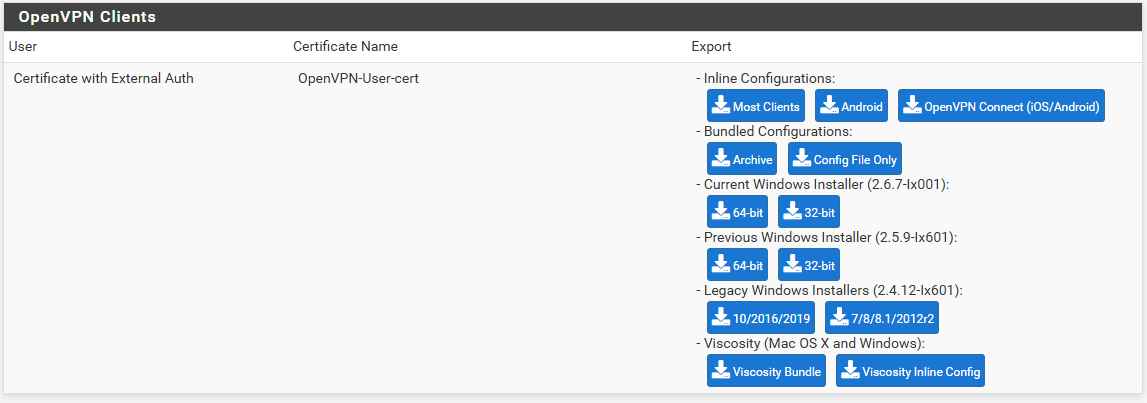
You can download the inline configuration since it has all the needed certificates details.
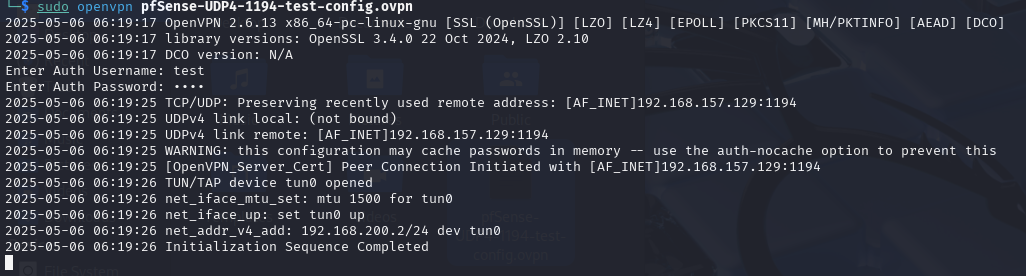
- Test the Connection from a Client Machine.
- Download the Openvpn Client based on your operating system.
Since I’m using linux, Connect with following command:
1
 sudo openvpn pfsense-UDP4-1194-test-config.ovpn
Finally Connected to the VPN
Set Up Dynamic DNS (DDNS) on pfSense
Previously we used the Interface IP while we were exporting the VPN Configuration file. But this is a private IP, only valid within your NAT/VMware network. To connect from another machine (outside), this must be changed to your public IP or a DNS name that resolves to your public IP.
We are going to set up Dynamic DNS (DDNS) on pfSense using a free provider like DuckDNS or No-IP, and configure the OpenVPN Export Utility to automatically use the DDNS hostname in .ovpn files:
🔧 Prerequisites
##

Using No-IP (Free Option)
- Sign up at https://www.noip.com/
- Create a hostname like
mysoclab.ddns.net - In pfSense:
- Go to Services → Dynamic DNS → Add
- Service Type:
No-IP (free) - Enter your No-IP username, password, and hostname
- Monitor interface:
WAN - Save & Force Update
Configure OpenVPN to Use DDNS Hostname
- Go to VPN → OpenVPN → Servers
- Edit your OpenVPN server
- Under “Tunnel Settings”, make sure “Interface” is set to
WAN - Save and Apply
Export VPN Configs Using DDNS
- Go to VPN → OpenVPN → Client Export
- Scroll to Host Name Resolution
- Choose:
- “Use Hostname”: Enter your DDNS name (e.g.,
mysoclab.ddns.net) - Or select from dropdown if auto-detected
- “Use Hostname”: Enter your DDNS name (e.g.,
- Export any config (
.ovpn) — the remote line in the file will now contain your DDNS name.
Final Wrap-Up: Part 2 — SOC Lab Network & VPN Setup Complete
At this point, you’ve built a solid and secure foundation:
🔐 What You’ve Accomplished:
- Network segmentation with isolated LAN, DMZ, SIEM, and upcoming VPN zones
- Granular pfSense firewall rules for each zone
- Remote access VPN using OpenVPN + Active Directory authentication
- Dynamic DNS (No-IP) to access your lab from anywhere
- Exportable VPN clients for easy use on Windows/Linux/Mobile
What to Test Now
Before moving to the next part, verify everything is functioning correctly:
| Item | Test |
|---|---|
| 🔗 LAN to SIEM Logging | Are Sysmon/Splunk logs flowing? |
| 🔒 DMZ Isolation | Can LAN reach DMZ? (It shouldn’t unless allowed) |
| 🌐 VPN Connectivity | Can remote users VPN in using AD credentials? |
| 🧠 AD Authentication | Can pfSense authenticate against AD (LDAP Bind test)? |
| 🛰️ DDNS Access | Can you access VPN from internet using mysoclab.ddns.net? |
Use tools like:
ping,tracert,telnet,tcpdump- Splunk search queries
- Wireshark (monitor VPN traffic)
Coming Next — Part 3: SIEM Integration, Threat Detection, and Blue Team Logging
In the next part, we’ll fully light up the SIEM and implement real-time threat detection, including:
Part 3 Goals:
- Ingest Windows Event Logs + Sysmon to Splunk
- Add pfSense firewall logs into Splunk
- Add Metasploitable2 logs (via syslog or honeypots)
- Build a Splunk dashboard to visualize:
- Login events
- Suspicious processes
- Failed RDP brute force
- Simulate attacks using Metasploit and observe how logs are captured
- Optionally: Setup Elastic Stack or Wazuh as alternate SIEM
BONUS (Optional Enhancements)
| Idea | Benefit |
|---|---|
| 🔐 2FA for pfSense | Harden access to web UI |
| 🎯 Port knocking | Add stealth to OpenVPN exposure |
| 🧪 IDS/IPS (Snort or Suricata) | Detect malicious payloads |
| 📥 Email alerting from pfSense or SIEM | Instant response to anomalies |
| 📤 Offload logs to cloud (e.g., Graylog, ELK on VPS) | Simulate remote SOC |
Closure: Why This Matters
You’re not just building a lab. You’re training yourself in:
- Network architecture & hardening
- Blue team defense
- Red team simulation
- Incident detection and analysis
This mirrors what real SOC analysts, Red Teamers, and Security Engineers do daily in enterprise environments — you’re bridging the gap between theory and real-world practice.
Happy Hacking